Debris shields – HONDA HHT25S User Manual
Page 20
20
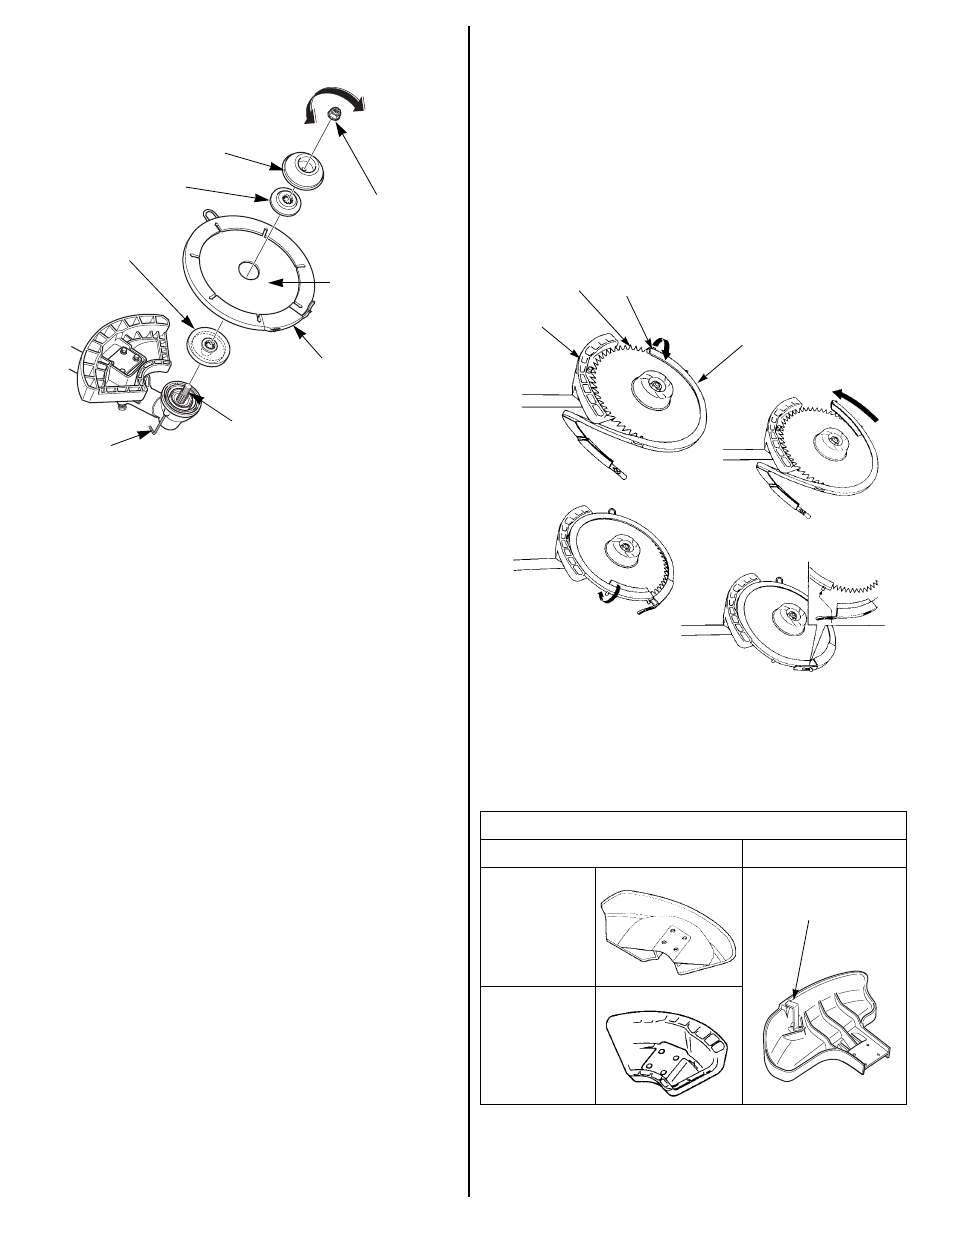
1. Install the protective plastic cover that came with the blade.
2. Insert a commercially available 4 mm hex tool or equivalent fully
into the gear case hole.
3. Turn the blade until you feel the tool drop into the hole in cover
plate/spacer A. Verify the blade does not turn. The output shaft and
blade lock nut have a left-hand thread. Make sure the tool remains
in the hole, then loosen the blade nut as shown. Pay attention to
the order and orientation of the parts as they are removed.
4. Installation is the reverse of removal. Make sure you install the
blade with the cutting edges in the direction of rotation. Be sure to
align the hole in the blade with the shoulder on cover plate/
spacer A. Tighten the blade nut to the specified torque.
TORQUE: 14 ft-lb (20 N·m)
Brush/Wood Blade Cover Installation and Removal
1. Install the blade cover over the blade so half the blade is covered.
2. To prevent the post end from interfering with the debris shield, pull
the post end away from the blade and set it on top of the blade as
shown.
3. Turn the blade cover slowly until the post end clears the debris
shield.
4. Reposition the post end over the blade.
5. With the blade cover fully seated on the blade, latch the tab over
the post.
Remove the blade cover in the reverse order of installation.
DEBRIS SHIELDS
A variety of blades are available from your Honda trimmer servicing
dealer. Always use a debris shield designed for use with a blade when
attaching a blade to your trimmer. The blade type debris shield does
not have a cutoff knife.
4 mm HEX
TOOL
SPACER B
COVER PLATE/
SPACER A
BLADE
10 mm LOCK NUT
(left-hand thread)
COVER
OUTPUT SHAFT
(left-hand thread)
LOOSEN
TIGHTEN
BLADE
COVER
DEBRIS SHIELDS
BLADE
CUTTING-LINE
GRASS/WEED
BLADE, WEED/
BRUSH BLADE
(optional part)
BRUSH/WOOD
BLADE
DEBRIS
SHIELD
BLADE
POST END
BLADE COVER
CUTOFF KNIFE