Holmes HPF1151MK User Manual
Page 2
OPERATING INSTRUCTIONS
1. Set the fan on a dry and level surface.
2. Plug the cord into a standard 120 volt AC outlet.
3. The fan controls are located on the back of the Motor
Housing. Select Fan Speed = I - Low, II - Medium,
III - High,
o
- Off.
4. Push, Pull Oscillation Knob (
) = Oscillation
On, Off.
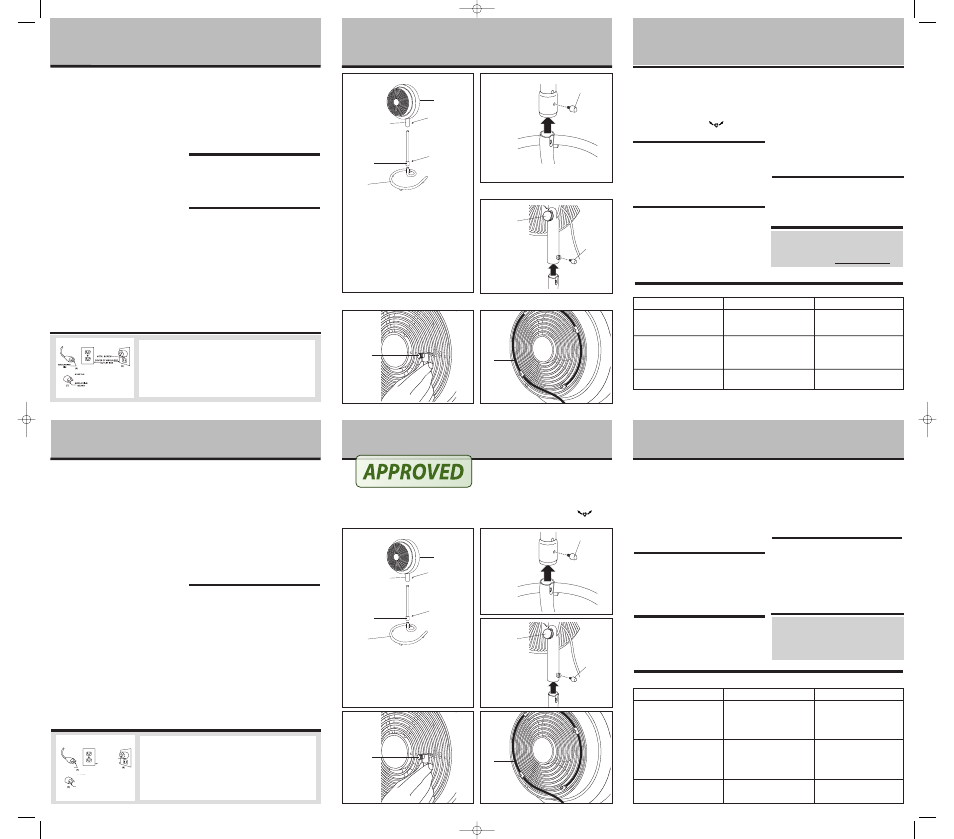
MISTING KIT ASSEMBLY INSTRUCTIONS
1. Turn the Fan Speed Knob to the (
o
) position.
2. Unwind the Misting Kit (G) and snap the Nozzle Clips
(F) to the Front Grill. Refer to Figures 4 and 5.
3. Attach the end of the Misting Kit (G) to a standard
garden hose and turn on the water.
4. Turn the fan on and enjoy.
FAN HEAD TILT ADJUSTMENT
Loosen the Tilt-Adjustment Knob (E), move the fan head
to desired angle, and tighten the Tilt Adjustment Knob (E)
to lock in place.
CLEANING/MAINTENANCE
INSTRUCTIONS
Follow these instructions to correctly and safely care for
your fan.
• Always unplug the fan before cleaning.
• Be sure to clean your fan with a soft cloth moistened
with a mild soap solution.
• Do not allow water to drip on or enter into the fan
housing.
• Do not use gasoline, thinner, or benzene as a cleaner.
• Lightly run a vacuum cleaner nozzle over the fan grill
to remove any dust or dirt that may have accumulated.
FAN STORAGE INSTRUCTIONS
• Store your fan in the original box or an appropriately
sized box.
• Protect the fan head from dust.
• Store your fan in a dry location.
P L E A S E R E A D A N D S AV E T H E S E
I M P O R TA N T S A F E T Y I N S T R U C T I O N S
F E AT U R E S - O P E R AT I O N S
When using electrical appliances, basic safety precautions
should always be taken including the following:
1. Read all instructions before using this appliance.
2. Use fan only for purposes described in the instruction
manual.
3. To protect against electrical shock do not immerse
unit, plug or cord in water or spray with liquids. Plug
the appliance directly into a 120V AC electrical outlet.
4. Close supervision is necessary when any appliance is
used by or near children.
5. Unplug from outlet when not in use, when moving
fan from one location to another, before putting on
or taking off parts and before cleaning.
6. Avoid contact with moving parts.
7. DO NOT operate in the presence of explosive and/or
flammable fumes.
8. To avoid fire hazard, NEVER place the cord under
rugs or any parts near an open flame, cooking or
other heating appliance.
9. DO NOT operate any appliance with a damaged cord
or plug after the appliance malfunctions, or has been
dropped/damaged in any manner.
10. The use of attachments not recommended or sold by
the appliance manufacturer may cause hazards.
11. DO NOT let the cord hang over the edge of a table,
counter or come in contact with hot surfaces or leave
exposed to high traffic areas.
12. To disconnect, grip plug and pull from wall outlet.
Never yank on cord.
13. Always use on a dry, level surface.
14. DO NOT operate fan until fully assembled with all
parts properly in place.
15. This product is intended for household use only and
not for commercial or industrial applications.
16. WARNING: To reduce the risk of fire or electrical
shock, DO NOT use this fan with any solid-state
speed control device.
PLEASE READ AND SAVE
THESE IMPORTANT SAFETY
INSTRUCTIONS
CONSUMER SAFETY INFORMATION
NOTE: This is an electrical appliance and requires
attention when in use.
NOTE: THIS PRODUCT IS EQUIPPED WITH A 3-PRONG
PLUG.
ASSEMBLY INSTRUCTIONS
Assembly Time: 10-15 minutes.
1. Place the Base (D) on a dry and level surface.
2. Line up the Thumb Screw (B) on the Extension Pole
(C) with the hole in the Base (D) and slide the
Extension Pole over the Base. Tighten the Thumb
Screw (B). Refer to Figure 2.
3. Line up the Thumb Screw (B) on the Neck (A) with
the hole on the Extension Pole (C) and slide the Neck
over the Extension Pole. Tighten the Thumb Screw
(B). Refer to Figure 3.
NOTE: To use the fan without the Extension Pole, slide
the Neck directly over the Base and tighten the Thumb
Screw.
F E AT U R E S - O P E R AT I O N S
C L E A N I N G / M A I N T E N A N C E
INSTRUCCIONES DE ENSAMBLADO DEL
JUEGO VAPORIZADOR
1. Gire la perilla de velocidad del ventilador hasta la
posición (
o
) .
2. Desenrosque el juego vaporizador (G) y encaje las
abrazaderas para boquillas (F) en el frente de la
rejilla. Remítase a las figuras 4 y 5.
3. Fije el extremo del juego vaporizador (G) en una
manguera de jardín estándar y abra el paso del agua.
4. Encienda el ventilador y disfrútelo.
AJUSTE DE INCLINACION DE LA CABEZA
DEL VENTILADOR
Afloje la perilla de ajuste de inclinación (E), mueva la
cabeza del ventilador hasta lograr el ángulo deseado y
apriete la perilla de ajuste de inclinación (E) para que la
cabeza quede fija.
INSTRUCCIONES DE LIMPIEZA Y
MANTENIMIENTO
Siga estas instrucciones para cuidar correcta y
cuidadosamente su ventilador.
• Siempre desenchufe el ventilador antes de limpiarlo.
• Asegúrese de limpiar el ventilador con un paño
suave humedecido con una solución jabonosa suave.
• No permita que el agua gotee sobre la carcasa del
ventilador ni que entre en ella.
• No use gasolina, disolvente ni benceno para limpiar.
• Pase la aspiradora levemente sobre la rejilla del
ventilador para eliminar el polvo o la suciedad que
puedan haberse acumulado.
INSTRUCCIONES DE ALMACENAJE DEL
VENTILADOR
• Guarde el ventilador en la caja original o en una caja
del tamaño adecuado.
• Proteja del polvo la cabeza del ventilador.
• Guarde el ventilador en un lugar seco.
L E A Y C O N S E RV E E S TA S I N S T R U C C I O N E S
I M P O R TA N T E S D E S E G U R I D A D
C A R A C T E R Í S T I C A S Y O P E R A C I O N E S
C A R A C T E R Í S T I C A S Y O P E R A C I O N E S
L I M P I E Z A / A L M A C E N A R
Al utilizar electrodomésticos, debe tomar las siguientes
precauciones básicas en todo momento:
1. Lea todas las instrucciones antes de usar este
electrodoméstico.
2. Use el ventilador sólo para los fines descritos en el
manual de instrucciones.
3. Para protegerse de una descarga eléctrica, no
sumerja en agua la unidad, el enchufe o el cable, ni
los rocíe con líquidos. Enchufe el ventilador
directamente en un tomacorriente de 120 V AC.
4. Se recomienda controlar de cerca cuando el
electrodoméstico sea utilizado por niños o cerca de ellos.
5. Desconecte el ventilador cuando no lo esté
utilizando, cuando lo mueva, antes de colocar o
extraer piezas, o antes de limpiarlo.
6. Evite el contacto con las piezas móviles.
7. NO opere el ventilador si hay gases explosivos o
inflamables en el ambiente.
8. Para evitar un incendio, NUNCA ubique el cable debajo
de alfombras, ni acerque cualquiera de sus piezas a las
llamas, a la cocina ni a otro artefacto de calefacción.
9. NO opere un electrodoméstico que tenga un cable o
enchufe dañado, que funcione mal, que se haya
caído o que se haya dañado de otra manera.
10. El uso de accesorios que no son recomendados o
vendidos por el fabricante del electrodoméstico
puede causar daños.
11. NO deje que el cable cuelgue del extremo de la mesa
o la mesada ni que entre en contacto con superficies
calientes; tampoco lo coloque en áreas muy transitadas.
12. Para desconectarlo, quite el enchufe del
tomacorriente de la pared. Nunca tire del cable.
13. Utilícelo siempre sobre una superficie seca y nivelada.
14. NO opere el ventilador hasta que esté
completamente ensamblado, con todas sus piezas
colocadas debidamente en su lugar.
15. El producto es para uso doméstico solamente y no
para aplicaciones comerciales o industriales.
16. ADVERTENCIA: A fin de disminuir el riesgo de
incendio o de descarga eléctrica, NO use el ventilador
con dispositivos de control de velocidad de estado
sólido.
LEA Y CONSERVE ESTAS
INSTRUCCIONES
IMPORTANTES DE SEGURIDAD
INFORMACION DE SEGURIDAD PARA EL
CLIENTE
NOTA: Este es un electrodoméstico y requiere que se
preste atención cuando se lo utiliza.
NOTA: ESTE PRODUCTO ESTA EQUIPADO CON UN
ENCHUFE DE 3 PATAS.
INSTRUCCIONES DE ENSAMBLADO
Tiempo de ensamblado: De 10 a 15 minutos.
1. Coloque la base (D) en una superficie seca y nivelada.
2. Alinee el tornillo de ajuste manual (B) sobre el poste
de extensión (C) con el agujero que está en la base
(D) y deslice el poste de extensión sobre la base.
Apriete el tornillo de ajuste manual (B). Remítase a
la figura 2.
3. Alinee el tornillo de ajuste manual (B) sobre el cuello
(A) con el agujero que está en el poste de extensión
(C) y deslice el cuello sobre el poste de extensión.
Apriete el tornillo de ajuste manual (B). Remítase a
la figura 3.
NOTA: Use el ventilador sin el poste de extensión,
deslice el cuello directamente sobre la base y apriete el
tornillo de ajuste manual.
INSTRUCCIONES DE FUNCIONAMIENTO
1. Coloque el ventilador sobre una superficie seca y nivelada.
2. Conecte el cable en un enchufe estándar de 120 V AC.
3. Los controles del ventilador están en la parte posterior
de la carcasa del motor. Seleccione la velocidad del
ventilador: I - baja, II - media, III - alta,
o
- apagada.
4. Presione o tire la perilla de rotación (
):
Rotación encendida o apagada.
This product is for use on 120 volts. The cord has a plug (A) as shown. An
adapter (C) (not included) is available for connecting three-blade grounding-
type plugs to two-slot receptacles (B). The green grounding lug extending from
the adapter must be connected to a permanent ground such as a properly
grounded outlet box. The adapter should not be used if a three-slot grounded
receptacle is available.
CAUTION: Use Only with GFCI Protected Receptacles.
Este producto debe usarse con 120 V. El cable tiene un enchufe (A) según se
muestra. Un adaptador (C) (no incluido) está disponible para conectar enchufes
de tres patas con conexión a tierra a receptáculos de dos ranuras. El enchufe
verde de conexión a tierra que se extiende desde el adaptador debe estar
conectado permanentemente a tierra, como una caja de tomacorriente
conectada a tierra en forma adecuada. El adaptador no debe usarse si está
disponible el receptáculo de tres patas de conexión a tierra.
PRECAUCIÓN: Sólo use el producto con receptáculos protegidos por GFCI.
CLAVIJA PARA
TIERRA
TORNILLO DE METAL
PLACA DE
TOMACORRIENTE
CONECTADO A
TIERRA
ADAPTADOR
MEDIO DE CONEXIÓN
A TIERRA
Fan head moves during operation.
Tilt Adjustment Knob not tightened
properly.
Tighten Tilt Adjustment Knob by
turning it clockwise after Fan Head
is in desired position.
Fan will not operate even though I
am turning on the fan with the
Speed Control Knob.
Fan is not plugged in.
Plug the power cord into a 120 V
AC Outlet. Be sure the Speed
Control Knob is in the off position
prior to plugging in the fan.
All Parts listed in Figure 1 are not
included.
Parts missing or lost.
Contact our Consumer Service
Department. (see Warranty section)
ISSUE
POTENTIAL CAUSE
POTENTIAL SOLUTION
TROUBLESHOOTING
El cabezal del ventilador se mueve
durante el funcionamiento.
La perilla reguladora de inclinación
no está ajustada correctamente.
Ajuste la perilla reguladora de
inclinación girándola en el sentido de
las manecillas del reloj después de que
el cabezal del ventilador esté en la
posición deseada.
El ventilador no funcionará aunque
lo prenda con la perilla del control
de velocidad.
El ventilador no está enchufado.
Enchufe el cable de electricidad en un
tomacorriente de 120 V de CA.
Asegúrese de que la perilla del control
de velocidad esté en la posición de
apagado antes de conectar el ventilador.
Las piezas detalladas en la Figura 1
no están incluidas.
Faltan piezas o se perdieron piezas.
Póngase en contacto con nuestro
Departamento de Servicio al
Cliente. (vea la GARANTIA)
PROBLEMA
CAUSA POTENCIAL
POSIBLE SOLUCION
DIAGNÓSTICO DE PROBLEMAS
Figure 1
A
B
D
A. Neck
B. Thumb Screw
C. Extension Pole
D. Base
E. Tilt Adjustment Knob
F. Nozzle Clips
G. Misting Kit
H. Motor Housing
Figure 2
Figure 3
B
B
E
B
C
Figure 4
Figure 5
F
G
H
Figura 1
A
B
D
Figura 2
Figura 3
B
B
E
B
C
A. Cuello
B. Tornillo de ajuste
manual
C. Poste de extensión
D. Base
E. Perilla de ajuste de
inclinación
F. Abrazaderas para
boquillas
G. Juego vaporizador
H. Carcasa del motor
Figura 4
Figura 5
F
G
H
If you have any questions regarding your product or would
like to learn more about other Holmes
®
products, please
contact our Consumer Service Department at 1-800-546-
5637 or visit our website at www.holmesproducts.com
Si tiene preguntas relacionadas con este producto o si
está interesado en conocer otros productos Holmes
®
,
póngase en contacto con nuestro Departamento de
Servicio al Cliente: llame al 1 (800) 546-5637 o visite
nuestro sitio web www.holmesproducts.com
HPF1151MK-UM_07ESM1.qxd 10/8/07 9:12 Page 2