Assembly and instructions for use – HoMedics WRF-COL User Manual
Page 3
Assembly and Instructions for Use
1. Unpack the product and place on a horizontal
surface on top of the waterproof black mat
provided. Wipe off dust with a damp cloth.
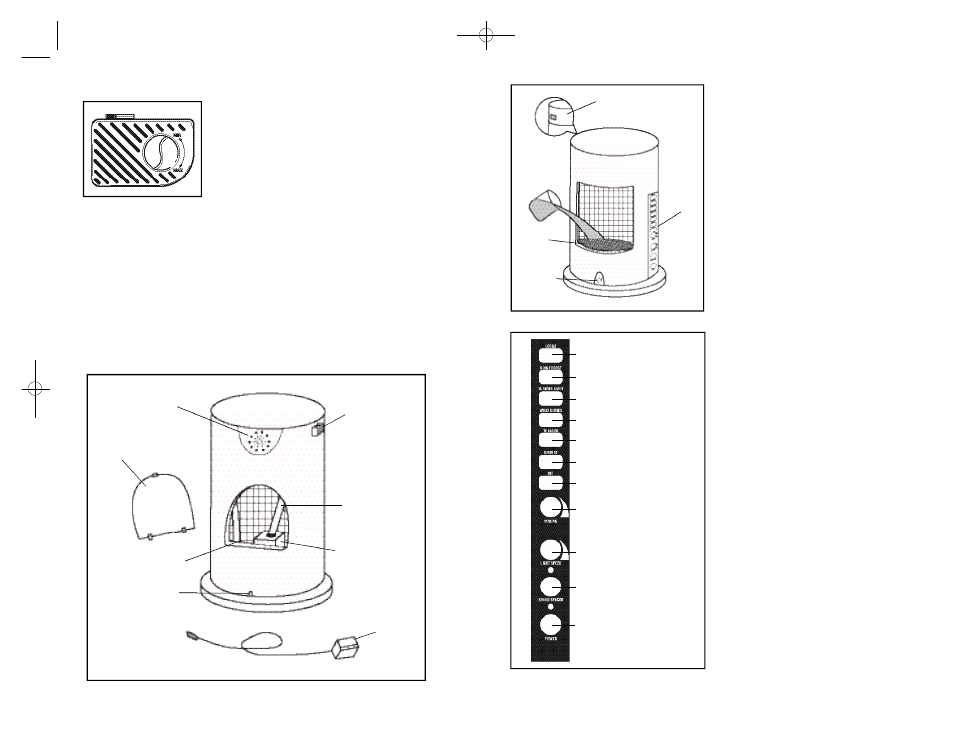
2. Remove the back cover (Fig 2).
3. Familiarize yourself with the pump. The pump
speed is controlled by the dial located at the front
of the pump. The speed is indicated by a “min”
and “max” (Fig 1). At its highest speed level, the
dial will cease to move any further. To decrease
the pump speed, move the dial counter-clockwise
toward the “min”sign. Similarly, at its lowest
speed, the dial will cease to move any further.
4. Insert the plastic tubing from the right side into
the pump. Place pump into fountain lower basin
(Fig 2) and replace back cover.
5. Fill the lower basin with clean water. The water level
should be approximately
1
/
2
an inch below the steel
net (Fig 3). NOTE: Distilled water is
recommended for easier maintenance.
6. Attach the A/C adaptor jack to the base. Plug the
power cord into a 120V household outlet.
7. To turn on press the POWER button located on the
control panel (Fig 4),
4
5
Figure 2
Figure 1
Figure 3
Figure 4
Music Speaker
Plastic Tu b i n g
Pu m p
A d a p t o r
Lower Basin
Water Flow Dial
Water Flow Dial
C o n t r o l
Pa n e l
S t e e l
N e t
B A C K V I E W
F R O N T V I E W
a red LED light will be illuminated to
indicate it is on.
NOTE: When the unit is on the continu-
ously changing colors will always be on.
8. To adjust the light speed, turn the
LIGHT SPEED dial (Fig 4) clockwise
to increase the speed and counter-
clockwise to decrease.
9. To adjust rainfall speed, turn the water
flow dial (Fig 2) clockwise to increase
the rainfall and counter-clockwise to
decrease. When dial stops in counter-
clockwise motion, rainfall will come to
a stop.
10. To use sounds, select your nature
sound by pressing the sound button
of your choice (Fig 4). Volume can be
adjusted by turning the VOLUME dial
(Fig 4) - clockwise to increase the
volume and counter-clockwise to
decrease the volume.
11. To turn sounds off press the OFF but-
ton (Fig 4). NOTE: This will retain your
volume setting for the next use.
12. To use the Sound Sensor™ feature
press the SOUND SENSOR button
(Fig 4). A red LED light will illuminate
to indicate it is on. When this feature
is engaged the lights will no longer
continuously change colors. Instead
the lights change color to the sounds
in your environment by responding
to the beat of music, environmental
sounds and voices. To turn this
feature off press the SOUND SENSOR
button again and the red LED will
turn off.
13. When you have finished using the
fountain and sound machine turn the
unit off by pressing the POWER
button (Fig 4) and unplug the adaptor
from the base.
NOTE: Main power switch must be used
to turn unit completely on or off.
- Fountain can be used independent
of sound machine
- Sound Machine can be used
without fountain water flowing,
although pump will remain on.
AC Jack
Back Cover
Sound
S e n s o r
L o o n s
Rain Fo r e s t
Summer Night
Wind Chimes
T h u n d e r
S u n r i s e
O f f
Vo l u m e
Light Speed
Sound Sensor
Po w e r
WRF-COL 5/17/04 10:38 AM Page 5