Functional overview, Fig. 1] [fig. 2] [fig. 3, Rear view – Hitachi DV-P533U User Manual
Page 6: Front panel remote control
ANALOG AUDIO OUT
DIGTAL AUDIO OUT
COAXIAL
S-VIDEO
OUT
VIDEO
OUT
L
Y
R
C
B
/P
B
C
R
/P
R
COMPONENT
VIDEO OUT
I P
PROGRESSIVE
13
15
12
11
9
10
14
REAR VIEW
y
/I POWER/
STANDBY
H
/E
SKIP/FR
D
/G
FF/SKIP
A
OPEN/CLOSE
B
PLAY
C
STOP
1
6
7
8
2
3
4
5
FRONT PANEL
REMOTE CONTROL
RETURN
ZOOM
MODE
MENU
SKIP
PAUSE/STEP
REPEAT
A-B REPEAT
ANGLE
AUDIO
SUBTITLE
CLEAR
TOP MENU
STOP
PLAY
SETUP
ENTER
OPEN/CLOSE
SEARCH MODE
DISPLAY
1
2
3
4
5
6
7
8
9
0
+10
/I
y
1
2
3
4
5
6
7
8
9
10
11
14
12
13
15
18
19
17
16
21
20
22
23
24
25
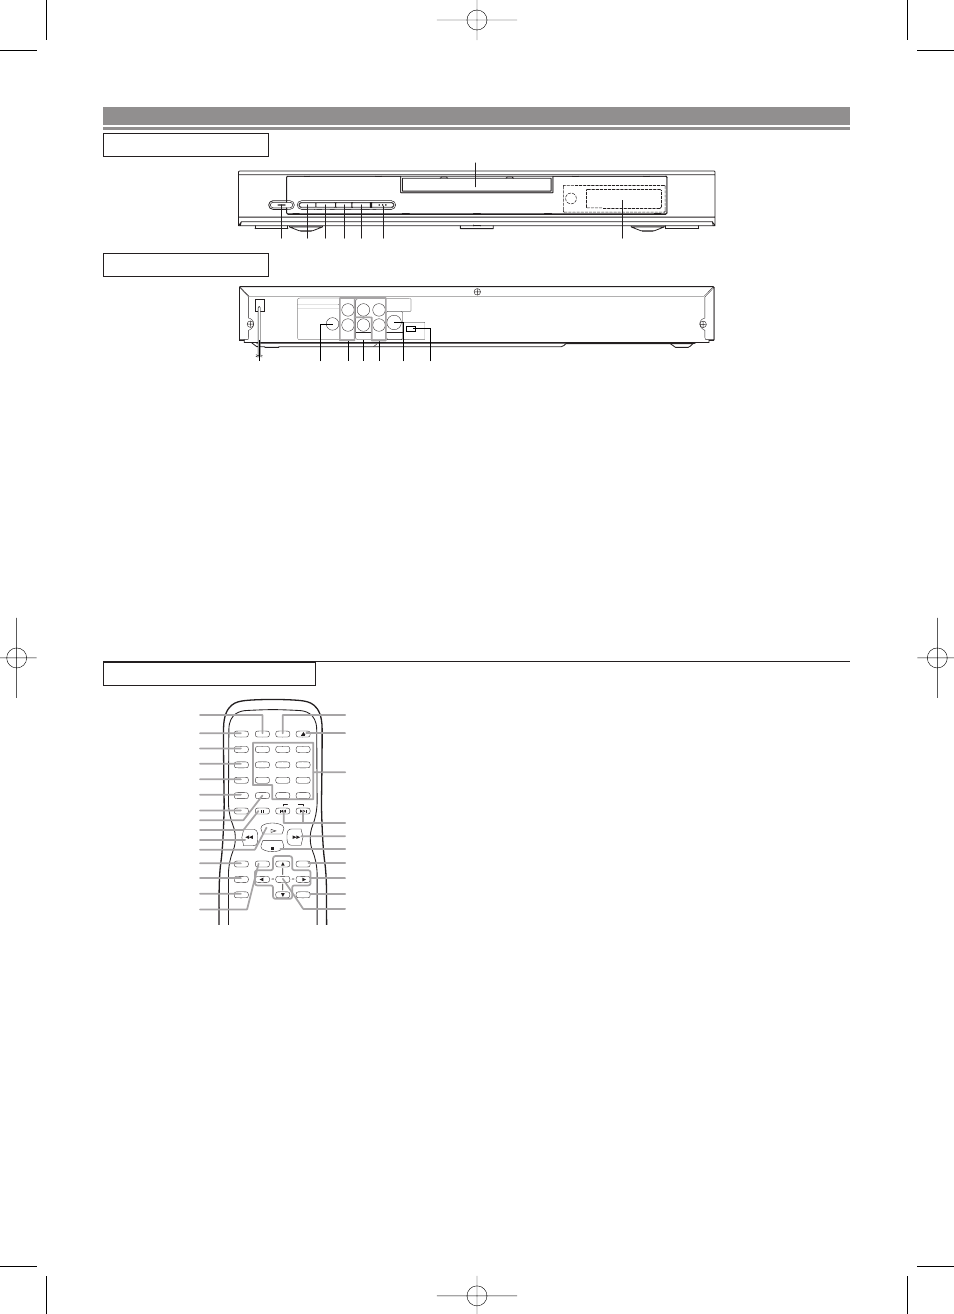
1. y/I (POWER/STANDBY)
to switch the player to ON or OFF
(As to the indication of the Operate switch, “I” indicates
ON and “y” indicates electrical power STANDBY)
2. SKIP/FR
goes to previous chapter or track during playback; press
and hold for 1.5 seconds for a reverse search
3. PLAY
to start or resume disc playback
4. FF/SKIP
goes to next chapter or track during playback; press and
hold for 1.5 seconds for a forward search
5. STOP
to stop playback
6. OPEN/CLOSE
to open/close the disc tray
7. Disc tray
8. Display
FUNCTIONAL OVERVIEW
9. MAIN (AC Power Cord)
connect to a standard AC outlet
10. COAXIAL (Digital audio out)
connect to AUDIO inputs of a digital (coaxial) audio
equipment
11. AUDIO OUT (Left/Right)
connect to AUDIO inputs of an amplifier, receiver or
stereo system
12. VIDEO OUT
connect to the Video Input of a TV.
13. COMPONENT VIDEO OUT
connect to a TV with Component video in jacks.
14. S-VIDEO OUT
connect to a TV with S-Video inputs
15. INTERLACE/PROGRESSIVE SCAN SELECTOR
to select interlace or progressive scanning (See page 5)
Caution: Do not touch the inner pins of the jacks on the
rear panel. Electrostatic discharge may cause permanent
damage to the player.
9. PAUSE/STEP
pause playback temporarily / frame-by-frame playback
10. h
h
to view DVD picture in fast reverse motion
11. PLAY
to start a DVD disc playback
12. SETUP
to access or remove the DVD setup menu
13. MODE
to set up programmed or random playback (Audio CD)
to set the black level and virtual surround during DVD
playback
14. ZOOM
enlarge DVD video image
15. TOP MENU
to display title menu of a disc
16. ENTER
acknowledge menu selection
17. RETURN
to return previous or remove setup menu
18. Arrow (s B K
K L
L
)
(left/right/up/down) select an item in the menu
19. MENU
to display the menu of the DVD disc
20. STOP
to stop a DVD disc playback
21. g
g
to view DVD picture in fast forward motion
22. SKIP H,G
to skip chapter/tracks
23. 0-9 numerical buttons
select numbered items in a menu
+10
use this button to enter number 10 and above
24. OPEN/CLOSE
to open/close the disc tray
25. SEARCH MODE
to locate a desired point
1. DISPLAY
to access or remove the display screen during DVD or
Audio CD playback
2. y/I (POWER/STANDBY)
switch DVD player ON or OFF.
(As to the indication of the Operate switch, “I” indicates
ON and “y” indicates electrical power STANDBY)
3. AUDIO
to choose audio languages or sound modes
4. SUBTITLE
subtitle language DVD selector
5. ANGLE
select DVD camera angle
6. REPEAT
repeat chapter, track, title, all.
7. A-B REPEAT
repeat a specific segment
8. CLEAR
to reset the setting
– 6 –
EN
[Fig. 1]
[Fig. 2]
[Fig. 3]
E5711UD.QX3 03.2.7 19:11 Page 6