Bodybubbles care and maintenance, Servicing of double-insulated products, Bodybubbles features – HoMedics Body Bubbles Massaging Bubble Mat BA-M200 User Manual
Page 3: Installation instructions, Instructions for use
BodyBubbles Care and Maintenance
Keep the BodyBubbles clean and clear of obstructions. Check
the intake area frequently for potential obstructions that could block air
or water flow, including lint and hair. Never store your BodyBubbles
wet.
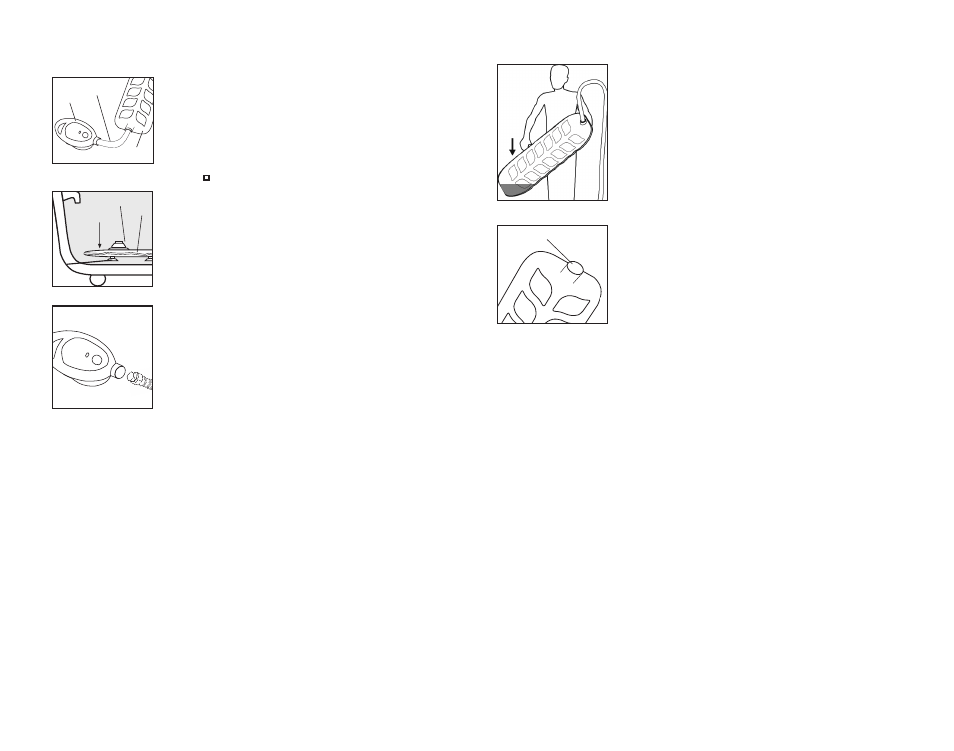
Storage
• To remove any remaining water inside the mat, lift mat, keeping
the hose attached and hold at an angle so water collects in the
corner (Fig. 4). Turn unit on and blow air through the mat for 30-45
seconds. Towel dry outside of mat.
• After mat is completely dry, you can fold for storage.
Cleaning
• Unplug the unit and allow it to cool before cleaning. Clean only
with a soft, slightly damp sponge.
NOTE: Do not use abrasive cleaners, brushes, gasoline, kerosene,
glass/furniture polish or paint thinner to clean.
• BodyBubbles mat should be disinfected periodically to keep it free
from bacteria. Disinfect with household cleanser once a week if used
several times a week. If used less frequently, disinfect after each use.
• This product is not designed to be used in conjunction with any
soaps, gels, shampoos or the like. However, should this occur,
follow these next steps to insure the longevity of this product:
1. Disconnect hose from mat.
2. Fill mat with fresh water, through hose inlet on mat (Fig. 5).
3. Empty water. Repeat several times until inside residue is removed.
4. Rinse outside of mat and sponge off to make sure all
residue is removed.
5. Follow draining instructions, as described under “Storage” section.
5
Servicing of Double-Insulated Products
In a double-insulated product, two systems of insulation are provided
instead of grounding. No grounding means is provided on a double-
insulated product, nor should a means for grounding be added to the
product. Servicing a double-insulated product requires extreme care and
knowledge of the system and should be done only by qualified service
personnel. Replacement parts for a double-insulated product must be
identical to the parts they replace. A double-insulated product is marked
with the words “DOUBLE INSULATION” or “DOUBLE INSULATED” The
symbol “ ” may also be marked on the product.
BodyBubbles Features
1. Comfortable bubble mat contours to any bath surface.
2. Variable control to customize from gentle to powerful bubbles.
3. Lightweight, compact and portable for easy storage.
Installation Instructions
1. Remove the mat from its packaging and make sure all
necessary components are included: mat, suction cups, control unit and
hose (Fig. 1).
2. Be sure the control unit is unplugged and positioned on a sturdy surface
where it cannot fall or be pulled into the tub, preferably the floor.
3. To place the mat, first dampen tub surface with a slight amount
of water. This will help the adhesion of suction cups (on bottom
of mat) to bathtub floor (Fig. 2).
4. To connect the hose to the control unit, insert the hose end into the con-
trol unit (Fig. 3).
5. Insert the other end of the hose into the mat (Fig. 4). NOTE: Keep the
hose free from kinks which could constrict airflow.
6. Plug unit into 120 volt electrical outlet.
Instructions for Use
1. After plugging in the control unit, turn the dial to your desired bubble
intensity.
a. First position is low intensity
b. Second position is medium intensity
c. Third position is high intensity
2. When you are done with your bath, return the dial to the “off” position
and drain the bathtub.
4
Caution:
Mat may move
when entering or
exiting bathtub.
Exercise caution.
Figure 2
Connector
Bathtub Floor
Mat
Suction
Cups
Mat
Figure 3
Hose
Control
Unit
Figure 1
Mat
Do not attempt to repair
BodyBubbles. There are no
user serviceable parts. For
service, send the unit to the
HoMedics address listed in
the warranty section.
Caution:
All servicing of this
BodyBubbles must be
performed by authorized
HoMedics service personnel
only.
Figure 4
Figure 5
Hose inlet