Temperature conversion chart, Grill, Always ✓ never – Hotpoint EW11E User Manual
Page 3
Shelf Position
from Base of
Oven
Food
3-10mins depending
on type of food
Toasting
of Bread
Products
5
5
15-20mins.
Small cuts of
meat,sausages,
bacon
4 or 5
4
20-30mins depend-
ing on thickness
Chops, etc.
Gammon
steaks
4
3 - 5
10-20mins.
(in base of pan)
Fish: whole
fillets
fingers
4 or 5
3
15-20mins.
Pre-cooked
potato
products
4
3 - 5
10-12mins. depend-
ing on size
Pizzas
4 or 5
3
5-7mins.
Browning of
food.
e.g.cauliflower
cheese
Always preheat the grill for 5 minutes, on setting required for cooking.
4
5
Grill
Setting
Approx. Cooking
Time
Preheat the grill at setting 5 for approximately five
minutes. The pilot light will illuminate to show the
grill is switched on. The grill pan is placed on the
shelf and should be correctly positioned under
the grill element. Leave the control at 5 for toast,
sealing and fast cooking of foods.
For thicker foods requiring longer cooking, turn
the switch to a lower setting after the initial seal-
ing on both sides at setting 5.The thicker the food
the lower the control should be set.
ALWAYS have the door open when grilling. If the
door is closed when the oven/grill control is
switched on then the oven will operate.
Remember to switch off the control at the end of
cooking.
Setting the grill
Note:
Note:
Guide to grilling successfully:
1. Position rod shelf as recommended in chart for food being cooked.
2. Preheat the grill for approximately 5 minutes.
3. Place the grill pan on the rod shelf, ensuring it is positioned
centrally under the grill element.
Temperature Conversion Chart
Gas Mark
˚F
Main
Convection
Oven
Top
Convection
Oven
Main Fan
Oven
2
3
1/
2
1
250
120
140
160
150
180
190
200
220
200
180
170
160
140
130
120
100
220
220
210
210
190
180
170
150
140
130
110
-
-
-
275
300
325
350
375
400
425
450
475
4
5
6
7
8
9
● Use good quality flat
based cookware on
all electric heat
sources.
● Ensure pans have
clean, dry bases
before use.
● Ensure pans match
size of heating area.
● Remember good
quality pans retain
heat well, so general-
ly only a low or medi-
um heat is necessary.
● Ensure pan handles
are positioned safely
and away from heat
sources.
● Lift pans, do not drag.
● Use pan lids except
when frying.
● Deal with spillage
immediately but with
care.
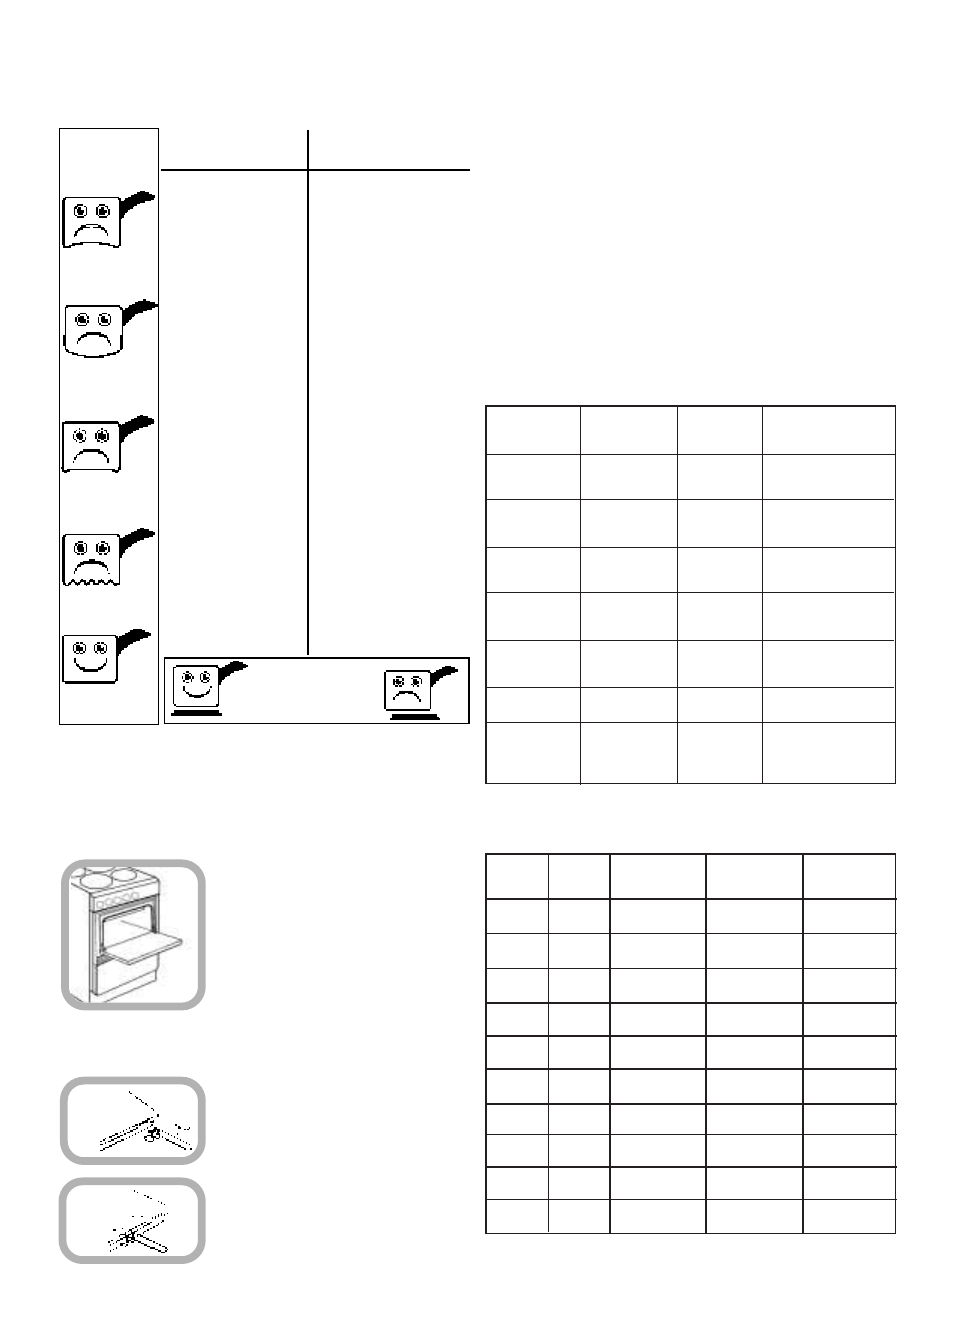
Grill
Grill Pan Handle
Door in
Grilling
position
Always ✓
Never ✗
PANS SHOULD
NOT:
Be concave
(bowed in)
Be convex
(bowed out)
Be rimmed
Be deeply
ridged
But essentially
Flat
Choice Of Utensils
Every Electric Hob deserves the right choice of utensils. We
recommend for optimum performance the use of good
quality utensils.
● Use gauze, metal pan
diffusers, asbestos
mats and stands e.g.
Wok stands – they can
cause overheating.
● Use utensils with skirts
or rims e.g. buckets
and some kettles.
● Use badly dented or
distorted
pans.
● Leave an element
switched on when not
cooking.
● Cook food directly on
the hotplate.
● Drag or slide utensils
across the hob surface.
● Place large preserving
pans or fish kettles
across two hotplates.
● Place plastic vessels or
utensils on a hot hob.
● Use the hob as an area
for storage
CAUTION – ACCESSIBLE PARTS WILL BECOME
HOT WHEN THE GRILL IS IN USE. CHILDREN
SHOULD BE KEPT AWAY.
GRILLING CANNOT BE UNDERTAKEN WITH THE
OVEN/GRILL DOOR CLOSED.
Open the Oven door fully.
The oven/grill control is designed to operate
either the oven or grill depending on the
position of the oven door. With the door fully
open, as shown, the door switch enables the
grill to operate.
With the oven door in the grilling position,
heating of the grill is achieved by turning the
control clockwise to the desired ‘grill setting’ on
the control panel, as described under ‘setting
the Grill’.
Never: line the grill/meat pan with aluminium
foil.
The grill pan handle is detachable so that the
pan may also be used in the oven as a meat
pan. To fit the handle to the pan:–
Tilt the handle over the recess adjacent to the
bracket.
Slide it towards the centre of the pan, up to the
‘stop’ position.
Always place pans
centrally on the
hotplate