Holmes HAWF2046 User Manual
Page 2
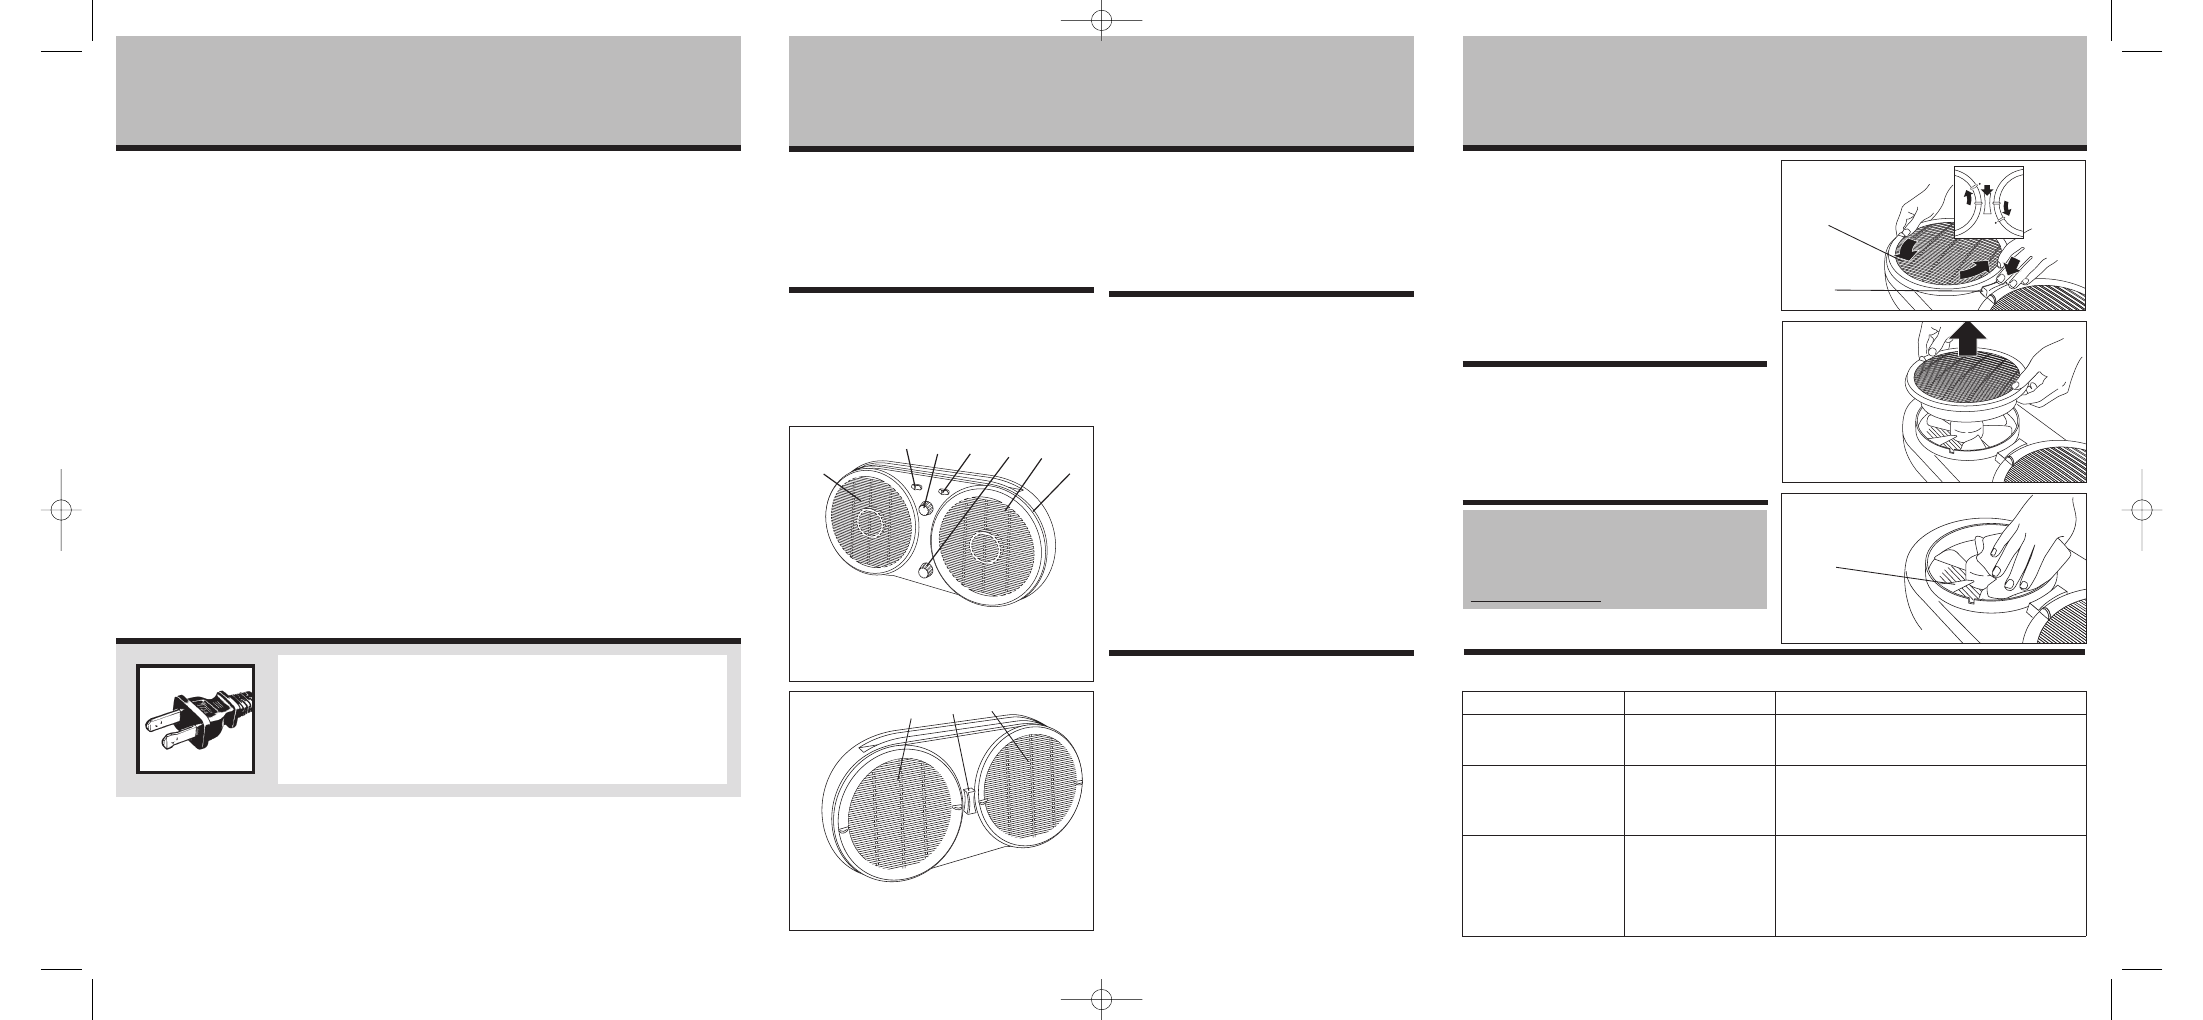
Fan Blade Cleaning
• Unplug the fan and remove the fan from the window.
• While pressing the grill release button, turn the
removable fan grills counter-clockwise (see Fig. 3).
• Remove the grills (see Fig. 4).
• Use a soft cloth moistened with a mild soap solution
to clean the fan blades (see Fig. 5).
• Place the grills back onto the fan and turn them
clockwise until they click into place. Make sure the
grills are secured, prior to replacing the fan in your
window and beginning operation.
FAN STORAGE
• Store your fan in the original box or an appropriately
sized box.
• Protect the fan head from dust.
• Store your fan in a dry location.
WINDOW FAN INSTALLATION
Your window fan is designed to be used with a window
screen in place. To install your window fan, simply
position your fan on the edge of the window sill and close
the window sash so that the window rests in the track on
the top of the fan.
OPERATING INSTRUCTIONS
Plug the fan into a 120V AC electrical outlet.
Fan speed control settings = Off, High, Med, Low.
Electrically Reversible Air Flow: Your fan blades are
electrically reversible so that you can change the direction
of the air flow by sliding the switches.
• To pull in fresh air from the outside, slide both Air
Flow Switches (A) to the Intake position.
• To exhaust the inside air out, slide both Air Flow
Switches to the Exhaust position.
• To circulate fresh air into your home and stale air out,
slide one of the Air Flow Switches to the Intake position
and the other Air Flow Switch to the Exhaust position.
COMFORT CONTROL THERMOSTAT
Your fan is equipped with a Comfort Control Thermostat
that you can program to turn the fan ON and OFF
automatically.
• Plug the fan into a 120V AC electrical outlet.
• For the fan to turn ON automatically, you must set
the thermostat to a temperature higher than the
current room temperature. If the fan power is on but
the fan blade(s) aren't moving, turn the Comfort
Control Thermostat dial to the right until the fan
blade(s) spin.
• To set your desired comfort level, run the fan until
the temperature in your room is comfortable. Slowly
turn the Comfort Control Thermostat dial to the left
until the fan blades turn off. Your fan will maintain
this temperature.
IMPORTANT: If you want your fan to run continuously,
turn the Comfort Control Thermostat dial all the way to
the right.
CLEANING/MAINTENANCE
INSTRUCTIONS
Follow these instructions to correctly and safely care for
your fan.
• Always unplug the fan before cleaning or
disassembling.
• Be sure to clean your fan with a soft cloth moistened
with a mild soap solution.
• Do not allow water to drip on or enter into the fan
housing.
• Do not use gasoline, thinner, or benzene as a cleaner.
• Lightly run a vacuum cleaner nozzle over the fan
grill to remove any dust or dirt that may have
accumulated.
P L E A S E R E A D A N D S AV E T H E S E
I M P O R TA N T S A F E T Y I N S T R U C T I O N S
F E AT U R E S - O P E R AT I O N S
C L E A N I N G / M A I N T E N A N C E
When using electrical appliances, basic safety precautions
should always be taken including the following:
1. Read all instructions before using this appliance.
2. Use fan only for purposes described in the instruction
manual.
3. To protect against electrical shock do not immerse
unit, plug or cord in water or spray with liquids. Plug
the appliance directly into a 120V AC electrical outlet.
4. WARNING: To reduce the risk of fire or electrical
shock, DO NOT use this fan with any solid-state speed
control device.
5. Close supervision is necessary when any appliance is
used by or near children.
6. Unplug from outlet when not in use, when moving
fan from one location to another, before putting on
or taking off parts and before cleaning.
7. Avoid contact with moving parts.
8. DO NOT operate in the presence of explosives and/or
flammable fumes.
9. To avoid fire hazard, NEVER place the cord under
rugs or any parts near an open flame, cooking or
other heating appliance.
10. DO NOT operate any appliance with a damaged cord
or plug after the appliance malfunctions, or has been
dropped/damaged in any manner.
11. The use of attachments not recommended or sold by
the appliance manufacturer may cause hazards.
12. DO NOT use outdoors.
13. DO NOT let the cord hang over the edge of a table,
counter or come in contact with hot surfaces or leave
exposed to high traffic areas.
14. To disconnect, grip plug and pull from wall outlet.
Never yank on cord.
15. Always use on a dry, level surface.
16. DO NOT operate fan until fully assembled with all
parts properly in place.
17. This product is intended for household use only and
not for commercial or industrial applications.
PLEASE READ AND SAVE
THESE IMPORTANT SAFETY
INSTRUCTIONS
C L E A N I N G / M A I N T E N A N C E
T R O U B L E S H O O T I N G
Fig. 1 Front View
A. Air Flow Switches (2)
B. Comfort Control
Thermostat Knob
C. Fan Speed Control
D. Fan Grills (2)
E. Front Housing
A
B
A
C
D
E
F
H
Fig. 2 Rear View
Fig. 3
H
F
Fig. 4
Fig. 5
G
THIS APPLIANCE HAS A POLARIZED PLUG (one blade is wider than the
other). To reduce the risk of electric shock, this plug is intended to fit in
a polarized outlet only one way. If the plug does not fit fully in the
outlet, reverse the plug. If it still does not fit, contact a qualified
electrician to install the proper outlet.
DO NOT ATTEMPT TO MODIFY THIS PLUG OR DEFEAT THIS
SAFETY FEATURE IN ANY WAY.
Issue
Potential Cause
Potential Solution
Air does not seem to be
blowing in properly.
Air Flow Switches set to
Exhaust rather than Intake.
Adjust Air Flow Switches to Intake.
Fan will not operate even
though I am turning the Fan
Speed Control knob.
Fan is not plugged in.
Plug in the power cord into a 120 V AC Outlet. Be sure
the Speed Control knob is in the off position prior to
plugging in the Fan.
Fan is not secure in the
window and moves during
operation.
Fan may not be set in the
window properly.
Ensure that the bottom edge of the window sash fits
securely into the groove along the top of the Fan. Close
the sash completely on top of the window so it is secure.
Please refer to the Installation portion of the manual for
more details.
TROUBLESHOOTING GUIDE
If you have any questions regarding your product or
would like to learn more about other Holmes
®
products,
please contact our Consumer Service Department at
1-800-546-5637 or visit our website at
www.holmesproducts.com
D
H
F. Grill Release Button
G. Fan Blade (not shown)
H. Removable Fan Grills (2)
HAWF2046-U_07EM1.qxd 12/10/07 14:49 Page 2