Balancing your lens on the monopod head, Attaching your lens to the monopod head, Using small lenses (or for vertical shooting) – Wimberley MH-100 MonoGimbal Head for Monopods User Manual
Page 2: Using large lenses
Level Plane
The MonoGimbal is now ready to use. Simply loosen the tilt knob about a quarter turn and start shooting. The lens should be
very easy to point, should stay pointed and should not tend to flop or creep. You can shoot with the knob loose for fluid mo-
tion, or lock
-
in on a target by tightening the knob.
If you have questions or need help setting it up, please contact us.
Page 2
Page 3
Prerequisite: In order to attach your lens to the MonoGimbal Head, it must be fitted with an
Arca
-
Swiss style quick
-
release plate or foot.
Step 1:
Tighten the tilt knob of the head
-
make sure that the head
’
s Quick
-
release clamp
is level so that the head is stable while you are loading your lens.
Step 2:
Open the jaws of the quick
-
release clamp
wide enough so that the jaws clear the
entire width of the QR plate attached to the foot of your lens.
Step 3:
While supporting your lens,
insert the quick
-
release plate or replacement
foot on your lens into the jaws of the clamp and tighten the clamp
securely
. Make sure the quick
-
release plate is seated properly and
captive in the clamp jaws before letting go of the lens.
BALANCING YOUR LENS ON THE MONOPOD HEAD:
ATTACHING YOUR LENS TO THE MONOPOD HEAD:
See our website for a tutorial video.
STEP 1: Preparing to Balance:
Tighten the Monopod Head
’
s tilt knob. Mount your lens (with camera body
attached). Stand behind the lens/camera setup and grab the camera
body as if you are going to take a picture.
If the front of the lens tilts downward you will need to slide
the lens backward (toward you) in the clamp.
If the front of the lens tilts upward, you will need
to slide the lens forward (away from you.)
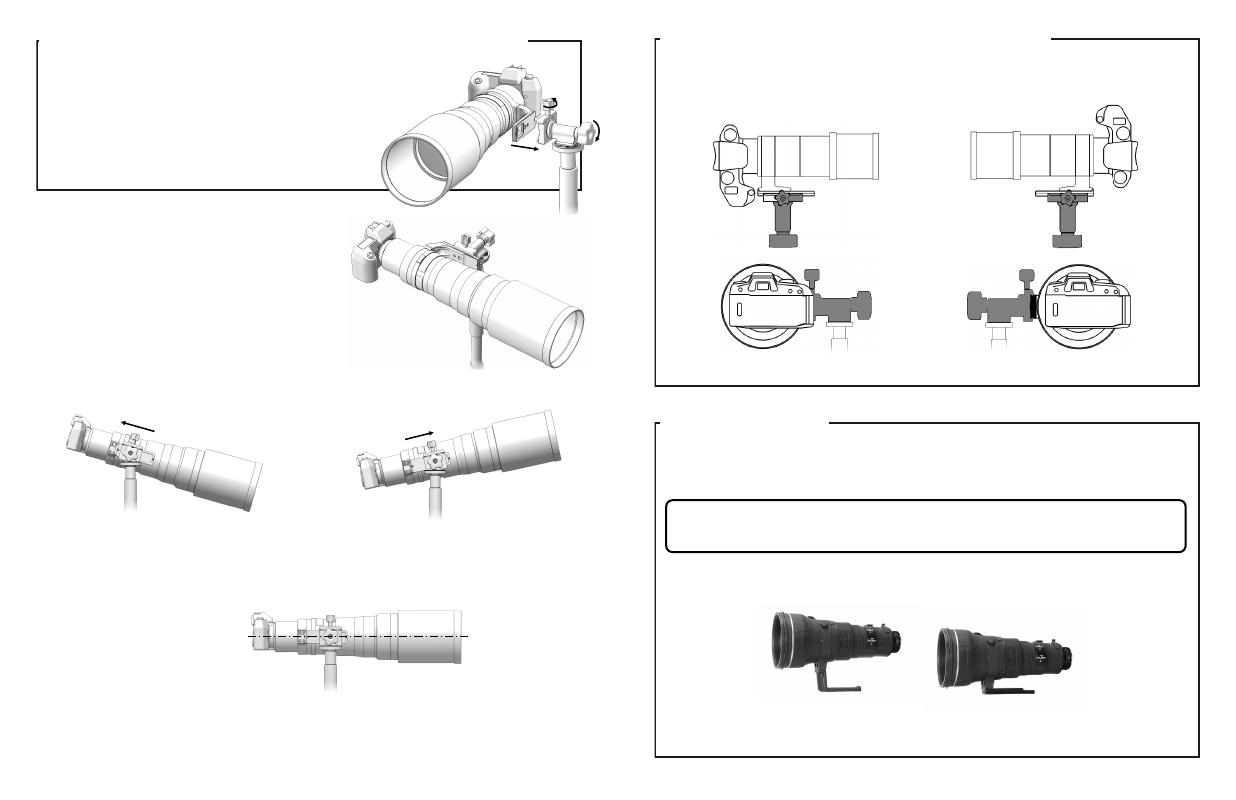
PROPER HORIZONTAL BALANCE:
Adjust the position of the lens in small increments until there is no tendency for it to tip.
STEP 2: Balance the Horizontal Position of the Lens:
Hold camera body with a relaxed grip and loosen the tilt knob of the MonoGimbal.
Adjust the horizontal position of the lens forward or backwards depending on how the lens tips (see figures below). You will notice
that the lens will want to tilt forward or backward. Don
’
t forget to re
-
tighten the clamp after each adjustment.
1
3
2
Monopod Head on Left
Smaller lenses (e.g. the 300 f/4, 70
-
200 2.8) are shorter and lighter compared to most pro camera bodies. In order to balance a
small lens, the quick release clamp may have to be so close to the camera body that there is not enough room for your fingers.
Some solutions to this problem are using a lighter camera body or mounting the MonoGimbal to the left side of the lens
(which allows much more room because of the shape of most cameras)
USING SMALL LENSES (OR FOR VERTICAL SHOOTING)
USING LARGE LENSES
The MonoGimbal will carry the weight of a really big lens, but there are some special considerations needed for safe and problem
-
free operation. Typically, the bigger the lens, the greater the distance is from the central axis of the lens to the bottom of the tripod
mounting foot. The higher the lens profile, the more the lens extends beyond the center of the monopod. While this is not particularly
an issue due to the nature of the head, it is always beneficial for the center of gravity to be as close to the center of the monopod for
overall comfort when mounting the lens and using the monopod.
Monopod Head on Right
Tripod Mounting foot
Low
-
Profile Replacement Foot
If you have a large lens that needs help balancing, we are here to help. We have an extensive list of lenses and
recommended setups on our lens compatibility list. This may be found in our catalog or on our website.
www.tripodhead.com/products/lens
-
plates
-
main.cfm
In order to use one of these larger lenses, we will often recommend a replacement foot which lowers the profile of the lens.