Operating instructions cont – Euro-Pro K4320 User Manual
Page 6
OPERATING INSTRUCTIONS cont.
OPERATING INSTRUCTIONS cont.
Using Solid Fat
Warning:
If you try to melt the solidified
fat in the oil container, there is a risk of
warm melted fat suddenly sputtering from
below through the still solid top layer of fat.
Therefore use only the following procedure:
• Make sure the fat is at room
temperature. If the fat is very cold, there
is a greater risk of splashing.
• Using a fork, carefully make some holes
in the fat. Make sure the lid is securely
closed while fat is melting. Set
temperature dial to 320º F (160º C).
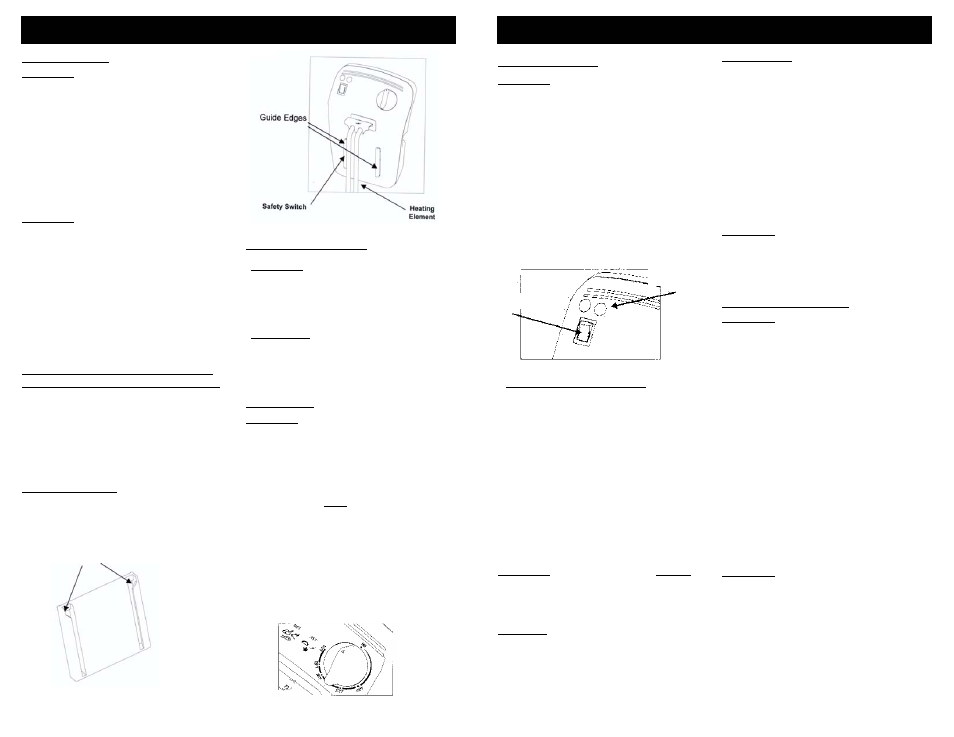
• Lift up the Control Panel with Heating
Element.
• Insert the "Guide Edges" on the Control
Panel (Fig. 4) into the "Guide Rails"
mounted on the metal body. (Fig. 3)
• Slide the "Guide Edges" down till the
end.
Important Notice:
The Automatic
Safety Interlock Switch ensures that the
unit will not operate unless the Control
Panel has been inserted into the "Guide
Rails" on the metal body correctly.
Guide Rails
Installing the “Control Panel With
the Heating Element” Into its Place
Warning:
Never plug in the Deep Fryer
before filling with oil to specified level.
Always make sure control panel is securely
in place in the body and the heating
element is inside the oil in the container
before plugging in.
Important:
Ensure the control panel is
fitted correctly to the main unit otherwise
the unit will not function. This is not a
defect. This product is fitted with a safety
interlock switch to prevent the unit from
turning on accidentally.
Back of Main Body
Control Panel
Using the Deep Fryer
Pre-Heating
Warning:
Never plug in the Deep Fryer
before filling with oil. (See "Filling"
instructions on page 3.) Always unplug
the appliance when not in use.
• Make sure the oil level in the oil
container is between the "minimum "
and "maximum lines inside the oil
container. Do NOT exceed the "MAX"
line on the oil container when filling with
oil.
• The frying basket should not be immersed
in the oil during the pre-heating.
• Replace the lid cover.
• Plug the appliance into a 120-volt outlet.
• Turn the On/Off switch to the "ON"
position.
• Select the desired temperature on the
temperature setting dial. (Fig. 5)
Fig. 3
Fig. 4
Fig. 5
Pre-Heating
(cont.)
• Pre-heating the oil will take up to 15
minutes depending on the temperature
selected.
• The temperature indicator light will
come on when the temperature is set
and the deep fryer is “on” showing that
the heating element is in operation.
This light goes off when the set
temperature is reached. (Fig. 6) The
temperature light may go on and off
several times during frying. This
indicates that the temperature is being
thermostatically maintained.
Warning:
In order to avoid injury or
burns, never touch any metal parts on the
deep fryer because they may be hot.
Filling the Frying Basket
• Do not fill the frying basket when it is
immersed in oil.
• Place the food in the frying basket. Do
not overfill it and never exceed the
maximum quantities. For optimum
results and shorter frying time, basket
should be only 1/2 full.
• The large basket has approximately
1.5 lb. food capacity. It will hold 3-4
average size pieces of chicken. The
small baskets should be filled ONLY till
the MAX line on the fryer basket.
• Do not fill the baskets higher than the
MAX line on the baskets with frozen
food.
Warning:
When frying foods, always
remove the frying baskets from the deep
fryer before filling with food because oil will
spatter and cause burns. Be especially
cautious when frying frozen foods.
Frying Food
• Always use the frying baskets to fry food.
• Always close the lid cover during frying.
• When the oil is pre-heated, ready
indicator light will come on it indicating
that the desired temperature is reached.
• Slowly lower the frying basket into the
hot oil. Lowering the frying basket too
quickly can result in the oil overflowing
and splashing.
• Replace the lid carefully.
• It is normal for steam to escape through
the sides of the lid while frying.
• Avoid standing too close to the deep
fryer while it is working.
Warning:
When opening the lid cover
after frying, lift up the lid slightly, then wait
to allow steam to escape before opening
the lid completely. Keep face away from
unit to avoid burns caused by escaping
steam.
• Set the temperature setting dial to the
lowest position, (turn fully counter
clockwise.).
• Turn On/Off switch to the "OFF" position.
• Unplug the main cord from the wall
socket.
• Lift up the lid cover slowly and wait to
allow steam to escape before opening
the lid cover completely.
• Lift up the frying baskets by the handle.
Place it (them) on the oil container and
allow the food to drain for a minute.
• Once the oil has drained from the
frying basket, the basket may be lifted
off and the food served.
Warning:
When you have finished frying,
always turn the temperature setting dial to
lowest position, turn off power switch and
unplug the deep fryer from wall outlet. To
avoid injury or burns, do not touch any
metal surfaces as they are hot.
At the End of Cooking
Caution:
When frying frozen foods such as
French Fries, you should not exceed
1.25 Lb. (564 gr.) in the large basket. For best
crispy results limit quantity to 1 Lb. (454 gr.).
Clean off any ice from frozen food prior to
frying. Failure to do so may cause fryer to
overflow when food is placed in oil.
Warning:
Always let the deep fryer
cool completely (approximately 2 hours)
before cleaning or storing. Never carry or
move the deep fryer with hot oil inside.
5
On/Off
Switch
Temperature
Indicator
Light
Fig. 6
Warning:
Do not put solid shortening in
the oil container or the frying basket.
• If using solid vegetable shortening, melt
it first in a separate pan and then very
carefully pour the melted fat into the oil
container.
• Previously used solid vegetable
shortening which has curdled and
hardened in the oil container should be
removed from the oil container and
melted in a separate pan before reusing.
4