Empire Comfort Systems CAST IRON VENTED FIREPLACE HEATER CIBV-30-2 User Manual
Page 12
Page 12
R-3450
Electric (120 volt) Operated Remote Control, FREC-1
Connect the green and red, stripped and bare, wires on the ON/OFF/
REMOTE switch wire harness to the wires on remote receiver that is a
component in the FREC-1. Turn the ON/OFF/REMOTE switch on the
wiring chase to the REMOTE position. Follow instructions in the
FREC-1 to complete installation.
Note: If electric (120 volt) fails in FREC-1, and immediate heat is
desired, turn the ON/OFF/REMOTE switch on wiring chase from the
REMOTE position to the ON position.
Wiring of ON/OFF/REMOTE Switch with 750 Millivolt Wall
Thermostat Accessory and Another Accessory
Connect the green and red, stripped and bare, wires on the ON/OFF/
REMOTE switch wire harness to the 750 millivolt wall thermostat AND
to the remote receiver that is a component in the FRBC-1, FREC-1 OR
to the FWS-1, wall switch.
1. Connect (1) wire from the 750 millivolt wall thermostat and (1) wire
from appropriate accessory to the GREEN, stripped and bare wire
from the ON/OFF/REMOTE wire harness.
2. Connect (1) wire from the 750 millivolt wall thermostat and (1) wire
from appropriate accessory to the RED, stripped and bare wire from
the ON/OFF/REMOTE wire harness.
Note: When the appliance is in the MANUAL mode and the batteries
fail in the FRBC-1 or if the electric (120 volt) fails in the FREC-1, and
immediate heat is desired, turn the ON/OFF/REMOTE switch on
wiring chase from the REMOTE position to the ON position.
Manual Operation
1. Turn ON/OFF/REMOTE switch on wiring chase to REMOTE
position.
2. Turn wall thermostat OFF.
3. Turn accessory, FRBC-1, FREC-1 or FWS-1, ON. Appliance is now
in the manual mode. You must turn the appliance ON or OFF with
appropriate accessory.
Wall Thermostat Operation
1. Turn the ON/OFF/REMOTE switch on wiring chase to REMOTE
position.
2. Turn accessory, FRBC-1, FREC-1 or FWS-1, OFF.
3. Turn wall thermostat ON and set appropriate temperature. Wall
thermostat will cycle the appliance ON and OFF.
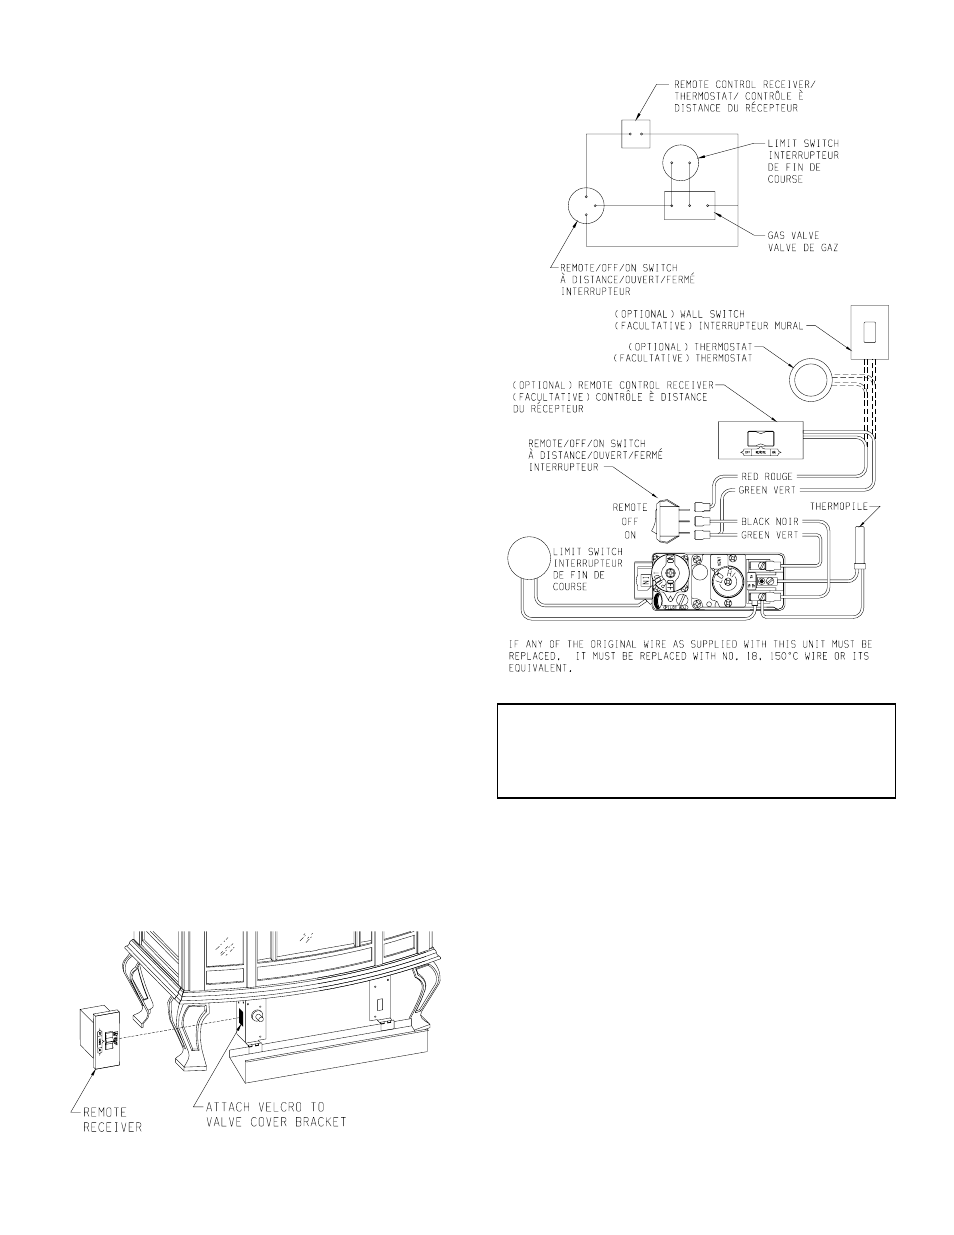
Installation of Remote Receiver
(Figure 17)
1. Attach, from left to right, the slide-on cover plate onto the remote
receiver. ON will be to the top and OFF will be to the bottom on the
slide-on cover plate.
2. Push the receiver slide button onto the receiver slide switch. Reverse
installation of the slide button if it is off center.
3. Attach velcro loop on the left side of the valve cover support.
4. Attach velcro hook onto remote receiver. The word TOP on the
remote receiver should be to the top when installed onto valve cover
support.
5. Attach velcro hook on remote receiver onto velcro loop on valve
cover support.
Figure 17
Wiring Diagram (Figure 18)
Figure 18
PLEASE NOTE
It is normal for appliances fabricated of steel to give off some
expansion and/or contraction noised during the start up or cool
down cycle. Similar noises are found with your furnace heat
exchanger or car engine.
Glass Cleaning
It will be necessary to clean the glass periodically. During start-up
condensation, which is normal, forms on the inside of the glass and
causes lint, dust and other airborne particles to cling to the glass surface.
Also initial paint curing may deposit a slight film on the glass. It is
therefore recommended that the glass be cleaned two or three times with
a non-abrasive household cleaner and warm water (we recommend gas
fireplace glass cleaner). After that the glass should be cleaned two or
three times during each heating season depending on the circumstances
present.