Livarno Z30803A/Z30803B/ Z30803C/Z30803D User Manual
Ac b d
GB
GB
GB
GB
GB
GB
GB
PL
powstałe wskutek użycia produktu niezgodnego z jego
przeznaczeniem. Produkt nie jest przeznaczony do
użytku komercyjnego.
Opis części
1
Kołek
2
Śruba ustalająca
3
Wkręt
4
Mocowanie drążka
4a
Mocowanie drążka (L)
(dla szerokiego drążka o ø 19 mm)
4b
Mocowanie drążka (S)
(dla wąskiego drążka o ø 16 mm)
5
Karnisz z końcówkami
5 a
Szeroki karnisz (ø ok. 19 mm)
5 b
Wąski karnisz (ø ok. 16 mm)
6
Końcówka
7
Wkręt z rowkiem
PL
PL
PL
PL
Karnisz do firanek
Wstęp
Przed rozpoczęciem montażu należy zapo-
znać się z produktem. W tym celu należy
uważnie przeczytać instrukcję montażu i
wskazówki dot. bezpieczeństwa. Produkt używać wy-
łącznie zgodnie z jego poniżej opisanym przeznacze-
niem. Prosimy o zachowanie instrukcji io jej dobre
przechowywanie. W przypadku przekazania produktu
w ręce osoby trzeciej, prosimy o przekazanie także
wszystkich należących do produktu instrukcji i innych
dokumentów.
Użycie zgodne z przeznaczeniem
Ten produkt jest przeznaczony do zawieszania firanek
i / lub zasłon o szerokości od ok. 90 cm do 180 cm.
Produkt jest przeznaczony tylko do użytku prywatnego
w pomieszczeniach wewnętrznych. Użycie inne niż
wyżej opisane lub dokonywanie zmian produktu nie jest
dozwolone i może prowadzić do jego uszkodzenia.
Producent nie ponosi odpowiedzialności za szkody
mogą wpływać na bezpieczeństwo i funkcje produktu.
OSTROŻNIE! Nie pozostawiać dzieci bez nadzo-
ru! Karnisz nie jest przyrządem do wspinaczki ani
zabawką! Należy zapewnić, aby nikt, w szczegól-
ności dzieci, nie podciągał się na karniszu. Karnisz
może oderwać się od ściany i spaść. Skutkiem tego
mogą być obrażenia i / lub szkody rzeczowe.
Należy pamiętać, że karnisz może być zamontowa-
ny tylko przez odpowiednio wykwalifikowane osoby.
Na karniszu nie zawieszać żadnych przedmiotów.
Nieprzestrzeganie tej wskazówki grozi obrażenia-
mi / lub uszkodzeniem produktu.
Przed montażem na ścianie należy sprawdzić, czy
wybrana ściana przystosowana jest do zamocowa-
nia produktu i należy zapewnić, aby karnisz został
prawidłowo zamocowany. Upadek może spowodo-
wać obrażenia osób, uszkodzenia produktu lub
innych rzeczy materialnych.
OSTRZEŻENIE!
ZAGROŻENIE ŻYCIA ORAZ
WYPADKIEM PRZEZ PORAŻENIE PRĄDEM
ELEKTRYCZNYM! ZAGROŻENIE USZKODZE-
NIA MIENIA! W trakcie dokonywania odwiertόw
należy zwracać uwagę, aby nie uszkodzić
Disposal
The packaging is made entirely of recyclable
materials, which you may dispose of at local
recycling facilities.
Contact your local refuse disposal authority for more
details of how to dispose of your worn-out product.
Product Description:
Curtain rail
Model No.:
Z30803A / Z30803B / Z30803C /
Z30803D
Version:
03 / 2011
Last information update: 05 / 2011
Ident.-No.: Z30803A / B / C / D052011-4
Wskazówki dotyczące
bezpieczeństwa
OSTRZEŻENIE!
ZGROŻENIE
DLA ŻYCIA I NIEBEZPIECZEŃSTWO
WYPADKU DLA DZIECI! Ze względu
na ryzyko uduszenia się nigdy nie pozostawiać
dzieci bez nadzoru z materiałem opakowaniowym.
Trzymać dzieci z dala od produktu.
OSTRZEŻENIE!
NIEBEZPIECZEŃSTWO
DLA
ŻYCIA! Trzymać dzieci z dala od produktu.
Dzieci mogą połknąć drobne części niezmontowa-
nego jeszcze produktu.
OSTROŻNIE! NIEBEZPIECZEŃSTWO SKALE-
CZENIA! Trzymać dzieci z dala od produktu.
Produkt może posiadać ostre naroża i krawędzie.
OSTROŻNIE! NIEBEZPIECZEŃSTWO OD-
NIESIENIA OBRAŻEŃ! Należy zapewnić prawi-
dłowy montaż wszystkich części i sprawdzić, czy
żadna z części nie jest uszkodzona. W przypadku
nieprawidłowego montażu występuje niebezpie-
czeństwo odniesienia obrażeń. Uszkodzone części
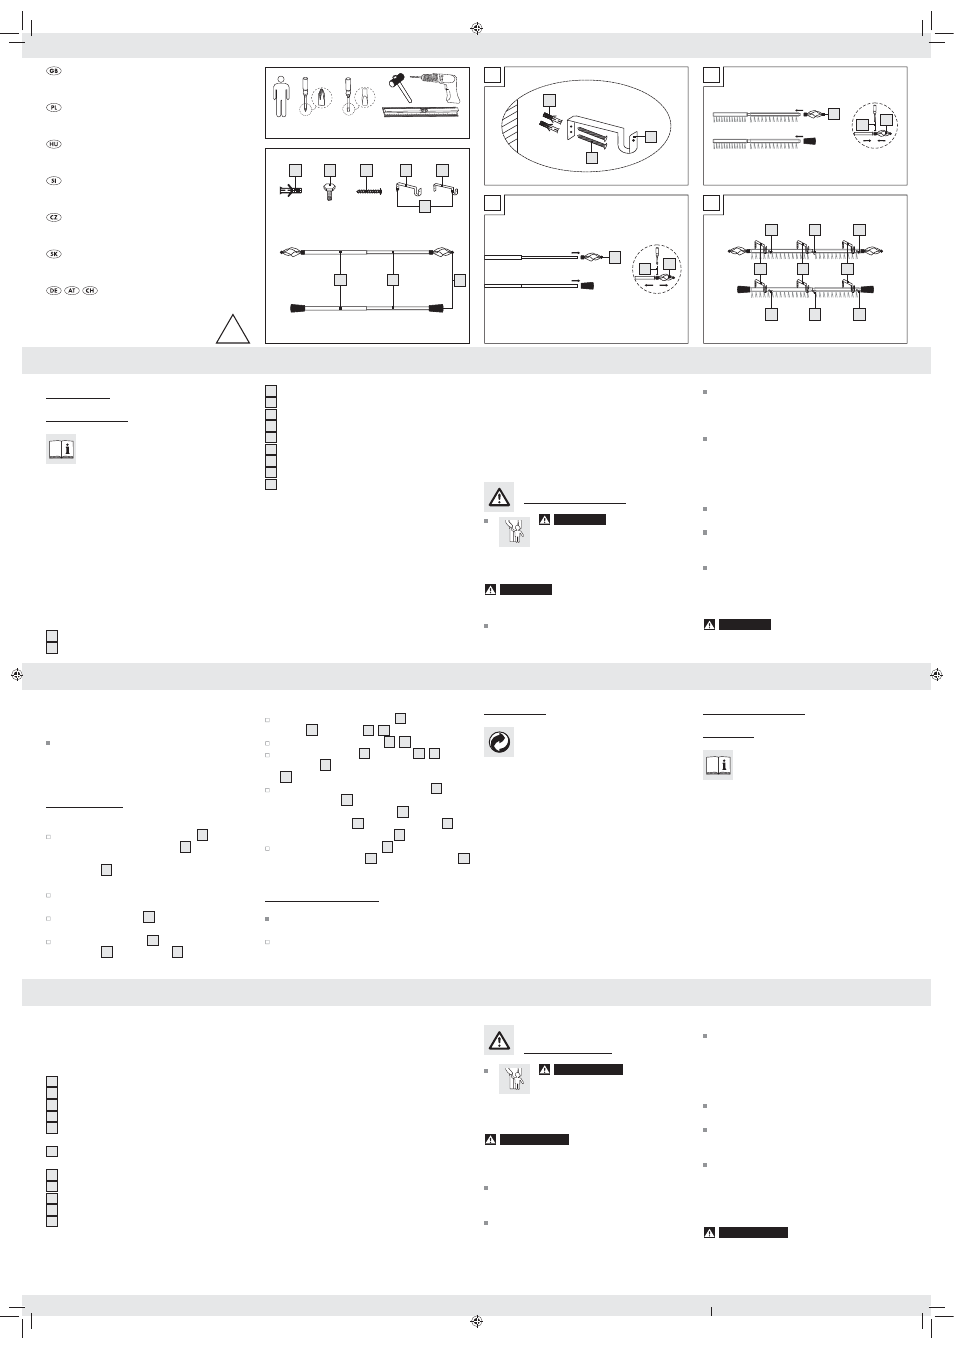
Mounting the curtain rail
Loosen the slotted head screws
7
and pull the end
pieces
6
off the rods
5 a
,
5 b
(see Fig. B).
Fit the curtain on to the rods
5 a
,
5 b
(see Fig. C).
Attach the endpieces
6
to the rods
5a
,
5b
. Fix the
endpieces
6
in place with the slotted head screws
7
, screwing them in tightly (see Fig. C).
Place the curtain rods with the endpieces
5
into
the rod brackets
4
.
Note: Ensure that the thick rod
5a
is placed into
the rod brackets (L)
4a
and that the thin rod
5b
is
placed into the rod bracket (S)
4b
(see Fig. D).
Screw in the locking screws
2
tightly to fix the cur-
tain rod with endpieces
5
on to the rod brackets
4
(see Fig. D).
Cleaning and care
Never use caustic cleaners. The product material
may otherwise be damaged.
Use a moist, lint-free cloth to clean and care for the
product.
Dane techniczne
Wymiary:
ok. 100–190 cm
(długość, tylko karnisz)
ok. ø 16 / 19 mm
Maks. obciążenie:
2 kg
Zakres dostawy
Prosimy o sprawdzenie zawartości – bezpośrednio po
rozpakowaniu produktu – pod kątem kompletności i
stanu elementów. Nie należy składać produktu, jeżeli
zawartość opakowania jest niekompletna.
6 Kołkόw
3 Śruby ustalające
6 Śrub
2 Mocowania drążka (L)
(dla szerokiego drążka o ø 19 mm)
1 Mocowanie drążka (S)
(dla wąskiego drążka o ø 16 mm)
1 Szeroki karnisz (ø ok. 19 mm)
1 Wąski karnisz (ø ok. 16 mm)
2 Końcówki
1 Instrukcja montażu
not damage any electrical cables, gas or water
pipes when you drill into the wall. If necessary, use
a suitable detector to check the wall before drilling.
Only use wall mounting fittings suitable for the
construction and condition of the wall. A falling rod
could lead to personal injury or damage the product
or other objects.
Installation
Attaching the rod brackets
Mark the positions for the rod brackets
4
on the wall.
To do this, hold the rod brackets
4
one by one in
their required positions and mark the positions of
the screws
3
on the wall using a pencil (see Fig. A).
If necessary use a spirit level as a guide.
Drill holes in the wall at the marked locations. Only
use a suitable drill-driver.
Then press the dowels
1
into the drill holes (see
fig. A).
Fasten the rod brackets
4
to the wall by screwing
the screws
3
into the dowels
1
(see Fig. A).
CAUTION! RISK OF INJURY! Ensure all parts
are undamaged and correctly installed. Incorrect
installation poses the risk of injury. Damaged parts
may affect safety and function.
CAUTION! Do not leave children unattended! The
curtain rail is not a toy or climbing equipment! Please
ensure persons, children in particular, do not pull
themselves up on the curtain rail. The curtain rail may
release from the wall and fall down. Injuries and /
or property damage may result.
Be sure the curtain rail is only assembled by skilful
persons.
Do not hang objects from the curtain rail. Non-obser-
vance may result in risk of injury and / or product
damage.
Check before attaching the product to the wall that
the wall is suitable for the attachment and then en-
sure that the curtain rail is assembled and mounted
properly. If the product falls it could become dam-
aged itself, injure someone or damage other objects.
WARNING!
RISK OF ACCIDENT AND LOSS
OF LIFE FROM ELECTRIC SHOCK! RISK OF
DAMAGE TO PROPERTY! Ensure that you do
6 Screws
2 Rod brackets (L) (for the thick rod with ø 19 mm)
1 Rod bracket (S) (for the thin rod with ø 16 mm)
1 Thick rod (ø approx. 19 mm)
1 Thin rod (ø approx. 16 mm)
2 End pieces
1 Installation instructions
Safety Instructions
WARNING!
DANGER TO LIFE
AND RISK OF ACCIDENTS FOR
INFANTS AND CHILDREN! Never
leave children unattended with the packaging mate-
rial. Risk of suffocation. Keep children away from
the product.
WARNING!
DANGER TO LIFE! Keep the product
out of the reach of children. Prior to assembly the
product consists of loose components of small sizes.
CAUTION! RISK OF INJURY! Keep the product
out of the reach of children. The product may contain
sharp points and sharp edges.
3
Screw
4
Rod bracket
4a
Rod bracket (L) (for the thick rod with ø 19 mm)
4b
Rod bracket (S) (for the thin rod with ø 16 mm)
5
Curtain rail with end pieces
5a
Thick rod (ø approx. 19 mm)
5b
Thin rod (ø approx. 16 mm)
6
End piece
7
Slotted head screw
Technical Specifications
Dimensions: approx. 100–190 cm (L, rod only)
approx. ø 16 / 19 mm
Max. load: 2 kg
Scope of Delivery
Immediately after unpacking please check the package
contents for completeness and whether all parts and the
product are in good condition. Do not assemble the
product if the package contents are incomplete.
6 Dowels
3 Locking screws
Curtain Rail
Introduction
Familiarise yourself with the product prior to
assembly. Carefully read the following assem-
bly instructions and safety tips. Only use the
product as described and for the indicated applications.
Keep these instructions in a safe place. If passing this
product on to a third party also include all documents.
Intended Use
This product is designed for hanging up curtains approx.
90 cm to approx. 180 cm wide. Any use other than
previously mentioned or any product modification is
prohibited and can lead to injuries and / or product
damage. The manufacturer is not liable for any damages
caused by any use other than the intended purpose. The
product is not intended for commercial use.
Description of parts
1
Dowel
2
Locking screw
CURTAIN RAIL
Assembly and Safety Notes
GARNIŽA
Pokyny pre montáž a bezpečnosť
KARNISZ DO FIRANEK
Wskazówki dotyczące montażu oraz bezpieczeństwa
FÜGGÖNYTARTÓ RÚD
Használati- és biztonsági utasítások
KARNISA
Navodila za montažo in varnost
TYČ NA ZÁCLONY
Pokyny k montáži a bezpečnostní pokyny
GARDINENSTANGE
Montage- und Sicherheitshinweise
4
You need · Potrzebujecie · Szüksége van · Potrebujete · Potřebujete
Budete potrebovať · Sie benötigen:
A
C
B
D
2
3 x
3
6 x
4a
4b
1
3
6
6
2
2
2
2
2
2
2 x
1 x
1
6 x
Z30803 A/C
Z30803 A/C
Z30803 A/C
Z30803 B/D
Z30803 B/D
Z30803 B/D
5 b
5 a
1x
1x
5
6
4
7
7
6
4a
4a
4b
4
Z30803A/Z30803B/
Z30803C/Z30803D
2
63899_mer_Gardinenstange_LB4.indd 2
09.05.11 13:09