Fig.1, Specification 2. introduction, Charging the battery – Sealey CP2518 User Manual
Page 2: Operation
3. sPecIFIcATIoN
2. INTrodUcTIoN
cordless random orbital polisher with Ø230mm 5-ply foam pad and two polishing bonnets.
smooth operation provides even buffing/polishing with no hot spots. Impact resistant
housing with twin grips. supplied with 18V ni-cd battery pack and battery charger.
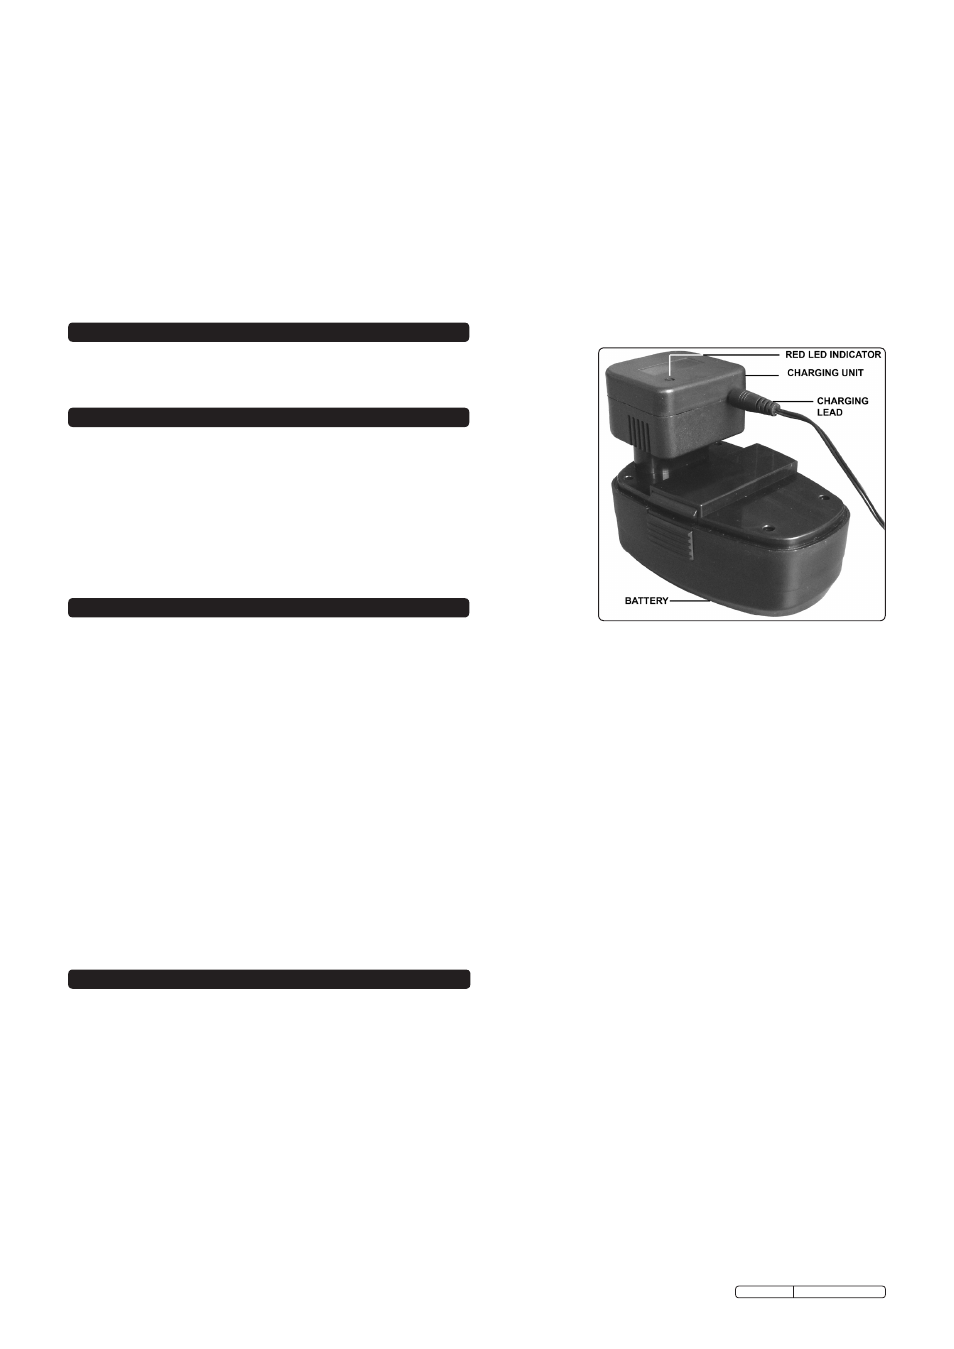
4. cHArGING THe BATTerY
Model no: . . . . . . . . . . . . . . . . . . . . . . . . . . . . . . . . . . . . . cP2518.V2
Battery: . . . . . . . . . . . . . . . . . . . . . . . . . . . . . . . . . . . . . . . . . . . . . 18V
speed: . . . . . . . . . . . . . . . . . . . . . . . . . . . . . . . . . . . . . . . . . . 3300rpm
Pad size: . . . . . . . . . . . . . . . . . . . . . . . . . . . . . . . . . . . . . . . . Ø230mm
Battery Pack: . . . . . . . . . . . . . . . . . . . . . . . . . . . . . . . . . cP2518BPV2
replacement Bonnet terry cloth: . . . . . . . . . . . . . . . . . . . Er230P.tB
replacement Bonnet synthetic Wool: . . . . . . . . . . . . . . . .Er230P.WB
noise Power . . . . . . . . . . . . . . . . . . . . . . . . . . . . . . . . . . . . . . .68dB.A
noise Pressure . . . . . . . . . . . . . . . . . . . . . . . . . . . . . . . . . . . . .79dB.A
Vibration (no Load) . . . . . . . . . . . . . . . . . . . . . . . . . . . . . . . . 6.73m/s²
5. oPerATIoN
WArNING! ensure that you read, understand and apply the safety instructions in section 1.
WArNING! do not use the polisher with abrasive or rubbing compounds.
WArNING! excess pressure can cause damage to paintwork and will put the polisher motor under strain. Polishers returned
with burnt out motors will be rejected as a warranty claim. Normally the weight of the polisher is sufficient.
5.1. regularly check that the bonnet is clean and free of abrasive particles and is undamaged and that the pad rotates freely.
5.2. Apply a small amount of polish/wax evenly over the surface of the bonnet. Do not apply polish directly to the vehicle surface.
5.3. Hold the polisher firmly by the handles and place the polishing face onto the panel to be polished.
5.4. start the polisher using the switch built into the underside of the right hand handle. squeeze and hold the switch ensuring that the pad is
still in contact with the vehicle panel.
5.5. Move the polisher with broad sweeping strokes over the surface in a criss-cross pattern. Do not apply pressure to the polisher when in
use. Work in logical areas and re-apply the polish/wax at intervals during the polish application process. Do not allow the foam pad to
become saturated with polish/wax as this will make polishing more difficult and will reduce pad life.
5.6. Polish/wax should be applied to difficult-to-reach areas by hand.
5.7. switch off the polisher by releasing the on/off switch before lifting it from the panel when polish application is completed.
5.8. remove the application bonnet and replace it with the wool bonnet.
5.9. Buff the polish/wax in the same order it was applied. Do not put pressure on the polisher but allow its weight and action to do the job.
5.10. Badly oxidised paint may require several applications. Do not use abrasive compounds.
5.11. If the polish/wax is difficult to buff too much has been applied. this may also cause the bonnet to come off the pad.
WArNING! do not immerse the polisher in water.
IMPorTANT WArrANTY INForMATIoN:
the battery pack fitted to this cordless tool is considered to be a consumable item and its ability to accept charge will reduce over time.
We will warranty it against mechanical and electrical defect for a period of one year - this does not cover fair wear and tear.
If the battery is not properly charged before first use, or regularly conditioned, its capacity will diminish. under these circumstances we
will not replace the battery pack even if it is less than one year old.
Note: When new, the battery is shipped in a low charge state. It will take longer to charge the battery initially (about 6 hours) and several
subsequent charges may also take a little longer until the battery reaches its optimum performance. In general use the battery should be
charged for 4-5 hours.
4.1. to remove the battery pack from the polisher, depress the two side clips on the battery and lift the battery up and off the polisher body.
Do not touch the metal battery terminals.
4.2. Lay the battery upside down on a flat surface with the connector stem facing upwards.
4.3. the charging unit will push down onto the battery stem one way only. this is to ensure that the positive (+) and negative (-) polarities
correspond. Align the ridge on the battery stem with the keyway in the charger unit recess and push the charger unit down over the
battery stem. Press firmly on the charger unit to ensure that it makes connection with the terminals at the bottom of the charger recess.
4.4. connect mains transformer to the charging unit. Plug the transformer into the mains socket and switch on.
4.5. the red LED indicator will come on when the battery is inserted showing that power is present and charging has commenced.
Do not charge the battery for more than 6 hours.
4.6. After 4-5 hours of charging, disconnect the charging lead from the charging unit and remove the unit from the battery stem.
switch off and remove the transformer plug from the mains. Push the battery into the polisher body until it latches into place.
the polisher is now ready for use.
Note: Do not attempt to recharge a battery immediately after use. In such a case allow the battery to cool for a time before recharging.
fig.1
remove ill fitting clothing. remove ties, watches, rings and other loose jewellery and contain and/or tie back long hair.
Keep children and unauthorised persons away from the work area.
Avoid unintentional starting.
do NoT use the polisher for any purpose other than that for which it is designed.
do NoT operate the polisher if any parts are damaged or missing as this may cause failure and/or personal injury.
do NoT switch the polisher on until the head is in contact with the panel and switch the unit off before removing the head from the panel.
do NoT use the polisher with abrasive cleaners or rubbing compounds as excessive paint removal may result.
do NoT get the polisher wet or use in damp or wet locations or areas where there is condensation.
do NoT allow untrained persons to operate the polisher.
do NoT operate the polisher when you are tired or under the influence of alcohol, drugs or intoxicating medication.
do NoT use the polisher where there are flammable liquids, solids or gases such as paint solvents, etc.
do NoT leave the polisher operating unattended.
do NoT carry the polisher with your finger on the power switch.
do NoT pull the cord from the power supply.
use a qualified person to maintain the polisher.
When not in use, unplug from the mains power supply and store in a safe, dry, childproof area.
Original Language Version
cP2518.V2 Issue: 3 - 22/12/11