Maintenance, Troubleshooting, Consumables – Sealey PC300SDAUTO User Manual
Page 4: Using dust free tools
Original Language Version
PC300SDAUTO.V3 Issue No.2 20/10/09
10. MAINTENANCE
10.1
GENERAL MAINTENANCE.
10.1.1 Ensure the machine is unplugged from the power supply. (1)
10.1.2 Disconnect the hose from the container. (2)
10.1.3 Undo the clasps and remove motor head from the container. (3)
10.1.4 Clear out any dirt or debris from the container and hose. (4)
10.1.5 Check that the telescopic suction tube operates smoothly,
and check the power cable to make sure it has not been
damaged.
10.2.
CARE OF CARTRIDGE FILTER
IMPORTANT! Clean or change the cartridge filter regularly
for best performance and long product life. The cartridge
filter is essential for the proper functioning of the cleaner.
If
the machine is used without a cartridge filter the motor
will burn out and the warranty will be voided. Always
keep a new, spare filter on hand.
10.2.1 The cartridge filters supplied are made of a high quality
material designed to trap small dust particles and should
only be used for dry vacuum cleaning.
If the cartridge filter
becomes wet it will clog very quickly and be very
difficult to clean. Always handle filters very carefully when
removing and cleaning them. Check the filter for tears or
small holes. Replace the filter if it is found to be damaged.
11. TROUBLESHOOTING
Symptom
Possible causes
Solutions
Vacuum will not operate
No power supply
Check power supply - cable, breakers, fuses.
Faulty power cable
Unplug and check the power cable. If
damaged have it replaced by your local Sealey
dealer.
Container full
Empty container
Dust expelled from the motor cover
Cartridge filter missing or damaged
Fit cartridge filter or replace damaged filter
Reduced efficiency and increased motor/
speed vibration
There is a blockage in the nozzle or hose
or in the container inlet.
Cartridge filter blocked by fine dust.
Check nozzle, hose and container inlets and clear
any blockages found.
Remove filter and clean it or install new filter.
12. CONSUMABLES
MODEL ..................................................................................................................................................................................PC300SDAUTO.V3
Locking Cartridge Filter (Must be used for dry vacuuming) ................................................................................................. Part No. PC200CFL
Foam Filter ......................................................................................................................................................................... Part No. PC200FF10
Dust Bags (Optional) ...........................................................................................................................................................Part No. PC300PB5
IMPORTANT! IF THE MACHINE IS USED WITHOUT A CARTRIDGE FILTER FITTED THE MOTOR WILL BURN OUT EVENTUALLY AND
YOUR GUARANTEE WILL BE INVALIDATED. ALWAYS KEEP A SPARE CARTRIDGE FILTER HANDY.
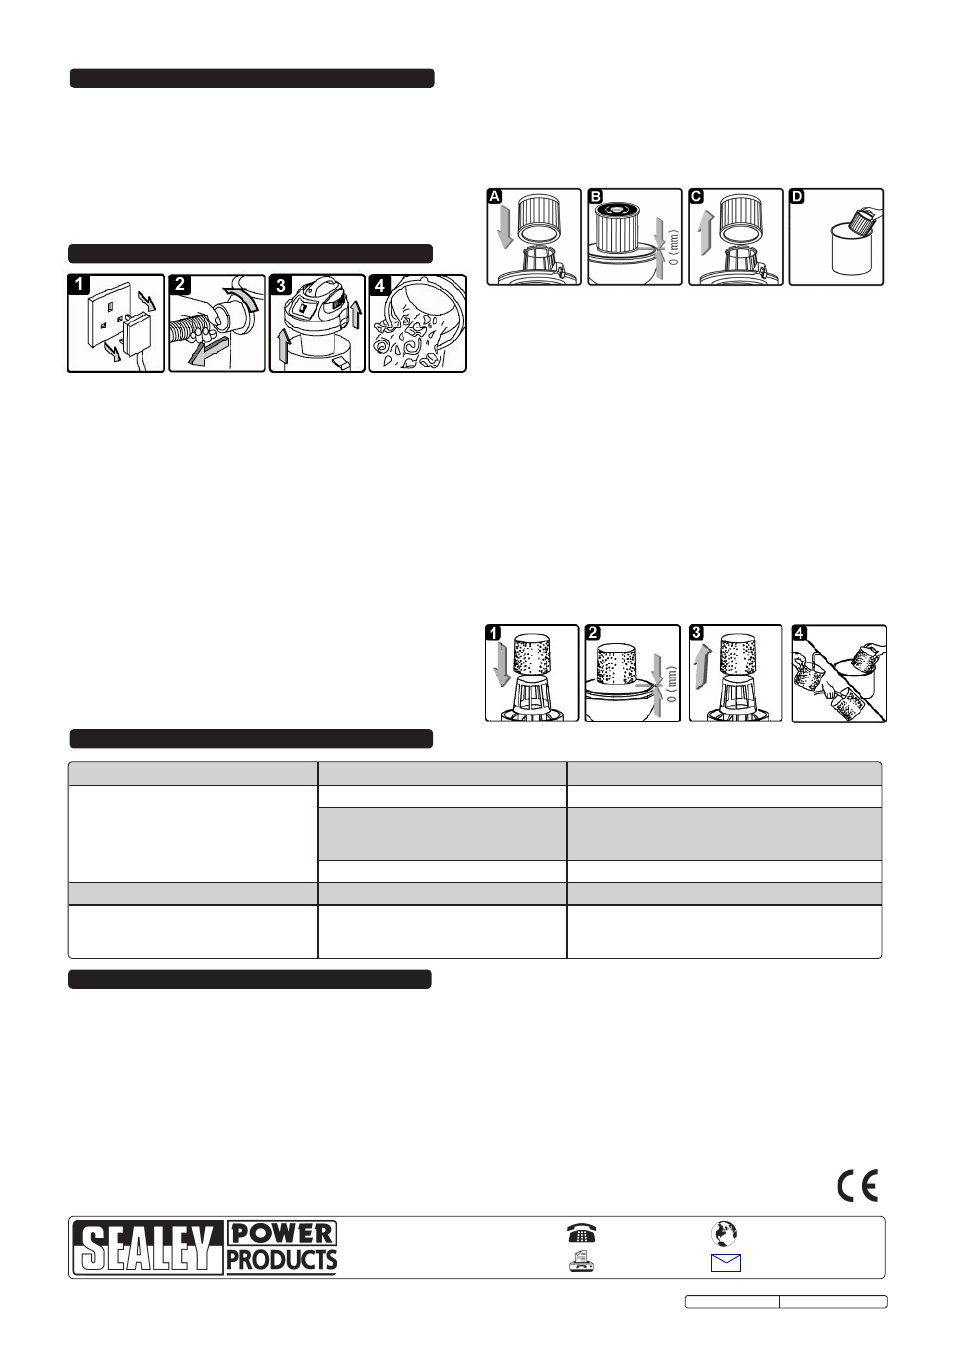
10.4
CLEANING CARTRIDGE FILTER
10.4.1 To remove the cartridge filter pull it carefully upwards and off
the filter cage. (C)
10.4.2 Clean the cartridge by gently tapping it over a waste
receptacle or lightly brushing with a soft brush. Do this
outdoors. (D)
10.4.3 If a cartridge filter becomes inadvertently wetted it should be
removed and allowed to air dry for 24 hours before reinstalling.
10.5
FITTING A FOAM SLEEVE FILTER (WET VACUUM ONLY)
10.5.1 Remove the power head and turn it upside down. Carefully
remove the cartridge filter and store safely for future use.
10.5.2 Slide the foam sleeve filter down over the filter cage ensuring
that the whole cage is covered. See 1`& 2
10.5.3 Invert the power head and refit it onto the container
10.6
CLEANING A FOAM SLEEVE FILTER
10.6.1 Carefully remove the foam sleeve from the filter cage.(3)
10.6.2 Wash the foam sleeve in a mild soap and water solution and
then rinse it in clean water. (4)
10.6.3 Allow the filter to air dry before installing and using again.
NOTE: It is our policy to continually improve products and as such we reserve the right to alter data, specifications and component parts without prior notice.
IMPORTANT: No liability is accepted for incorrect use of this product.
WARRANTY: Guarantee is 12 months from purchase date, proof of which will be required for any claim.
INFORMATION: For a copy of our latest catalogue and promotions call us on 01284 757525 and leave your full name and address, including postcode.
01284 757500
01284 703534
Sole UK Distributor, Sealey Group,
Kempson Way, Suffolk Business Park
,
Bury St. Edmunds, Suffolk,
IP32 7AR
www.sealey.co.uk
Web
10.3
INSTALLING CARTRIDGE FILTER (DRY VACUUM ONLY)
10.3.1 Remove the top section and with the raised rim uppermost fit
the cartridge filter tube down over the filter basket and push
fully home. Place the locking disc onto the top of the filter
and turn the locking bar until the latch drops into the slot in
the top of the filter cage. Continue turning until the filter is
fully locked down. (see below)
9.1
Connect the tool to the vacuum hose using the rubber adaptor
supplied. Ensure that the ON/OFF switch is in the
OFF
position then plug the dust free tool into the covered socket
provided on the front of the power head (see fig.1-12). Move
the function switch to the double bar position. Move the ON/
OFF switch to the ON ('I') position. The vacuum cleaner will
start automatically when the tool is switched on. When the
tool is switched off the vacuum will continue to run for 10
seconds to ensure that the tool and hose are left free of dust.
9. USING DUST FREE TOOLS