Installation for el25, Call button board, Disconnect power to the unit – Elite B/W User Manual
Page 2: Unlock and open the unit, Close and lock the unit, Reconnect power to the unit, A static discharge can damage circuit boards
LED
LED
Board
Board
Call
Call Button
Button
Board
Board
+
Call Button
Board
© 2011, The Chamberlain Group, Inc.
114A2972E All
Rights
Reserved
I N S T A L L A T I O N F O R E L 2 5
C A M E R A M O D U L E M O D E L S E L 2 5 B W C A M K T ,
E L 2 5 C C A M K T , A N D E L 2 5 D V R C A M K T
1
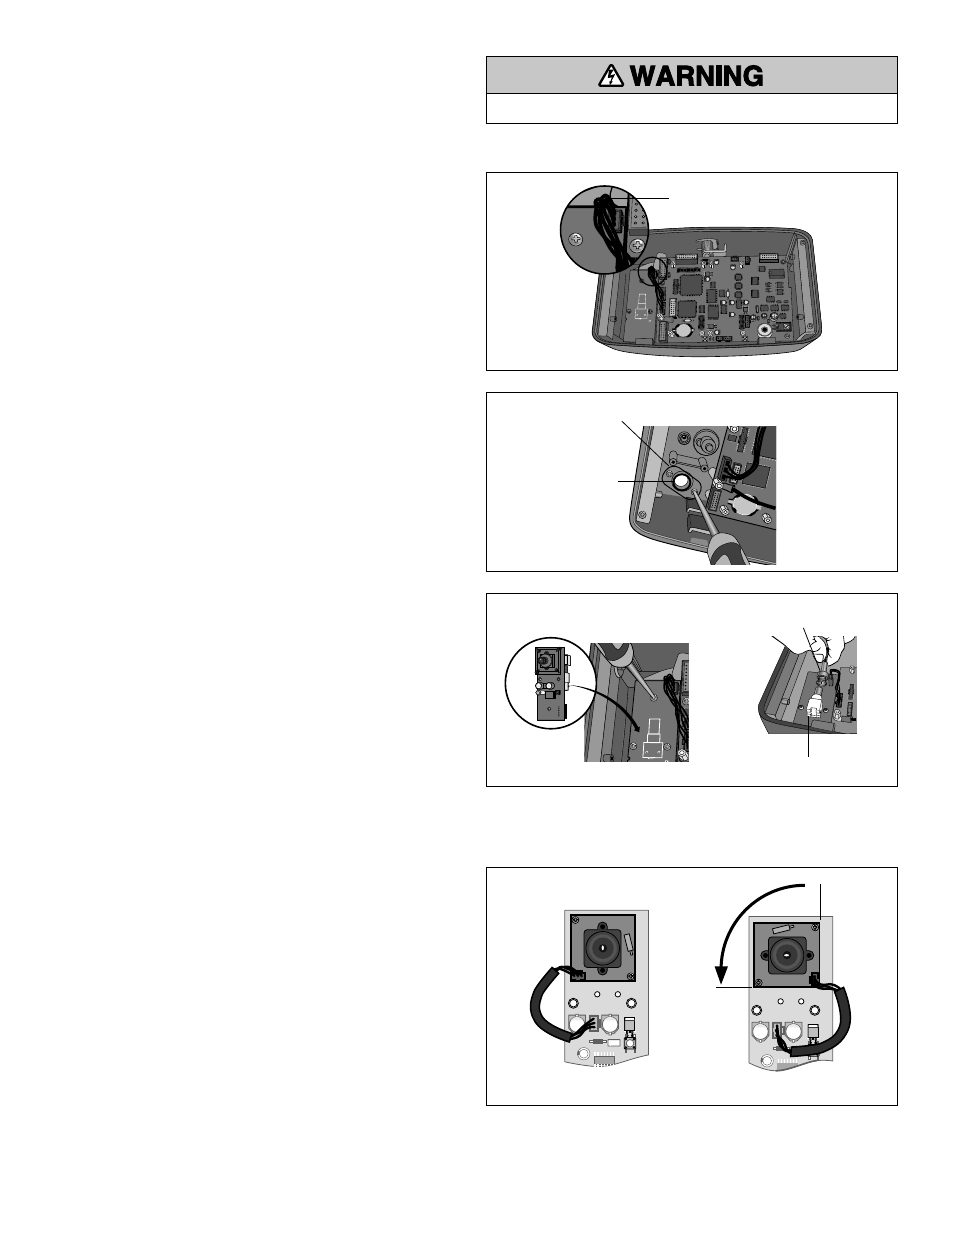
Disconnect power to the unit.
2
Unlock and open the unit.
3
To remove the LED board, unplug the wire harness from LED
board and remove the screws (3). Do not remove the rubber
O-ring.
4
Replace black plastic lens with the clear lens. Keep rubber
O-ring in place.
5
Install the camera module. Reconnect the LED board wire
harness to the camera module.
6
Feed a coaxial cable (not provided) through the conduit hole
in the back mounting plate of the unit. Connect a BNC coaxial
connector to the back of the camera module.
7
Close and lock the unit.
8
Reconnect power to the unit.
3
4
5
6
LED
Board
Call Button
Board
+
+
H2
100A
UD
H2
100A
UD
H2
100A
UD
H2
100A
UD
Wire Harness
Clear Plastic Lens
O-ring
Camera Module
Coaxial Cable
BNC Coaxial Connector
NOTE:
If the EL25 is connected to a home entertainment system,
the home entertainment system must be switched to video input.
F O R V E R T I C A L L Y M O U N T E D E L 2 5 U N I T S
The camera lens board must be repositioned 90 degrees
counterclockwise before the above steps can be performed.
When repositioning the camera board carefully remove and set
aside the 2 mounting screws.
“Portrait” positioning for vertical mounting
Rotated 90°
A static discharge can damage circuit boards.