Basic operation, Basic playback, Power sources – Curtis DVD8039B User Manual
Page 2
BASIC OPERATION
Virtual Remote
Press “Virtual Remote” Button: The diagram appear on screen , there
are 12 functions. press the navigation buttons (///) move high-
light to select your desired function.
Through the Enter button to press the Virtual button on screen, to control
or achieve the function.
3D Sound
• 3D audio post-processing will give a multichannel effect when using
only 2 speakers. This only works with discs encoded with Dolby. Pro Logic, Dolby Digital
and DTS multi-channel audio tracks.
Press the Virtual 3D button repeatedly to achieve the highest quality sound. The following
surround effects will appear on the TV screen when you press the 3D button repeatedly:
SURROUND ROCK SURROUND POP SURROUND LIVE SURROUND DANCE
SURROUND TECHNO SURROUND CLASSIC SURROUND SOFT SURROUND
OFF (return
)
SLOW/F, SLOW/R button:
Press this virtual button on screen, to select slow-motion forward or rewind playback at 1/2,1/
4,1/8,1/16 normal speed without sound.
NOTE: This player does not support slow-motion for playback audio CD & MP3-disc, and
slow-motion re-wind (SLOW/R) does not support playback VCD disc and “
xxxxx
” will
appear on the TV screen if you press SLOW/R button when playing a VCD disc.
ZOOM Function
Note: MP3 discs does not support this function.
Press Virtual ZOOM button (Zoom x2, x3, x4) during normal, slow or still playback mode.
This player can magnify a picture and use Navigation Arrow buttons (,,,) to select
desired part of the zoomed picture.
REPEAT button
DVD disc:
While in the Playback mode, press the Virtual REPEAT button once; “ 3 CHAPTER ” will
appear briefly on the TV screen and the currently playing Chapter will repeat continuously.
While in the Playback mode, press the Virtual REPEAT button a second time; “ 3 TITLE ”
will appear briefly on the TV screen and the currently playing Title will repeat continuously.
Press the Virtual REPEAT button once more to cancel Repeat mode.
CD / VCD disc:
To Repeat play a track, simply select the track as described on the previous page, then press
the Virtual REPEAT button once; “ 3 TRACK ” Will appear on the TV screen and the unit will
repeat the selected track continuously until the STOP () button is pressed.
To Repeat play all tracks on a CD, press the Virtual REPEAT button a second time; “ 3 ALL
” will appear on the TV screen and unit will repeat the CD continuously until the STOP ()
button is pressed.
To cancel Repeat play, press the Virtual REPEAT button until “ REPEAT ” disappears from
the TV screen.
SEARCH REV(
) and FF(
) button:
These buttons allow searching ahead/back at 4-level speeds 1st press: x2 2nd press:
x4 3rd press: x8 4th press: x16
Noted: Press the PLAY (X) button to resume normal playback.
A-B REPEAT button
Note: MP3 discs does not support this function.
DVD disc:
•
You can repeatedly play a given portion by operating as following:
To press this button once to define the portion head.
To press this button again to define the portion toe. Then the portion will be played
repeatedly.
•
To press this button again to return to normal playback.
CD / VCD disc:
While playing back a CD, this unit can repeatedly play back a specific section.
While in the Playback mode, press the Repeat Virtual A-B button to define where you want
the section to start. Press the Repeat Virtual A-B button again to define where you would like
the section to end, the unit will then play the selected area continuously.
To cancel A-B Repeat mode, press the Virtual A-B button again until the icon disappear on
screen.
BASIC PLAYBACK
DVD, VCD, Audio CD, MP3-disc Starting playback
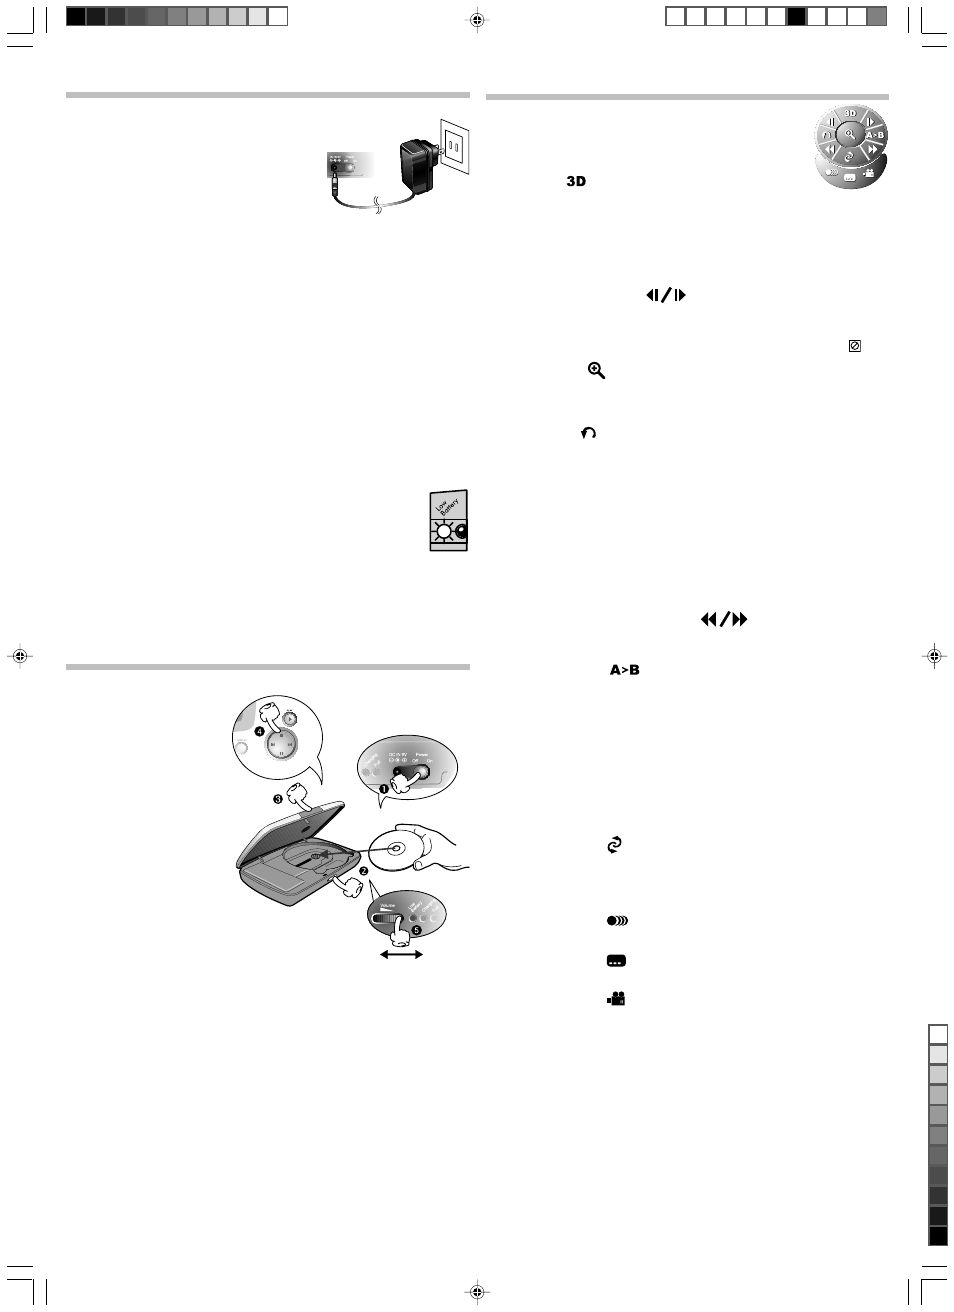
1 To power on the unit. Slide the
POWER knob on at the unit right
then the unit will turn on.
Notes: Selection kind of power
source, please refer portion of
POWER SOURCE
2 Press OPEN button, to open up
the disc compartment door
(OPEN appears on screen) and
place the disc with the label side
facing front on the disc tray.
Notes: Hold the disc without touching
either of its surfaces, placed
with the printed title side
facing up only.
3 Push down the front edge on the
door, to close secure. The disc will
start playback automatically.
Notes:
•
Loading the disc in any source
mode will switch from the current
mode to disc mode.
•
For MP3 disc, the disc reading
time may exceed a little bit longer, due to the large number of songs complied into one
disc.
If playing DVD disc a MENU appears on the TV screen:
Press the (//or) Arrow buttons, to select the desired item, then press the ENTER
button. Playback of the selected item will start.
Note: For more details, please refer to the jacket or case of the disc. If the password is set
and the inserted disc is within the Parental Ratings set, then the Password screen will
appear, prompting you to enter the password.
4 Stopping play
Press the STOP button once and Press PLAY to Continue appears on the screen. The
player memories the point where you stopped. If you press the PLAY button again, play
starts automatically from the point where you stopped. (Resuming Playback)
If the STOP button is pressed twice, the screen shows STOP() then the player stops
completely.
Note: Some discs may not start resuming playback.
5. Adjust the volume knob to a comfortable level.
Note: When in play mode, the “LOW BATTERY” indicator is blinking, the battery is nearly
exhausted. Refer “POWER SOURCE” to recharge the battery.
POWER SOURCES
Using AC Adapter for Player
Insert the DC plug at the end of the adapter cord into the
DC IN jack at the right side of the player. Then plug the
other end into an AC wall outlet.
Notes:
•
Only use with the supplied AC adapter. Using with other
AC adapter could be damaged.
•
Remove both DC plug & AC-IN plug, to disconnect the
AC adapter when not necessary.
Charging the Battery
Unit has build-in NiMH battery, then refer the step of “Using AC Adapter for player” to connect
power converter.
Notes:
• For the kind of Ni-MH rechargeable battery, it will not be fully charged when a battery to be
charged first time, please note that the discharging time will be short.
• The battery will be operated normally with normal capacity after 4–5 times of charging and
discharging. It is not a defect and abnormal battery.
• After a period of storage, or not use for a period, it will require users to repeat above
mentioned steps to get the battery back to normal condition.
• The battery is fully charged for approximately 4-5 hours after the AC adaptor is connected.
Battery is charging the CHARGE indicator at the right will light on RED. When charging is
completed, the FULL indicator will light on GREEN.
Notes:
• Disconnect the AC adapter plugs from both the battery and the AC outlet, when charging is
completed or not necessary.
• Battery recharge circuit operates in OFF mode and STANDBY mode. But Switch off the
unit for battery recharge is recommended.
• When battery is fully charged and released from unit, the CHARGE indicator will light on
RED, it means the charge circuit is ON.
Battery Low Indication
When the rechargeable battery packs becomes weak, the LOW BATTERY indi-
cator will light and you will have approx. 5 more minutes of playing time. Charge
the battery full (3 to 3.5 hours) in this situation or use AC power.
Random Playback
Press the Virtual RANDOM button once and “RANDOM” will appear on the TV screen.
Press the PLAY (X) button and the unit will play all the tracks back in random order. After 20
tracks have been randomly played, the unit will automatically stop playing and enter the Stop
mode. To cancel Shuffle, press the Virtual RANDOM button a second time “RANDOM” will
disappear from the TV screen.
Audio menu
Press Virtual AUDIO MENU button, you can change the audio language from the one se-
lected at the initial settings to a different language, if available.
Subtitle Menu
Press the Virtual SUBTITLE MENU button to select a subtitle language, and to turn the
subtitle menu on /off. This feature is not available on all discs.
Angle Mark
This only works when there is an angle mark on the disc.
•
Select “ON” the screen shows the angle mark when playing a DVD.
•
Select “OFF”, the angle mark is not shown.
CUSTIS_530_IB_a4sp_size.p65
8/30/2005, 12:09 PM
2
Black