Operating instructions – Euro-Pro EP585WR User Manual
Page 4
Read all the sections of this booklet and follow all the instructions carefully.
OPERATING INSTRUCTIONS
OPERATING INSTRUCTIONS
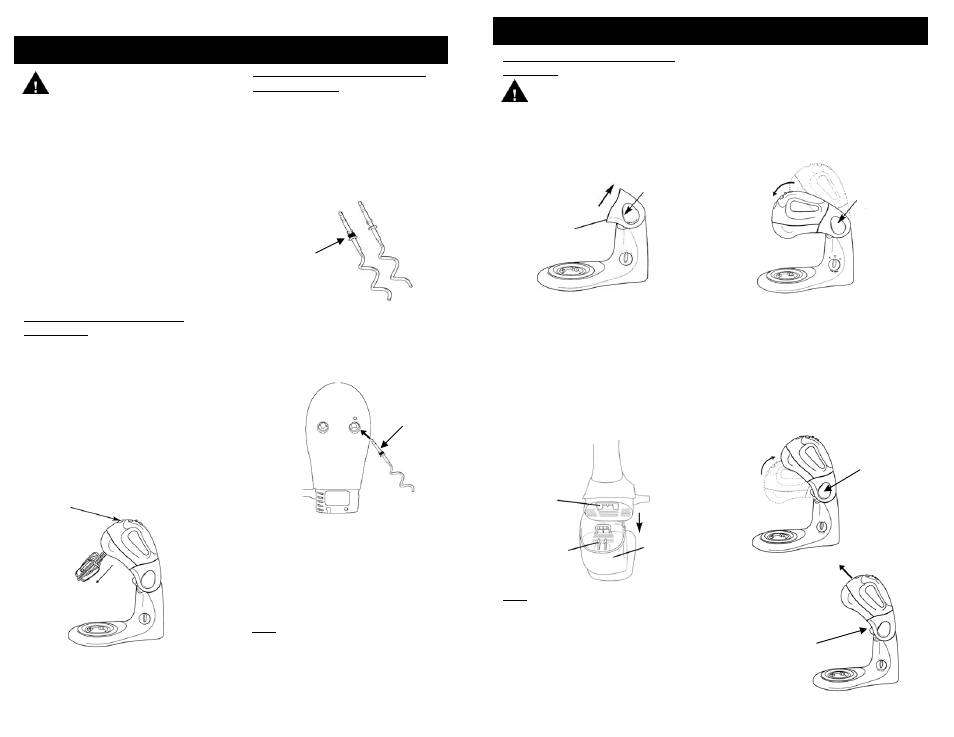
1. Press the tilt button, located on the
top of the support pivot . While the
button is depressed, ease the support
pivot back. (Fig. 4)
Warning:
To avoid injury when
assembling the hand mixer to the
stand, always set the speed selector on
“0” and unplug the appliance.
Support
Pivot
Fig. 4
Tilt Button
The support pivot will lock into this
raised position until it is released by
pressing the tilt button again.
2. To connect the hand mixer to the
support pivot, locate the two retaining
prongs on the support pivot into the
two rectangular holes in the heel of
the hand mixer. (Fig. 5) When the
hand mixer is seated on the support
pivot, press down on the hand mixer
to click it into place and lock the hand
mixer and the support pivot together.
Fig. 5
Rectangular
holes
Retaining
prongs
Support
pivot
3. While the hand mixer is still in the
raised position, insert either the
beaters or the dough hooks.
4. To lower the hand mixer, press and
hold the tilt button with one hand
while holding the hand mixer with the
other hand and slowly lower the hand
mixer down. (Fig. 6)
Press the
tilt button
and tilt the
hand
mixer
down
Fig. 6
5. To remove the hand mixer from the
pivot support, first raise the mixer by
pressing the tilt button and raise the
mixer up. (Fig. 7) the mixer will lock
into the raised position.
6. Then press the mixer release button
which is located on the under side of
the pivot support with one hand and
with the other lift the hand mixer by
the handle upwards and away from
the support pivot. (Fig. 8)
Press the
tilt button
and tilt the
hand
mixer up
Fig. 7
Hand
mixer
release
button
Fig. 8
Assembling the Hand Mixer to
the Stand
1. Ensure that the hand mixer is not
plugged in to an electrical outlet
and that the speed control switch
is on the “0” (off) position.
2. The dough hooks have a set
method of fitting into the hand
mixer because they are not
identical. One has a grommet and
the other does not. (Fig. 2)
Attaching the Dough Hooks to
the Hand Mixer
Grommet
3. Looking at the under side of the
hand mixer, you will see that one
of the sockets has a red dot over
it. (Fig. 3) Insert the dough hook
with the grommet into this socket.
Grommet
4. Then insert the other dough hook
into the other socket. Push both
dough hooks in until you hear a
click confirming that they are
securely in place.
5. To release the dough hooks from
the unit, press on the beater eject
button on the front of the unit and
they will pop out. (Fig. 1)
Note: Ensure that the beaters or
dough hooks are fully inserted into
the correct sockets or your mixing
results may be affected.
Fig. 2
Fig. 3
Warning:
To avoid injury when
inserting or removing beaters or
dough hooks, always set the speed
selector on “0” and unplug the appliance.
1. Before using your Convertible
Hand/Stand Mixer for the first time,
wash the beaters, dough hooks,
bowls and spatula in warm, sudsy
water. Rinse and dry thoroughly. Use
a damp cloth to wash over the mixer
base and the hand mixer. Dry with a
soft cloth. NEVER immerse the base
stand or the hand mixer in water or
any other liquids.
2. Before assembling your Convertible
Hand/Stand Mixer, make sure that the
power cord is unplugged from the
electrical outlet and that both the
speed control and the base speed
control dial are in the “OFF” position.
3
1. Ensure that the hand mixer is not
plugged in to an electrical outlet
and that the speed control switch
is on the “0” (off) position.
2. Insert the beaters into the sockets
on the under side of the hand
mixer and twist counter clockwise
until the beater is firmly fitted into
the socket.
3. To release the beaters from the
unit, press on the beater eject
button on the front of the unit and
they will pop out. (Fig. 1)
Attaching the Beaters to the
Hand Mixer
Press
eject
button
Fig. 1
Note: Ensure that the two retaining
prongs on the support pivot are fully
connected into the hand mixer.
4