Operating instructions operating instructions cont, Cleaning the compact air driven turbo brush – Euro-Pro SHARK CW240 User Manual
Page 4
OPERATING INSTRUCTIONS
OPERATING INSTRUCTIONS cont.
Using the Deluxe and Compact
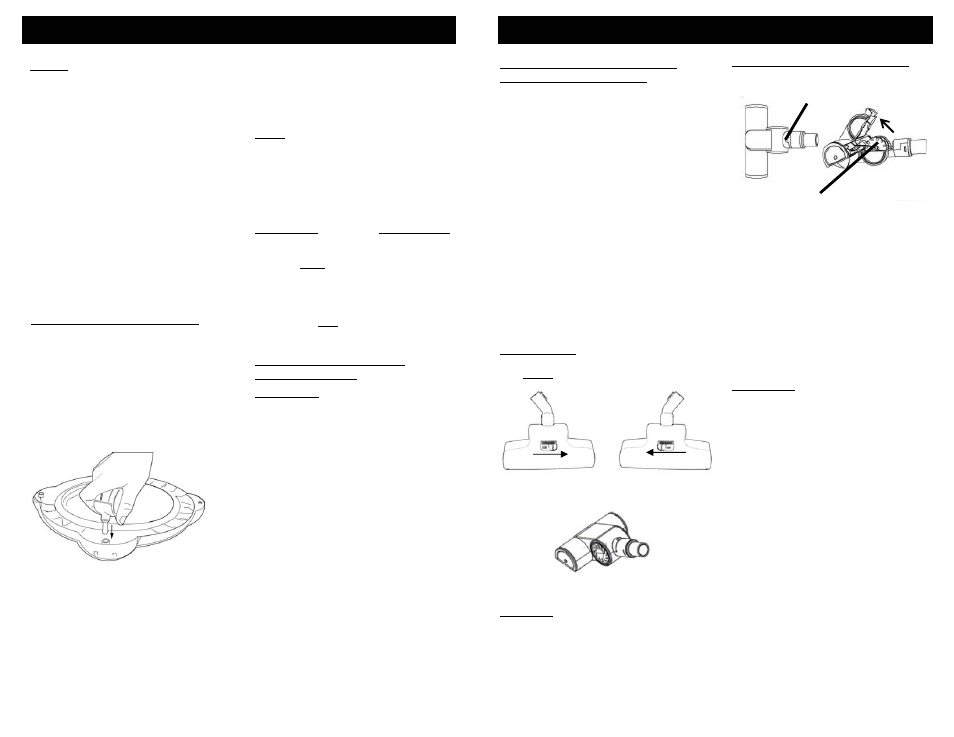
Air Driven Turbo Brushes
Fig. 1
Slide
For high pile carpet
Fig. 2
Slide
For low nap carpet
IMPORTANT:
Do not use the Air
Driven Turbo Brush for wet pick-up.
Use ONLY for dry floors or carpets.
Compact Air Driven Turbo Brush
Cleaning the Compact Air
Driven Turbo Brush
Turbine
Tilt
Upwards
Locking Latch
1. Slide locking latch forward then tilt the
top housing of the brush upwards. The
top housing is hinged and will tilt up
approximately 45°only.
2. Inspect turbine wheel and air passage
for debris and/or blockage. Remove
debris if present.
3. Inspect the rotating brush for built-up
hair or string. If present, remove by
carefully cutting with scissors. Avoid
damaging or cutting bristles.
4. Once clean, close the top cover of the
turbo brush and slide the locking latch
toward the rear of the brush to lock.
WARNING:
These air driven turbo
brushes rotate with the force of the
suction power. As the water tank fills
with dirt, the suction power will
reduce and the air driven turbo
brushes will slow down. If this
happens, empty the water tank and
verify that no threads or hairs have
accumulated on the beater brushes
which can also reduce beater brush
rotation speed.
Your CW240 Water Filtration Vacuum
may also be used as a wet pick-up
vacuum. To use as a wet pick-up
vacuum, operate the unit on the wet
surface as you would for a dry surface.
3
1. Add 6 to 8 cups of water to the tank.
2. Attach the flexible hose to the
suction hole.
3. Attach one of the extension tubes to
the hand grip of the flexible hose.
Insert the hand grip into the wider
end of the extension tube and turn
to tighten the connection.
4. Attach the other extension tubes to
the first one and turn to tighten the
connection.
5. Attach the desired accessory (brush
with squeegee, air driven turbo
brush or floor to carpet brush) to
the narrow end of the extension
tube.
NOTE:
Always remove the power plug
from the wall outlet before assembling or
removing accessories.
1. Turn off the vacuum and unplug
from wall outlet.
2. Attach the Air Driven Turbo
Brush to the extension tube.
3. Re-plug the vacuum into the wall
outlet and start the vacuum.
Beater bar on the Air Driven
Turbo Brush will begin to rotate
and will continue to operate as
long as the vacuum is “ON”.
4. The Deluxe Air Driven Turbo
Brush is adjustable for carpet
nap. The Compact Turbo Brush
is not. To adjust for high pile
carpet, move the slide control on
top of the brush housing as
shown in Fig. 1.
5. For low nap adjust the slide
control as shown in fig. 2.
NOTE: The air driven turbo brush may
not be used for wet pick-up. It is
important to monitor the water level in the
tank when using the unit for wet pick-up
to avoid filling water tank over the "Max"
level. "MAX" pick-up capacity is 8 cups
or 64 fl. oz.
WARNING:
Water level MUST NEVER
exceed the "Max" level indicated on the
water tank. Empty tank when water level
reaches "MAX" indicator. If water is seen
to be coming from the exhaust -
immediately turn the unit off and unplug
from electrical outlet. Empty water tank
and clean. Refill water tank with clean
water to the "MIN" level, then plug unit
back in and continue working.
Assembling the Base Casters
The casters for the base on your new
Bagless Water Filtration Vacuum are
packed and shipped unassembled. To
assemble the caster to the base,
simply insert the caster stem into one
of the four (4) holes in the base and
push downward with the palm of your
hand. (See illustration below.) Repeat
for the next three (3) casters.
Using Your Bagless Water
Filtration Vacuum
IMPORTANT: DO NOT operate this
vacuum when water level is below the
"Min" line on the water tank.
1. Unwrap the power cord to the
desired length.
2. Insert plug into electrical outlet.
3. Turn the "On/Off" Switch to the "On"
position.
4. The speed control knob can be used
to adjust the suction. The manual
variable suction control on the hand
grip can be used to further reduce
the suction.
5. Keep the flat space between the
floor brush and floor surface, hand
grip and extension tube and move
the vacuum cleaner up and down.
6. When finished using the unit, unplug
from electrical outlet and wrap the
power cord around the top of the
unit.
WARNING: The beater brush of this floor
attachment rotates very fast. To avoid
injury, DO NOT TOUCH the beater brush
with fingers while the brush is rotating.
4