Product - installation diagram, Introduction, Connecting the sfx – Smart Avi SFX User Manual
Page 2: Features, Learning the ddc
Introduction
The SFX is a perfect solution for extending DVI-D and
USB 2.0 signals from a computer in a remote location up
to 1,500 feet away. It supports high-resolution DVI-D
video and all USB device types from high-speed web
cams, hard drives, printers, scanners, audio devices,
touch screens, digital cameras and game controllers.
The SFX is immune to electromagnetic interference,
making it ideal for use in situations where there is
considerable interference. The SFX is also very secure
because it’s fiber optic signals cannot be easily tapped.
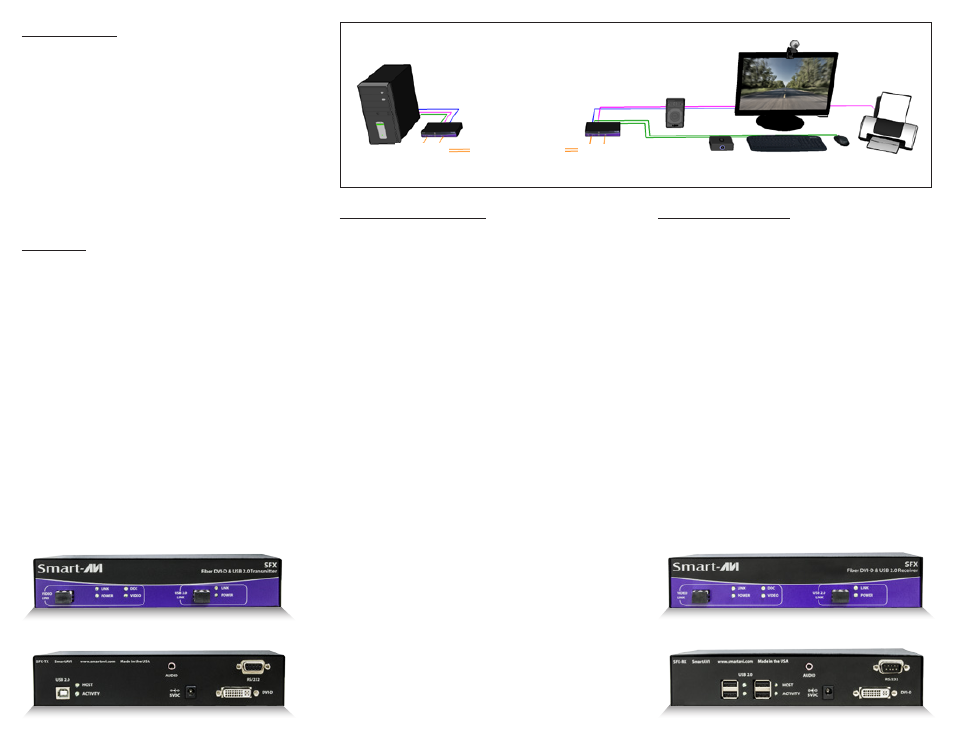
Connecting the SFX
1. Power off all devices.
2. Connect the DVI-D source (computer) to the DVI-D
port on the SFX-TX (transmitter).
3. Connect the USB source (computer) to the USB
port on the SFX-TX (transmitter).
4. Connect an audio source (computer) to the Audio
port on the SFX-TX (transmitter).
5. Connect the RS232 source (computer) to the
RS232 port on the SFX-TX (transmitter).
6. Connect the SFX-TX (transmitter) to the SFX-RX
(receiver) using 2 fiber optic cables up to 1,500
feet in length.
7. Connect a DVI-D display to the DVI-D port on the
SFX-RX (receiver).
8. Connect up to four USB 1.1 or 2.0 devices to
the integrated 4-port USB hub on the SFX-RX
(receiver).
9. Connect speakers to the audio port on the SFX-RX
(receiver).
10. Connect RS232 devices to the RS232 port on the
SFX-RX (receiver).
11. Connect the power supply to the SFX-TX and the
SFX-RX.
12. Power on the computer, display, USB devices,
speakers and RS232 devices.
Features
•
Top Signal Quality at Maximum Extension
Over Multimode Fiber (1,500 ft.) Plug Type LC
•
DVI-D Video Resolutions up to 1920 x 1200
WUXGA at 60Hz
•
Automatic Learning DDC for Mac/PC
•
Supports USB 1.1 (12 Mbps) and USB 2.0 (480
Mbps) data rates
•
Supports all USB device types transparently (no
emulation)from high-speed web cams, hard
drives, printers, scanners, audio devices, touch
screens, game controllers and more Integrated
Four-Port Hub in the receiver
•
Compatible with all operating systems
•
Extends Stereo Audio
•
Extends RS-232
•
Plug and play
SFX
Receiver
SFX
Transmitter
DVI-D Display
Computer
Stereo Speakers
Up to 1,500 feet over 2
pair fiber optic cables
USB 2.0
HARD DRIVE
USB 2.0
MOUSE
USB 2.0
PRINTER
USB 2.0 KEYBOARD
USB 2.0 WEBCAM
Product - Installation Diagram
SFX-TX Front
SFX-TX Rear
SFX-RX Rear
SFX-RX Front
Learning the DDC
1. Connect a DVI-D display to the DVI-D port on the
SFX-RX (receiver).
2. Connect the power supply to the SFX-RX
(receiver).
3. Power on the display.
4. Connect the SFX-TX (transmitter) to the SFX-RX
(receiver) using 2 fiber optic cables up to 1,500
feet in length.
5. Connect the power supply to the SFX-TX
(transmitter).
6. Wait 30 seconds until the VIDEO light on the SFX-
TX (transmitter) begins to blink.
7. The VIDEO light will continue to blink for
approximately 10 seconds, then it will be steady
for another 10 seconds.
8. The DDC has been learned.
9. Connect the video source (computer) to the SFX-
TX and power it on.