Introduction, Features, What’s in the box – Smart Avi SX-500 User Manual
Page 2: Installation diagram installation instructions, Quickstart
Introduction
The SX-500 is a combination of transmitter and
receiver devices designed to allow access to the PC
from a keyboard, mouse, and monitor at a remote
location up to 1000 ft. away.
Features
Provides remote access to the PC with
keyboard, mouse and monitor.
Uses a single CAT-5 UTP cable to reduce
installation costs
.
Extends signals up to 1000 ft.
Supports all PC/AT and PS/2 keyboards with
full emulation
.
Caps Lock, Num Lock, and Scroll Lock are
automatically saved and restored.
Supports full emulation and conversion on all
PC/AT and PS/2 mice
.
Recognizes and supports a mix of PC/AT and
PS/2 mice.
Compatible with Windows, NT, OS/2, UNIX,
Linux, and other operating systems.
Supports computer monitors with resolutions
of up to 1600x1200.
Offers adjustable cable compensation.
Compact metal enclosure.
Supports stereo audio.
Supports RS232 from 300bps to 19,200 bps.
Compensation for each color.
What’s in the box?
SX-500
SX-500
SX-500
SX-500
SX-500
Please check the contents of the package before
beginning installation.
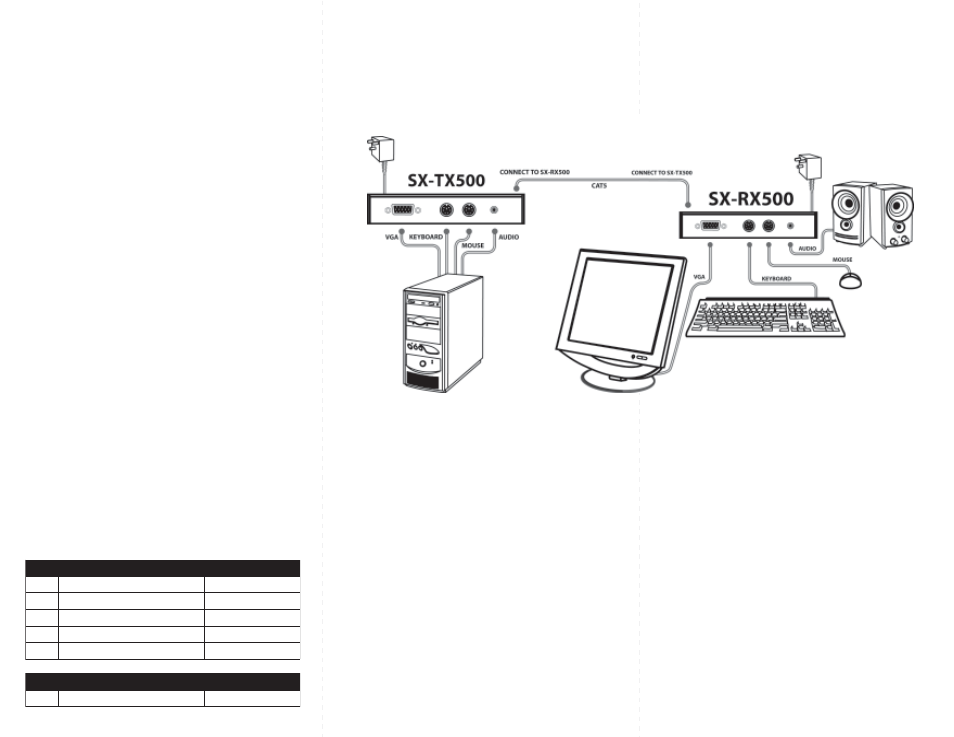
Installation Diagram
Installation Instructions
System Power Up
System Power Up
System Power Up
System Power Up
System Power Up
1. Connect the 9 volt power supplies to the transmitter
and receiver.
2. Turn the system on by plugging in the power adapter,
if it is not yet connected.
3. Power up your computer.
4. Observe to see if both transmitter and receiver power
LEDs are ON, and computer has finished the boot
up process.
5. Observe monitor at receiver end to see if signal is
going through.
Before you power up, ensure that all cables are properly
connected as shown in the diagram below.
Quickstart
1. Connect the video out, keyboard and mouse ports
on your computer to the transmitter using the
supplied KVM cable.
3. Connect the power adapter to the transmitter and
the receiver.
4. Optional - Connect the RS232 on your computer to
the RS232 port on the transmitter unit.
5. Connect a CAT5 cable to the transmitter and run it
over to the receiver.
6. Connect peripherals to the receiver. I.E. keyboard,
mouse, monitor, and optionally a serial device.
7. Once everything is connected power on your
computer and the SX-500 unit.
t
n
e
t
n
o
C
e
g
a
k
c
a
P
0
0
5
-
X
S
t
n
e
t
n
o
C
e
g
a
k
c
a
P
0
0
5
-
X
S
t
n
e
t
n
o
C
e
g
a
k
c
a
P
0
0
5
-
X
S
t
n
e
t
n
o
C
e
g
a
k
c
a
P
0
0
5
-
X
S
t
n
e
t
n
o
C
e
g
a
k
c
a
P
0
0
5
-
X
S
y
t
Q y
t
Q y
t
Q y
t
Q y
t
Q
n
o
i
t
p
i
r
c
s
e
D
n
o
i
t
p
i
r
c
s
e
D
n
o
i
t
p
i
r
c
s
e
D
n
o
i
t
p
i
r
c
s
e
D
n
o
i
t
p
i
r
c
s
e
D
r
e
b
m
u
N
t
r
a
P
r
e
b
m
u
N
t
r
a
P
r
e
b
m
u
N
t
r
a
P
r
e
b
m
u
N
t
r
a
P
r
e
b
m
u
N
t
r
a
P
1
r
e
t
t
i
m
s
n
a
r
T
0
0
5
-
X
S
0
0
5
X
T
-
X
S
1
r
e
v
i
e
c
e
R
0
0
5
-
X
S
0
0
5
X
R
-
X
S
2
y
l
p
p
u
S
r
e
w
o
P
A
1
C
D
V
9
S
U
-
A
1
D
9
-
S
P
1
M
V
K
e
l
a
m
e
F
o
t
e
l
a
M
6
0
-
F
M
M
V
K
-
C
C
s
e
i
r
o
s
s
e
c
c
A
l
a
n
o
i
t
p
O
s
e
i
r
o
s
s
e
c
c
A
l
a
n
o
i
t
p
O
s
e
i
r
o
s
s
e
c
c
A
l
a
n
o
i
t
p
O
s
e
i
r
o
s
s
e
c
c
A
l
a
n
o
i
t
p
O
s
e
i
r
o
s
s
e
c
c
A
l
a
n
o
i
t
p
O
1
e
l
b
a
C
o
i
d
u
A
o
e
r
e
t
S
m
m
5
.
3
6
0
-
M
M
A
M
M
-
C
C
9V
9V
5V DC 2A Power Supply
PS-5D2A-US
5
5