Introduction, Connecting the dvnet-4pro, Controlling the dvnet-4pro – Smart Avi DVN-4Pro User Manual
Page 2: Application diagram, Dvnet-4pro rear edid learning, Features
INTRODUCTION
DVNET-4Pro is a dedicated multi-platform KVM switch
capable of managing up to 4 different computers through
a single DVI-D monitor, USB keyboard & mouse, a single
set of speakers and a USB 2.0 Device. It features USB
keyboard and mouse emulation for faster and reliable
switching through the use of hotkey sequence commands.
It is also RS-232 compliant, capable of being controlled
remotely via third-party software.
CONNECTING THE DVNET-4Pro
1. Ensure that power is disconnected from DVNET-
4Pro.
2. Connect the DVI cables, USB cables (male-A to male
-B), and audio cables from the computers to the
respective ports on the DVNET-4Pro.
3. Optionally connect RS-232 for control functions.
4. Connect the USB keyboard and mouse on the two
USB ports on the right (close to the RS-232 port).
Note: The 2 USB ports on the right are dedicated for
keyboard and mouse emulation. The 2 on the left
are for other USB peripherals (flash drives, printers,
etc.)
5. Connect the speakers into the Audio Out port lo-
cated above the USB ports.
6. Connect the display monitor to the DVI OUT connec-
tor on the DVNET-4Pro.
7. Power on the DVNET-4Pro.
CONTROLLING THE DVNET-4Pro
Front Panel Control
To switch ports using the front panel, press the UP button to navigate up and DOWN button for down.
EDID learning
EDID learning
EDID learning
EDID learning is also done through the front panel buttons by pressing both buttons simultaneously.
RS-232 Control
Use a male-to-female serial cable to connect a computer to the RS-232 port of the DVNET-4Pro. Use terminal
client software such as the HyperTerminal
HyperTerminal
HyperTerminal
HyperTerminal to connect to the DVNET-4Pro
.
Make sure to use the standard com-
munication mode of 9600 bps, 8, N, 1. This port can also be used for software upgrade. Please refer to online
manual for more details.
Hotkey Commands
The Hotkey command is a keyboard sequence used to trigger an action on the DVNET-4Pro through the use of
the keyboard connected on the USB port of the DVNET-4Pro. To activate the hotkey sequence, press the CTRL
key twice and then enter the desired hotkey commands.
COMMANDS
HOTKEYS
RS-232 CONTROL
Switch all devices (KVM, USB 2.0, and Audio) [CTRL] [CTRL] m
m
m
m [port #] [ENTER]
//m
m
m
m[port #]
Switch KVM only
only
only
only
[CTRL] [CTRL] c
cc
c [port #] [ENTER]
//c
cc
c[port #]
Switch audio only
only
only
only
[CTRL] [CTRL] a
a
a
a [port #] [ENTER]
//a
a
a
a[port #]
EDID Learning
[CTRL] [CTRL] e
e
e
e [ENTER]
//e
e
e
e
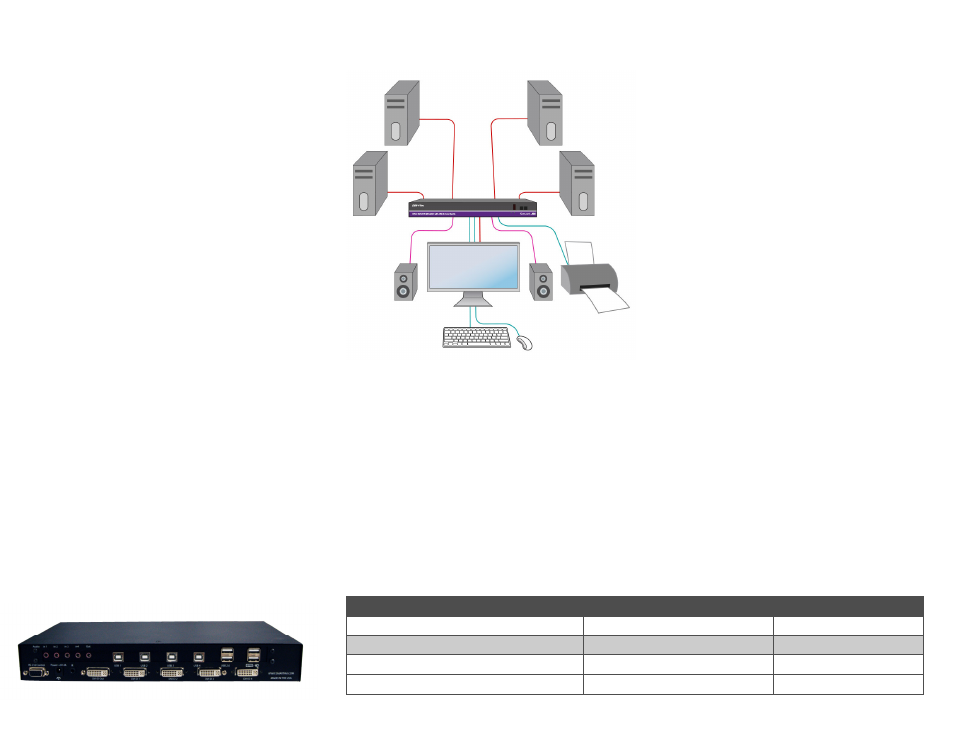
APPLICATION DIAGRAM
USB INPUTS
AUDIO
KEYBOARD
& MOUSE
DVI INPUTS
DVI OUTPUT
DVNET-4Pro REAR
EDID LEARNING
The DVNET-4Pro is fully capable of “learning” and remem-
bering what type of display monitor is connected to the
unit. With its EDID learning feature, the DVNET-4Pro pro-
vides plug-and-play capability to its display.
Programming the EDID can be accomplished through the
Front
Front
Front
Front----Panel buttons
Panel buttons
Panel buttons
Panel buttons or through RS
RS
RS
RS----232
232
232
232.
Please refer to the “Controlling the DVNET-4Pro” section of
the manual for more info.
FEATURES
•
Compatible with Windows, Mac and Linux Operating
Systems
•
Supports up to 1920x1200 digital video resolution
•
Uses universal DVI single-link connectors
•
Supports all USB 2.0 Devices (Flash drives,
Printers, Cameras, Scanners, etc.)
•
Supports USB keyboard and mouse emulation
•
Balanced stereo audio output
•
Front panel tactile switch with LED display for local
control
•
RS-232 control for additional control
•
Special Hotkey keyboard sequence to switch independ-
ent simultaneous device selection: Flexibility is key to
the DVNET-4Pro