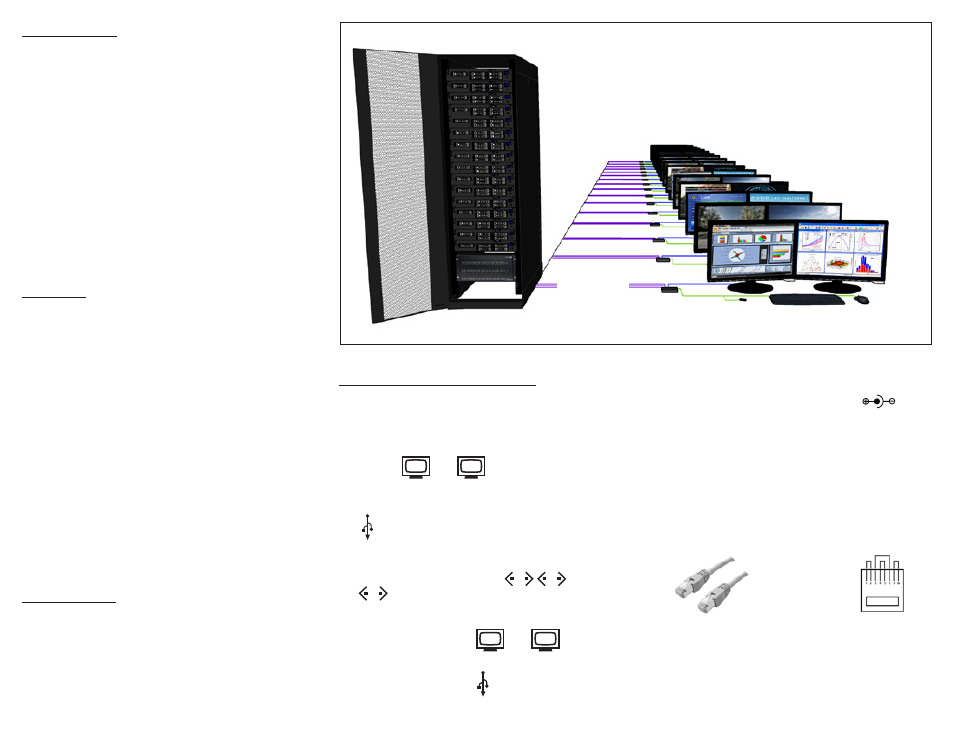
Product - installation diagram, Introduction, Applications – Smart Avi RK-DVX2U User Manual
Page 2: Features, Connecting the rk-dvx2u
up to 275 ft
over 3 STP cables
RK-DVX2U-TX
DVX2U-RX
USB FLASH DRIVE USB KEYBOARD
USB MOUSE
DVI-D MONITORS
COMPUTERS
Introduction
The RK-DVX2U is the perfect solution for extending dual
DVI-D displays and USB 1.1 devices to a remote location
up to 275 feet away. It is the ideal way to consolidate
up to 16 workstation computers into one location. The
RK-DVX2U features dual DVI-D extension up to 275 feet
over STP. It is fully compatible with MAC, PC and LINUX
DVI standards.
The RK-DVX2U also features transparent USB 1.1 signal
extension, with full support for all USB 1.1 devices and
an integrated 4-port hub in the receiver. Flash Drives,
Printers, Cameras, Scanners, etc. may all be used with the
RK-DVX2U.
Applications
•
Medical Applications
•
Industrial Work Areas
•
Home Theater Integration
•
Digital Signage Deployment
•
Information Kiosks/Displays
•
Film/Recording Studios
Features
•
Supports up to 2 DVI-D single-link sources
•
Supports Mac, PC, and Linux DVI
•
Supports High Resolution 1920x1200 60Hz
WUXGA
•
Distance: 275 feet with three CAT6 STP cables
•
Uses universal DVI Single Link connectors
•
Zero pixel loss with TMDS signal correction
•
DDC from internal table for Mac/PC
•
Supports all USB 1.1 Devices Transparently
(Flash Drives, Printers, etc.)
•
Supports USB 1.1 keyboard and mouse
•
Compatible with all operating systems
•
Compatible with all major KVM switches
•
Rack Mountable Solution
•
Data recovery for digital video
•
Supports 1.5 and 12Mbps data rates
•
Plug-and-play
Product - Installation Diagram
The following is the wiring standard for terminating UTP/STP
cable using RJ-45 connector:
Connectors: RJ-45
Capacitance:
14 pf/ft (46.2 pf/m)
Conductor Gauge:
24 AWG
Impedance:
100 +/- 15 ohms
Pair 1
Pins 1 & 2
Pair 2
Pins 3 & 6
Pair 3
Pins 4 & 5
Pair 4
Pins 7 & 8
Connecting the RK-DVX2U
1. Power off all devices.
2. Connect two DVI-D sources (computer) to each of
the 16 DVI-D ports on the rear of the RK-DVX2U-TX
labeled and .
3. Connect two USB sources to each of the 16 USB
ports on the rear of the the RK-DVX2U-TX labeled
.
4. Connect the RK-DVX2U-TX to the the DVX2U-RX
with three STP (Sheilded Twisted Pair) cables using
each the front ports labeled and
.
5. Connect a DVI monitor to the ports on the rear of
the DVX2U-RX labeled and .
6. Connect up to 4 USB 1.1 devices to the ports on
the DVX2U-RX labeled .
1
2
1
2
3
1
2
7. Connect the power to the ports labeled POWER
110-240V on the RK-DVX2U-TX and on
the DVX2U-RX.
8. Power on the computers, displays and USB 1.1
devices.