Introduction, Features, What’s in the box – Smart Avi SDX-2P User Manual
Page 2: Connecting the sdx-2p, Installation diagram, Applications
INTRODUCTION
Using HDBaseT technology, the SDX-2P DVI extender
is capable of sending dual DVI-D signals up to 400
feet over two conventional and inexpensive
CAT5/5e/6 cable. HDBaseT technology is superior to
older DVI extenders that require special CAT6
shielded cable to go a short distance.
The SDX-2P also has USB keyboard and mouse, au-
dio and RS232 extension, giving you the ability to
control your displays or devices remotely.
FEATURES
Extends dual DVI-D up to 400 feet (120m) from
the source
HDCP Support
Supports up to 1920x1200 digital video resolu-
tion
Automatic DDC Learning
USB Keyboard and Mouse extension
Uncompressed Video HDBaseT
RS232 extension allows for remote control of dis-
plays
External power adapter for transmitter and re-
ceiver unit
Supports Stereo Sound
Compatible with Windows, Mac and Linux Operat-
ing Systems
To reach maximum dis-
tances with HDBaseT tech-
nology, it is recommended
to use the best possible
quality cable available.
CAT5e/6 shielded cabling is
ideal for best performance.
PART NO.
QTY DESCRIPTION
SDX-2P-RX
1
SDX-2P Receiver. Dual DVI-D,
Dual RS232, USB & Audio Re-
ceiver over CAT5/5e/6
SDX-2P-TX
1
SDX-2P Transmitter. Dual DVI-
D, Dual RS232, USB & Audio
Transmitter over CAT5/5e/6
Power Supply 2
PS5VDC4A
WHAT’S IN THE BOX?
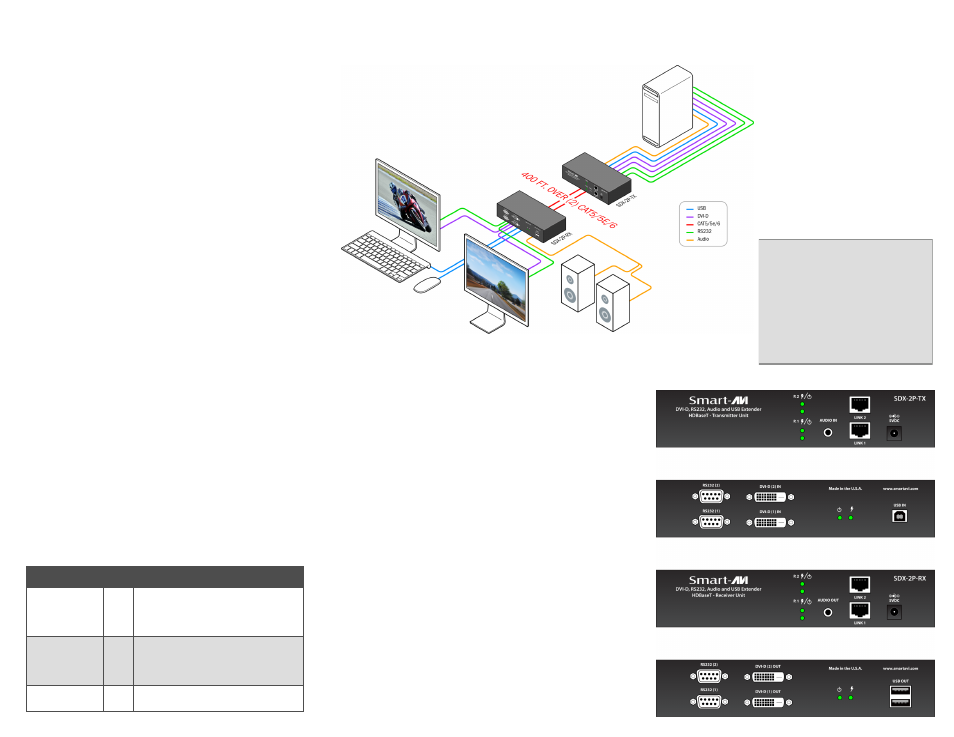
CONNECTING THE SDX-2P
1. Power off all devices.
2. Connect two DVI-D sources (computer) to the
two DVI-D ports on the back of the SDX-2P-TX.
3. Connect a USB source (computer) to the USB
port on the SDX-2P-TX.
4. Optionally connect RS232 for control functions.
5. Connect the SDX-2P-TX to the SDX-2P-RX with
two CAT5 UTP (Unshielded Twisted Pair) cables.
6. Connect a DVI-D compatible display to each of
the two DVI-D ports on the back of the SDX-2P-
RX.
7. Connect USB keyboard and mouse to the USB
ports on the SDX-2P-RX.
8. Optionally connect RS232 for control functions.
9. Connect the power to the SDX-2P-RX and the
SDX-2P-TX.
10.Power on the display and then the computer.
The DDC of your display will be learned automatically.
INSTALLATION DIAGRAM
SDX-2P-TX Front
SDX-2P-TX Back
SDX-2P-RX Front
SDX-2P-RX Back
APPLICATIONS
Digital Signage
Security
PC Networking
Conference Center Systems
Point of Sale
Camera Surveillance
Video Phone
Control Room Systems
Recording Studio
PC KVM Extension