Product - installation diagram, Introduction, Connecting the dvx-multi – Smart Avi DVX-Multi User Manual
Page 2: Applications, Features, Setting the ddc
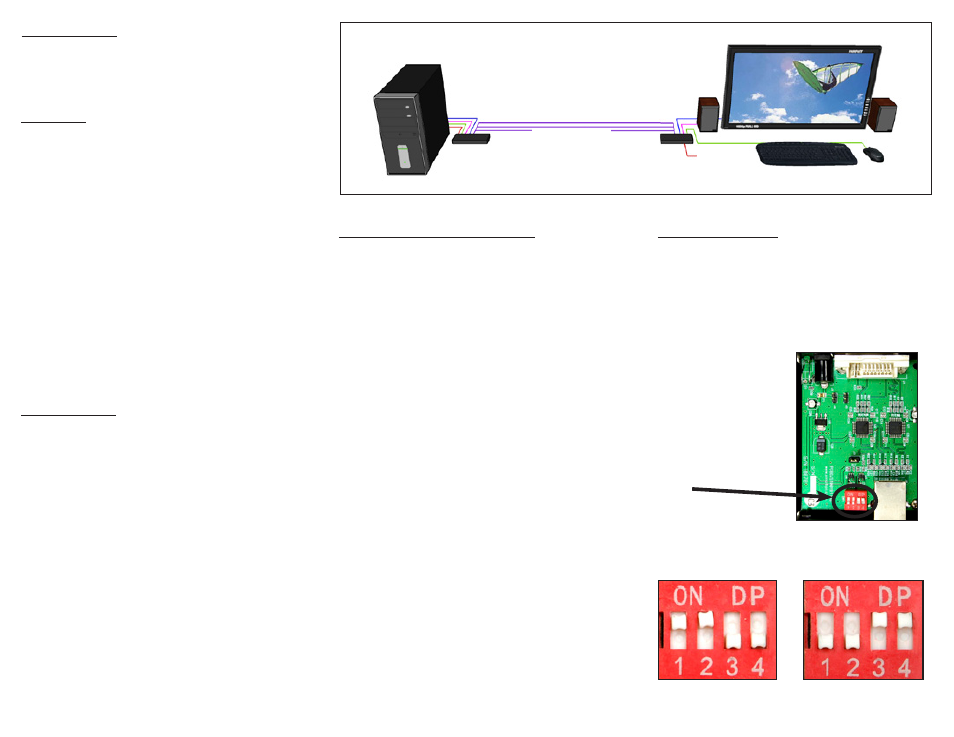
up to 275 ft over STP
DVX-Multi-TX
DVX-Multi-RX
RS232
USB KEYBOARD
USB MOUSE
DVI-D DISPLAY
STEREO SPEAKERS
COMPUTER
Introduction
The DVX-Multi extends DVI-D, RS232, USB 1.1 and Audio
up to 275 feet over 3 STP Cables.
Connecting the DVX-Multi
1. Power off all devices.
2. Connect a DVI-D source (computer) to the DVX-
Multi-TX.
3. Connect an audio source to the DVX-Multi-TX.
4. Connect a USB source to the USB port of the the
DVX-Multi-TX.
5. Connect RS232 devices to the DVX-Multi-TX.
6. Connect the DVX-Multi-TX to the the DVX-Multi-
RX with three STP (Sheilded Twisted Pair) cables.
7. Connect a DVI display to the DVX-Multi-RX.
8. Connect speakers to the DVX-Multi-RX.
9. Connect up to 4 USB 1.1 devices to the DVX-Multi-
RX.
10. Connect RS232 devices to the DVX-Multi-RX.
11. Connect the power supply the DVX-Multi-TX and
DVX-Multi-RX.
12. Power on the computer, displays, speakers, RS232
devices and USB 1.1 devices.
Applications
•
Medical Applications
•
Industrial Work Areas
•
Home Theater Integration
•
Digital Signage Deployment
•
Information Kiosks/Displays
•
Film/Recording Studios
Features
•
Top image quality at all resolutions
•
Resolutions up to 1920 x 1200 at 60Hz (1280 x
1024 at 75Hz)
•
Distance: 275 feet with 3 CAT6 STP cables
•
Compatible with all operating systems
•
Compatible with all major KVM switches
•
Rack mount options (19)
•
Supports USB 1.1 keyboard and mouse
•
Uses easy-to-install, inexpensive pair cable
•
Data recovery for digital video
•
Fully-compliant with USB 1.1 specifications
•
Supports 1.5 and 12Mbps data rates
•
External power adaptors for transmitter and
receiver units
•
Fully-transparent (does not use any emulation)
•
Plug-and-play
Product - Installation Diagram
Setting the DDC
DDC provides plug-and-play capability to your
displays. When you plug a display into your computer,
the DDC table in the display tells the computer the
optimal resolution to use.
The DVX-Multi is capable of
supporting two primary types of displays: PC and Mac.
The default setting is PC.
For Mac, configure the
switches as shown below:
For PC, configure the
switches as shown below:
1&2 ON, 3&4 OFF
1&2 OFF, 3&4 ON
To change this setting,
first remove the top cover
from the DVX-Multi
TRANSMITTER
by removing the four side
screws. Next, locate the
DIP switches near the rear
of the device next to the
Data Port (RJ45 Ethernet
Port).