Dip switches and buttons, Remote control, Figure 3 – Paloma DUOnex 2-Unit System User Manual
Page 2: Figure 4
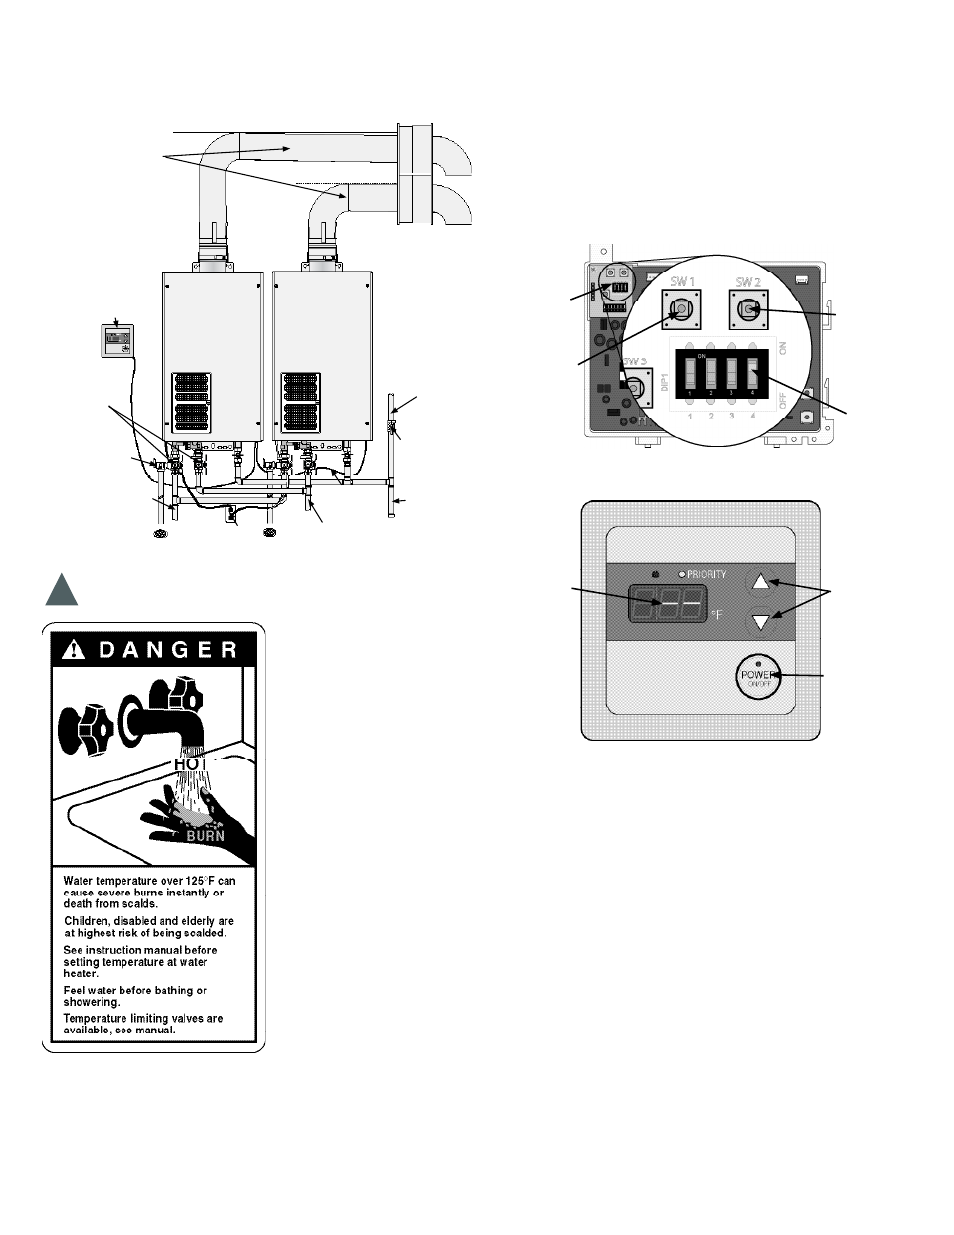
Danger - Water Temperature Setting
Safety and energy conservation are factors to be con-
sidered when selecting the water temperature setting
of a water heater’s remote
control. Water temperatures
above 125°F (52°C) can
cause severe burns or death
from scalding. Be sure to
read and follow the warnings
outlined on the label pictured
to the left and information
in the Instruction Manual
provided with your tankless
water heater.
2
Typical Two Unit Manifold - Figure 2
Review the Instruction Manual provided with the water
heater for complete information and installation instruc-
tions.
Max Temperature
Adjustment - The factory
default temperature setting
is 120°F (49ºC). Follow
these instructions to set
the system to allow up to
140°F (60ºC) for Residential
model and 180ºF (82ºC) for
Commercial model.
Note: Only the UMC-117
Main Remote Control can
be used for 140°F (60ºC) or 180ºF (82ºC) operation.
Turn off the system at the remote control.
At water heater with the remote control connected, change
the #4 dip switch setting (see fi gure 3) to the “OFF” posi-
tion. Wait two seconds, and change the #4 dip switch set-
1.
2.
ting back to the “ON” position. The display on the remote
control will begin to blink a “dash”. (see fi gure 4)
While the remote is blinking a “dash” push and hold the
“SW2” button (see fi gure 3) for three seconds. The display
on the remote control will stop blinking and show a solid
“dash”.
Turn on the system at the remote control and adjust to the
desired temperature (see fi gure 4).(Leave the #4 dip switch
in the “ON” position.)
120°F (49ºC) Max Temperature Reset - Follow these
instructions to reset back to 120°F (49ºC) Factory Maximum
temperature setting.
Turn off the system at the remote control.
At the water heater with the remote control connected,
change the #4 dip switch setting (see fi gure 3) to the
“OFF” position. Wait two seconds and turn it back to the
“ON”. The remote control will display a solid “dash” (see
fi gure 4).
Next push and hold the “SW1” button for three seconds.
The display on the remote control will begin to blink a
“dash”.
Turn on the system at the remote control and adjust to the
desired temperature (see fi gure 4).
3.
4.
1.
2.
3.
4.
Venting
Follow the
instructions in
the instruction
manual.
Units cannot
be common
vented.
Gas Supply
Follow the
instructions in
the instruction
manual for
proper pipe
sizing.
Unit 2
Unit 1
Cold Water
Supply
Hot Water
to fi xtures
Remote
Control
Gas supply
and cut off
Relief Valve piped
to suitable drain.
See the instruction
manual for detailed
instructions.
Drip Leg
Grounded
Outlet
DUOnex™
Cable
Water Isolation
Valves
Dip Switches and Buttons -
Figure 3
Dip Switch
Position #4
Switch 2
Switch 1
Control
Switches and
Buttons
!
Remote Control -
Figure 4
Power Button
LED Display
Temperature
Adjustment
Buttons
To Drain Water Heater - When draining water heaters, fi rst
return the #4 dip switch setting to the “OFF” position. Follow
steps in the Instruction Manual.