Connecting a computer, Using your tv, About the symbol – Dynex DX-LTDVD22-09 User Manual
Page 11: Turning your tv on or off, 11 connecting a computer, About the, Symbol
Using your TV
11
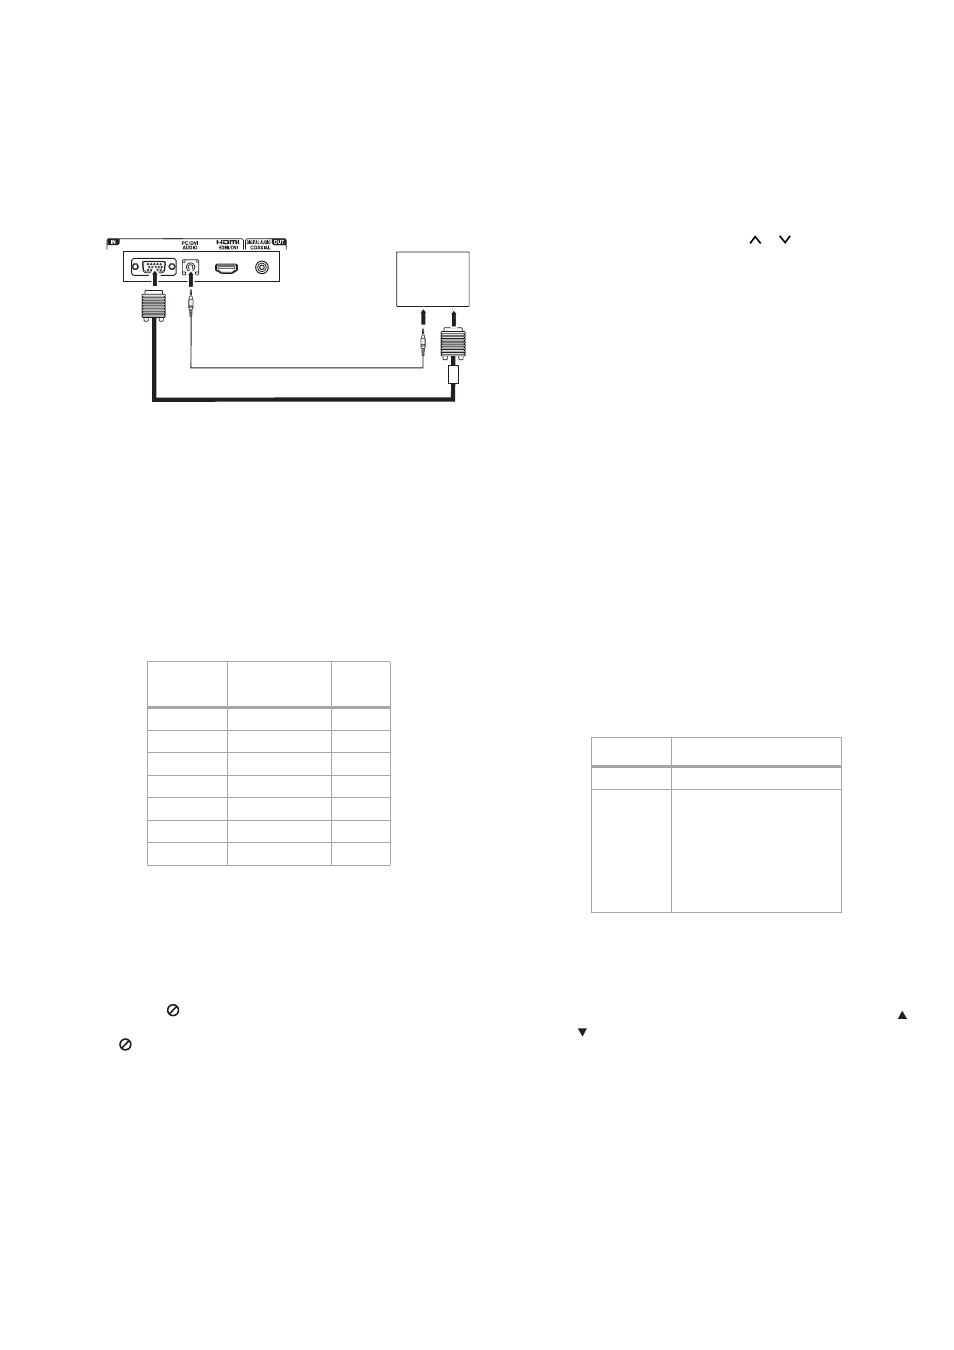
Connecting a computer
The TV can operate as the computer monitor.
To connect a computer:
1 Connect one end of a VGA cable to the VGA jack on the computer,
then connect the other end of the cable to the VGA
IN jack on the
back of your TV.
2 Connect one end of a mini-plug audio cable to the
AUDIO LINE OUT jack on the computer, then connect the other
end of the cable to the PC/DVI AUDIO IN jack on the back of your
TV.
3 Press INPUT SELECT on the remote control to select PC mode.
Turn on the computer.
4 To return to normal mode, press INPUT again and select another
mode.
Notes:
The on-screen displays have a different appearance in PC mode than in TV
mode.
If there is no video signal from the computer when the TV is in PC mode,
“No signal” appears on the TV screen.
Note: This TV does not support Plug and Play connection to PC. Also, the
PC may need to be set for proper resolution, based on above chart.
Using your TV
About the
symbol
The
symbol may appear on your TV display during operation and
indicates that the function is not permitted by your player or specific
media.
Turning your TV on or off
To use your TV:
1 Plug in your TV (see “Connecting the power” on page 9).
2 Press POWER.
Warning: When you press POWER to turn off your TV, your TV goes into
Standby mode. It is still receiving electrical power. To completely
disconnect power, unplug the power cord.
Note: When your TV does not receive a signal and you do not press any
buttons for 15 minutes, your TV goes into Standby mode.
3 Adjust the volume by pressing VOL+ or -. You can also press
MUTE to turn off the sound. The TV’s sound turns off and “Mute”
appears on the screen. The sound can be turned back on by
pressing this button again or the VOL + or –.
4 Set the signal type to the appropriate position (see “To select the
signal type:” on page 12).
5 Select a channel by pressing CH
or . The channel
automatically stops at the next channel set into memory. See
“Memorizing channels” on page 12.
- OR -
Select a channel by pressing the number buttons (0-9). (If you
press only the channel number, channel selection is delayed for a
few seconds.)
To select analog channels:
• 1-9: Press 1-9 as needed. For example, to select channel 2,
press 2.
• 10-99: Press the two digits, in order. For example, to select
channel 12, press 1, 2.
• 100-125: Press the three digits, in order. Example, to select
channel 120, press 1, 2, 0.
To select digital channels:
Press the first three digits, then press the – button, followed by
the remaining number. For example, to select channel 015-001,
press 0, 1, 5, –, 0, 0, 1.
• If a channel with only audio content is selected, “Audio only”
is displayed on the screen.
• If a channel with a weak digital signal is selected, “Digital
channel signal strength is low” is displayed on the screen.
• The same program may be available on either an analog
channel or a digital channel. You can choose to watch either
format.
• If a channel to which you have not subscribed is selected,
“Digital channel is encrypted” is displayed on the screen.
Notes:
If a channel with no broadcast is selected, the sound is automatically
muted.
It may take a few seconds for a digital channel picture to appear on the
screen after being selected.
6 Select the video input source by pressing INPUT, then press or
or the corresponding number buttons (0-5), then press
ENTER. You can select TV, Video, Component, HDMI, PC, or
DVD, depending on which input jacks you used to connect your
devices and which devices are connected.
7 Press DISPLAY to display information about the program on the
screen.
• Digital information includes channel number, channel label
(if preset), broadcast program name, V-chip rating, signal
type, sleep timer, audio language, program guide, picture
size, and resolution. Analog information includes channel
Mode
Resolution
Refresh
rate
VGA
640 × 480
60 Hz
VGA
720 × 400
70 Hz
SVGA
800 × 600
60 Hz
XGA
1024 × 768
60 Hz
WXGA
1280 × 768
60 Hz
WXGA
1280 × 720
60 Hz
WXGA
1360 × 768
60 Hz
VGA
Computer
Mini audio cable
VGA cable
Back of TV
Air
Cable
VHF 2-13
VHF 2-13
UHF 14-69
STD/HRC/IRC
14-36 (A)
(W)
37-59
(AA) (WW)
60-85
(AAA) (ZZZ)
86-94
(86) (94)
95-99
(A-5) (A-1)
100-125 (100) (125)
01
(5A)