Interactive Toy Concepts Shooting Gallery User Manual
Page 2
The SHOOTING GALLERY has been carefully packaged to avoid damage during shipping.
PLEASE USE CAUTION WHEN UNPACKING.
UNPACKING YOUR SHOOTING GALLERY:
To prevent damage during shipping the SHOOTING GALLERY is securely located in the package.
Please ensure that all of the plastic bags found in the box have been safely disposed of and are out of the
reach of children. Plastic bags present a choking hazard to small children. Be very careful when removing
the SHOOTING GALLERY to prevent damaging any of the components.
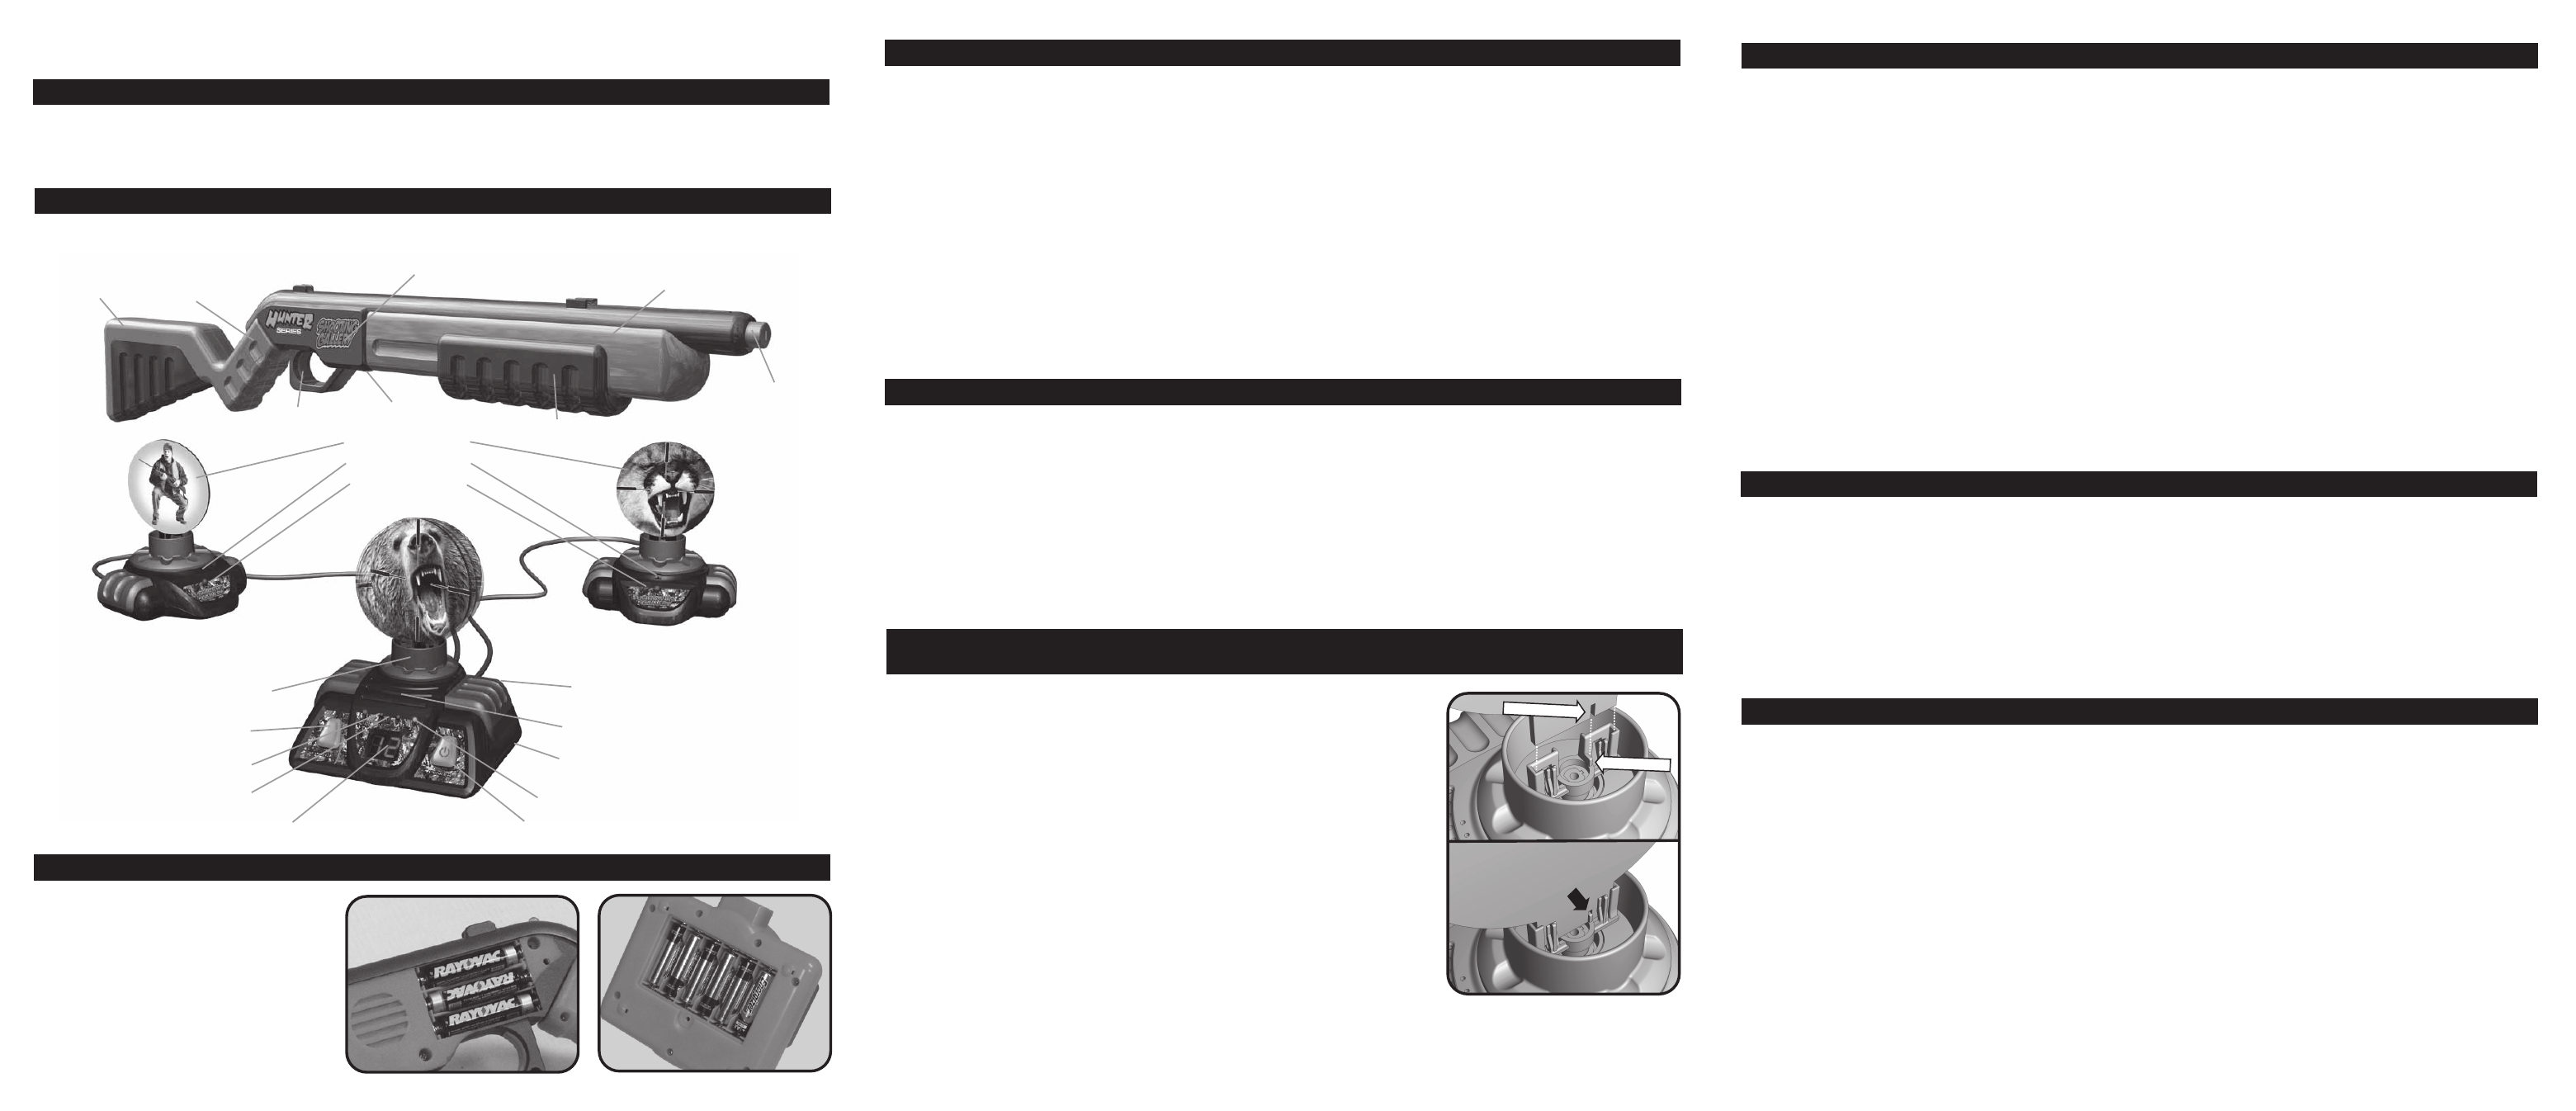
COMPLETE PACKAGE CONTENTS AND COMPONENT BREAKDOWN:
IR Blaster (comes in 2 easy to assemble parts)
Main Target Pod
Side Target Pod B
Side Target Pod C
Swiveling Target
Slot A
Cardboard Targets
Battery Compartment Door
(underside)
Power Button
Mode Button
3 Green Mode LEDs
Red Action LED
Speaker
Infrared Receiver
Score Display
2 Sockets for Side
Taget Pods B and C (back)
Infrared Receivers
Red Action LEDs
Butt Stock
Push Tab
Main Housing
ON/OFF Switch
Trigger
Battery Compartment DoorMain Housing
Safe Infrared
Beam Emitter
Reload Pump
INSTALLING BATTERIES:
The IR Blaster uses 3 “AAA” batteries.
The Main Target Pod uses 4 “AA”
batteries. The 2 Side Target Pods do
not require any batteries as they are
connected to the Main Target Pod.
(All batteries are sold separately.) No
charging is required of any
components in the SHOOTING
GALLERY. Once the batteries are
inserted, the toy is ready to play.
INSTALLING BATTERIES -Continued
SHOOTING GALLERY IR Blaster Battery Installation
1. Open the battery compartment door located at the upper left side of the IR Blaster by using a Philips
screwdriver (not included).
2. Insert the 3 AAA batteries according to the picture (shown). Ensure that the + and – polarities match the
illustrations inside the battery compartment.
3. Replace the battery compartment door and tighten the screw using the screwdriver. Do not over tighten.
SHOOTING GALLERY Main Target Pod battery Installation:
1. Ensure that the Main Target Pod is turned off.
2. Open the battery compartment door located at the bottom of the Main Target Pod by using a Philips
screwdriver (not included).
3. Insert the 4 AA batteries according to the picture (shown). Ensure that the + and – polarities match the
illustrations inside the battery compartment.
4. Replace the battery compartment door and tighten the screw using the screwdriver. Do not over tighten.
ASSEMBLING THE IR BLASTER:
The IR Blaster requires minimum assembly. By mounting the Butt Stock onto the IR Blaster, the ergonomics
of the toy will be greatly improved. Removing the Butt Stock from the IR Blaster may improve its storage
when not in use. Follow these simple steps to assemble the IR Blaster.
1. Locate the Main Housing of the IR Blaster as well as the Butt Stock in the package.
2. Slide the Butt Stock onto the Main Housing of the IR Blaster until it clicks into position. The Butt Stock
will only fit one way.
Note: To remove the Butt Stock from the IR Blaster for storage purposes, simply press the two tabs on either
side of the Butt Stock that have the text “PUSH” molded into them and slide the Butt Stock off.
PREPARING THE TARGET PODS:
INSERTING THE TARGETS INTO THE PROPER TARGET POD SLOTS:
There are 3 Cardboard Targets included with the SHOOTING GALLERY.
Each Target has to be mounted correctly on the proper Target Pod for the
SHOOTING GALLERY game to work properly. Target A fits with the Main
Target Pod. Targets B and C fit with the 2 Side Target Pods. Please note,
the 2 Side Target Pods are identical, so Target B or C can be mounted on
either Side Target Pod. However, once Targets B and C are mounted into
the Side Target Pods, the Side Target Pods will need to be connected to
the Socket with the corresponding letter (B or C) on the Main Target Pod.
Follow the next steps to mount the Cardboard Targets onto their
respective Swiveling Target Slots.
1. Select the matching Target Pod and Cardboard Target.
2. Note the small cut-out notch located on the bottom of the Cardboard
Target. Locate the corresponding raised notch on the Swiveling Target
Slot on the Target Pod.
3. Line up the notches on the Cardboard Target and the Swiveling Target Slot.
4. Gently Insert the Cardboard Target into the Swiveling Target Slot as shown.
5. Follow steps 1 through 4 for the remaining 2 Targets.
NOTE: IF THE NOTCHES ON THE CARDBOARD TARGET AND THE SWIVELING TARGET SLOT DO
NOT MATCH UP PROPERLY, THE TARGETS WILL BE MOUNTED INCORRECTLY AND THE SHOOTING
GALLERY GAME WILL NOT WORK PROPERLY!
CONNECTING THE SIDE TARGET PODS TO THE MAIN TARGET POD:
Once all 3 Targets are in their proper Swiveling Target Slots you will need to connect the Side Target Pods
to the Main Target Pod. Connecting the Target Pods is very easy as they use standard “telephone jacks” to
connect to each other. Follow these easy steps to connect all 3 Target Pods.
1. Locate the 2 Sockets at the back of the Main Target Pod. The 2 Sockets are labeled B and C.
2. Locate the Side Target Pod B (with Target B mounted onto it). Insert the Side Target’s Wire Connector
into Socket B at the back of the Main Target Pod.
3. Locate the Side Target Pod C (with Target C mounted onto it). Insert the Side Target’s Wire Connector
into Socket C at the back of the Main Target Pod.
NOTE: IT IS CRITICAL TO CONNECT THE CORRECT TARGET ONTO THE CORRECT TARGET POD.
BOTH SIDE TARGET PODS ARE IDENTICAL WITH THE ONLY DIFFERENCE BEING THE TARGETS
THEMSELVES. THE FOLLOWING COMBINATIONS WILL WORK ONLY:
Main Target Pod – Cardboard Target A (Bear / Hunter)
Side Target Pod B – Cardboard Target B (Mountain Lion / Hunter)
Side Target Pod C – Cardboard Target C (Wolf / Hunter)
CHOOSING YOUR PLAYING LOCATION:
The HUNTER SERIES: SHOOTING GALLERY is intended for indoor use only. The Infrared Beam used by
the IR Blaster is completely safe. In order to work properly the Target Pods must face the user directly.
Under normal operation, the targets will be perpendicular to the user until they swivel. For the most
challenging game play, the Target Pods should be placed as far apart as possible. Each Side Target Pod
has a 5.5’ (1.7 M) Connector Wire. When all 3 Targets are connected together, they will have a total span of
about 11’ (3.5 M). The 3 Target Pods can be placed at different elevations to create a more challenging
game play. If the Target Pods are too close together (nearly adjacent) their Infrared Sensors may become
confused and the wrong targets may be hit. The SHOOTING GALLERY will operate best in a room which
does not have very bright light or many reflective surfaces. A common house room should be the ideal
operating environment for the SHOOTING GALLERY.
PLAYING WITH YOUR SHOOTING GALLERY:
You can start playing SHOOTING GALLERY as soon as the Target Pods are assembled and the batteries
are inserted. There is no charging necessary! The objective of the SHOOTING GALLERY game is to score
the most points by shooting the most correct targets, and least wrong targets within a one minute time frame.
The SHOOTING GALLERY can be played as a 1 player or 2 player (or more) game. In 1 player mode, the
player tries to shoot as many correct targets as possible while avoiding shooting the wrong targets. The goal
is to improve the final score. In 2 or more player mode, all players take turns in attempting to shoot as many
correct targets as possible, without hitting the wrong targets. The winner is the person who has the highest
score at the end of play.
The following steps outline the SHOOTING GALLERY game play:
1. Once the batteries are properly inserted into the Main Target Pod, press the Power Button on the Main
Target Pod to turn on the system.
2. Select one of the 3 modes of play by pressing the Mode Button until the desired mode is selected. One
of 3 Green LEDs will light up above the selected Mode Number on the Main Target Pod.
SLOT
NOTCH
CORRECT
ALIGNMENT