Interactive Toy Concepts Duck Hunter Blaster Extreme User Manual
Page 2
ON
OFF
PRESS
In order to experience the most challenging form of play, the shooter and the controller must be in direct competition with each other. The shooter tries to hit the
duck with an IR beam and the controller tries to avoid getting his duck struck down. There are some flight maneuvers that can be done so that it becomes more difficult for
the duck to be shot down.The duck’s IR receiver is located at the ventral (bottom) part of the duck, so any flight pattern that obstructs the shooter’s direct view
of the bottom of the duck will help the duck avoid getting hit. It is up to the duck controller to discover these flight maneuvers and for the shooter to counteract
them. As the duck flies along its frantic path, it represents a moving target to the shooter. The object of the game is to see either how long it takes the shooter to
bring the duck down (time trial), or how many shots are required to bring the duck down (shot count). The 2 players take turns shooting and controlling the duck.
It is possible to make this game even more challenging by allowing the duck 5 seconds to get away immediately after launch, and prior to shooting, or to launch
the duck at a further distance away from the shooter.
Before flying the DUCK HUNTER BLASTER XTREME duck for the first time (or if you have depleted a charge on the duck) you will need to recharge it. A typical charge
takes about 20-30 minutes and allows approximately 10 minutes of flying time. Note: During charging, both the POWER LED (RED) and CHARGING
LED (GREEN) should light up constantly. If the RED LED starts BLINKING when the Green LED turns on, you should replace the TX batteries.
The duck has a built-in, non-removable, non-replaceable, rechargeable battery. The blster requires 3 “AAA” alkaline batteries (sold separately).
Install the batteries as shown:
For the time trial mode, a third player (referee)
would be required to time each hunt with a
stopwatch (not included). The shooter who takes
the least amount of time to bring down the duck is
the winner. The number of shots fired at the duck
is irrelevant in this mode.
1. Open the battery compartment door located on
the left side of the blaster by using a Philips
screwdriver (not included).
2. Insert the 3 AAA batteries according to the
picture (shown). Ensure that the + and – polarities
match the illustrations inside the battery
compartment.
3. Replace the battery compartment door and
tighten the screw using the screwdriver. Do not
over tighten.
The shooter who brings down the duck with the
least amount of shots fired is the winner. It is
necessary to get a direct hit on the duck 3 times.
If both players uses 3 shots to bring down the
duck, the game is a tie and it will be necessary to
play again until a winner is declared. For this
mode only 2 players are needed.
It is possible to hone your skills at controlling the
flight of the duck. This is a one player mode of
play and it involves no hunting aspect whatso-
ever. Marvel at the amazing prowess and control
of the duck in flight and hone your skills to make it
more difficult for your competitor to shoot your
duck down during competition.
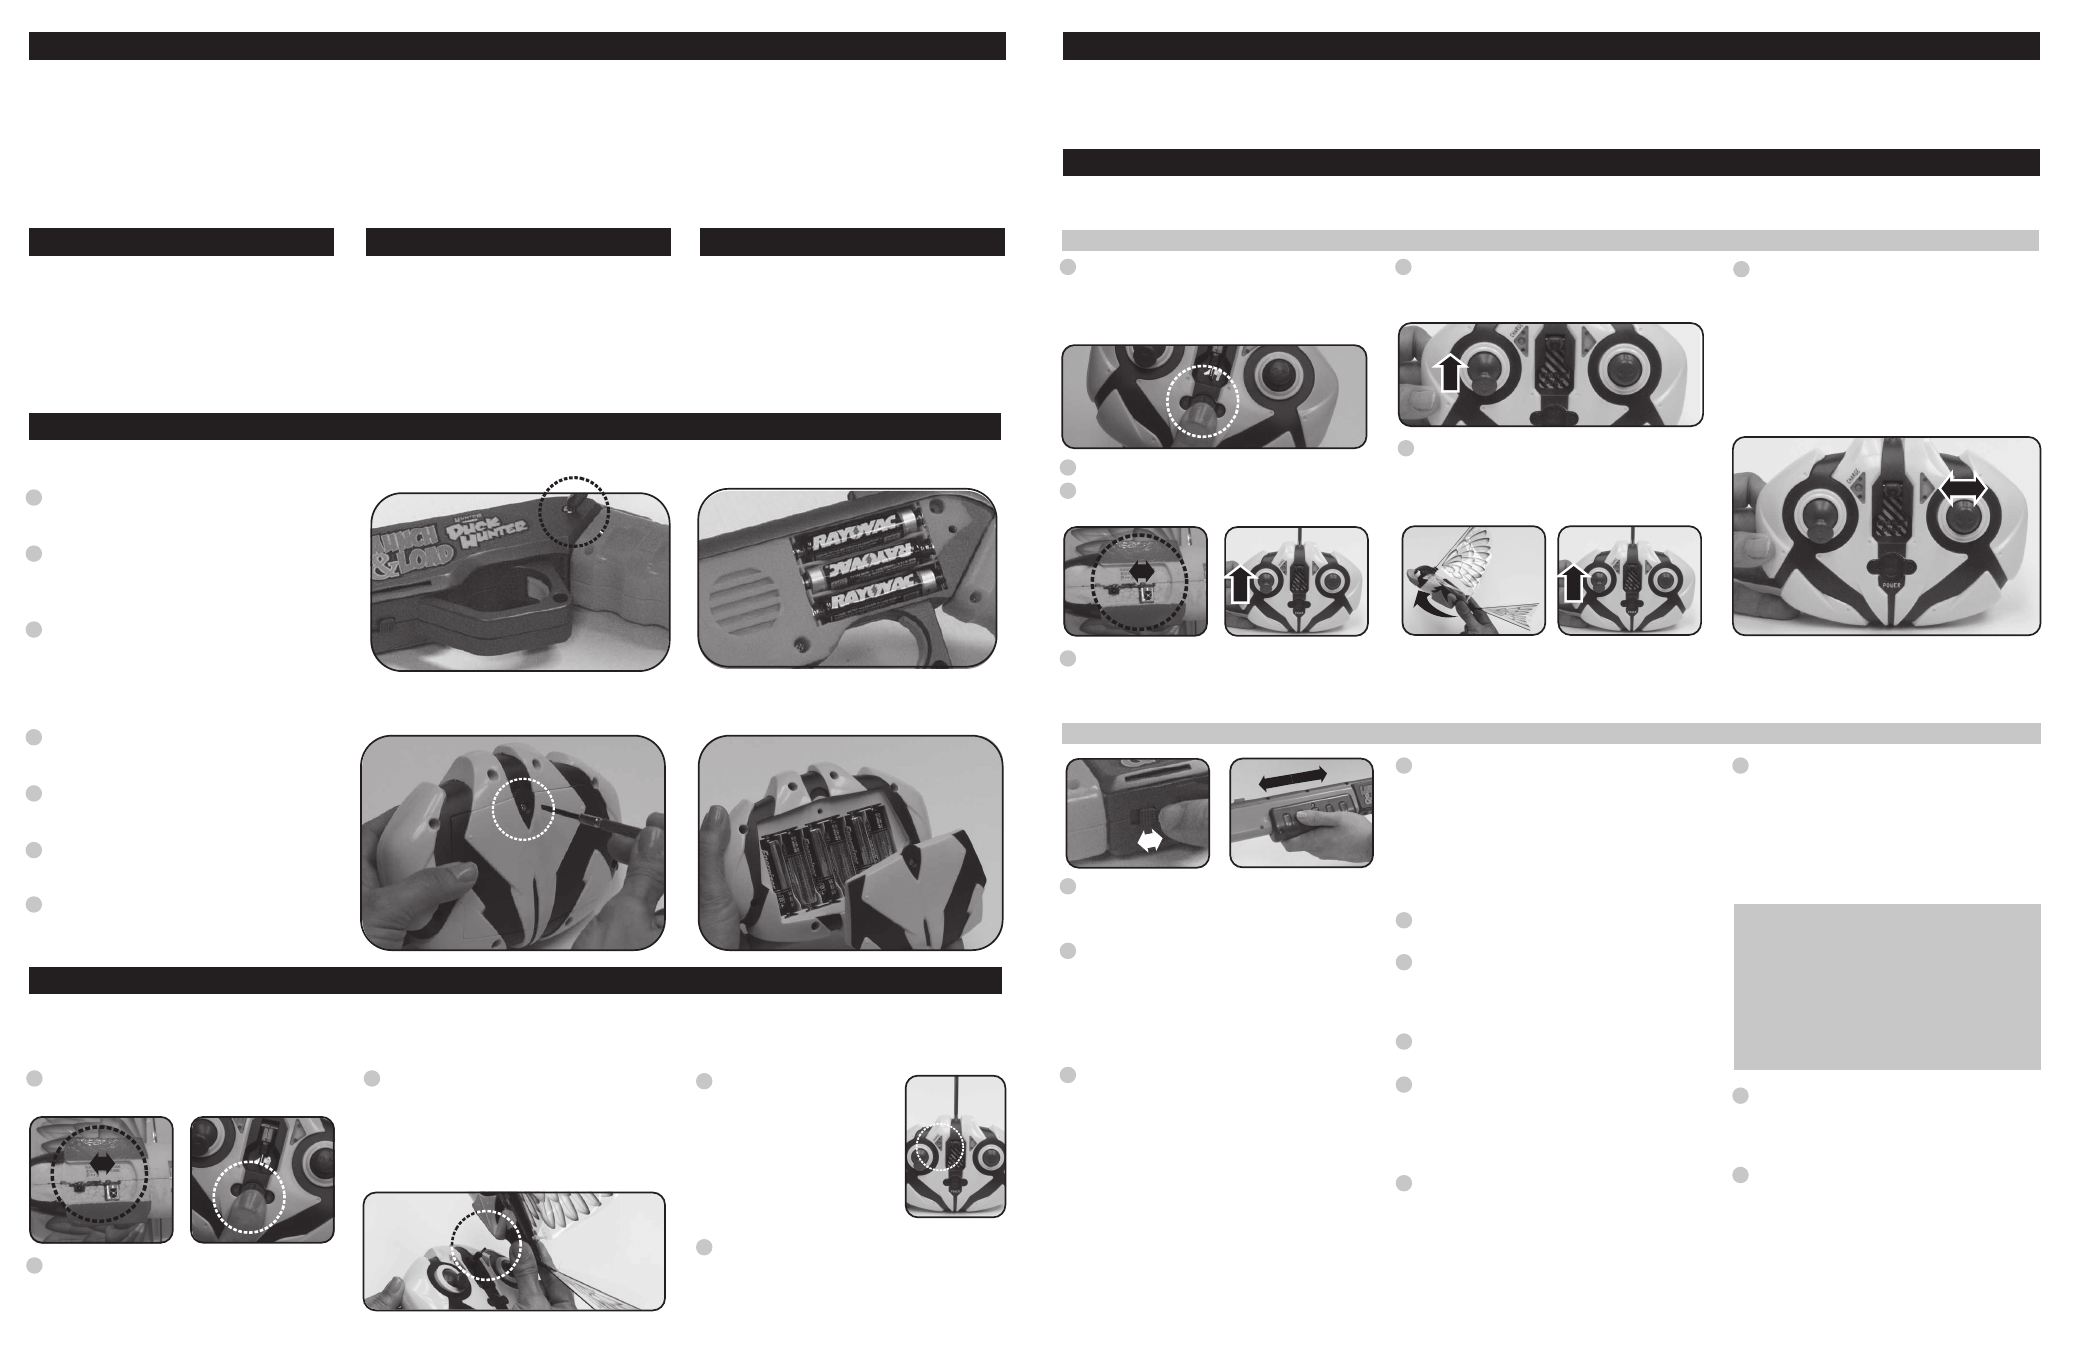
1. Turn the duck’s On/Off switch to the Off position
for charging.
2. Press the transmitter’s POWER button to light
up Red and lift up the charging adapter on your
transmitter (as shown).
3. Hold the duck firmly by its body, and then insert
the adapter into the socket at the ventral (bottom)
side of the duck (as shown). Pay close attention
to where the adapter should be inserted into the
socket of the duck. The duck will sit on the
adapter snugly.
5. Once the green GREEN LED indicator light on
the transmitter turns off, remove the duck from the
adapter. You are now ready to play DUCK
BLASTER HUNTER XTREME.
4. Once inserted, enable the
charging mode by switching on
the transmitter. When charging
the duck, the GREEN LED
indicator light should be ON.
When the duck has been fully
charged, this GREEN LED
indicator light will switch off.
GAME PLAY
You can operate your DUCK HUNTER BLASTER XTREME toy outdoors on a calm day or indoors. The outdoor space should be roughly 50 feet x 50 feet
(15 meters x 15 meters) with a height allowance of about 20 feet (6 meters). Avoid operating your DUCK HUNTER BLASTER EXTREME near power-lines, trees, or
roof-tops. Do not fly your duck during windy conditions, rain or any other harsh weather. If flying your duck indoors, the area should be roughly 16 feet x 16 feet
(5 meters x 5 meters) with the standard household ceiling height as a minimum.
CHOOSING YOUR FLYING LOCATION:
The duck is ready to fly as soon as it is finished charging. The objective of the DUCK HUNTER BLASTER EXTREME game play is to shoot down the duck with the
shooter quicker than your opponent and with fewer shots. To do this, take turns controlling and shooting the duck. It takes 3 direct hits to bring down the duck.
FLYING AND HUNTING YOUR DUCK HUNTER BLASTER XTREME:
TIME TRIAL
INSTALLING BATTERIES
CHARGING THE DUCK HUNTER XTREME: DUCK
The charger is built into the transmitter and requires 6 “AA” alkaline batteries (sold separately). Use only the supplied charger provided in this DUCK HUNTER BLASTER
XTREME package to charge the duck. DO NOT USE ANY OTHER SOURCE TO CHARGE THE DUCK. Install the batteries as shown:
1. Attach the antenna (provided) to the
transmitter. Note: Always operate the transmitter
with the antenna extended.
2. Using a Phillips screwdriver (not included) to
loosen the screw on the battery compartment
door of the transmitter.
3. Insert the batteries as shown. Ensure that the +
and - polarities match the illustrations inside the
battery compartment.
4. Replace the battery compartment door and
tighten the screw using the screwdriver. Do not
over tighten.
SHOT COUNT
SOLO DUCK FLIGHT
Player 1: The Duck Controller
Player 2: The Duck Blaster
ON
OFF
7. On the transmitter, push the right stick
(directional) to the left to turn left, or push the stick
to the right to turn right. The patented technology
on the duck allows the main wings to be
controlled to change direction (left and right) upon
receiving inputs from the right control stick
(steering control) on the transmitter. Note: Always
apply the stick control liberally on throttle and
steering input.
Fly the duck in such a way to avoid the IR beam of your opponent’s shooter.Its not easy, but the longer
you can prevent your opponent from shooting your duck down, the greater the odds that you will be the
winner in the DUCK HUNTER BLASTER XTREME competition
1. Turn the transmitter on by pressing the
POWER button. Note: it may still be on from when
the duck was being charged. The RED LED light
on the POWER button will indicate that it is on.
2. Extend the antenna on the transmitter.
3. Turn the duck on by setting the ON/OFF switch
at the ventral side (bottom) to the ON position.
4. On the transmitter, push the left stick upward
once for the first time to activate the control, then
push the left stick again to activate wings.
5. Check that the wings are flapping, increase the
speed or frequency of the wing-flapping motion by
pushing the left stick up (throttle control).
3. Once the blaster is reloaded, you can fire a
narrow infra-red beam at the duck by pressing the
trigger button on the Shooter. A firing sound is
heard.
1. When you are ready to hunt the duck you will
need to turn the shooter’s ON/OFF switch to the
ON position.
2. To fire at the duck, it is necessary to reload the
blaster. Reloading the Shooter is done by sliding
the “fore-end” all the way backwards and
forwards. A reloading sound is heard if this
process is done successfully. Note, it is necessary
to reload the blaster after each shot fired.
4a. If your shot misses the duck, the duck will
continue to fly in the direction that the controller
intends it to.
b. If your shot hits the duck, the duck will stop
operating for a brief moment and appear to
fall. This is meant to simulate a glancing blow
to the duck. The duck will resume its flight
right away.
5. Reload the blaster and shoot at the duck
again.
6. When you shoot the duck directly for the
second time, the duck will appear to temporarily
fall again just like in step 4b. Normal flight will
resume again momentarily.
7. Reload the blaster and shoot at the duck
again.
8. When you shoot the duck directly for the third
time, it will fall from the sky defeated. It will not
break on impact.
Congratulations on your marksmanship!
9. Retrieve the duck and turn its ON/OFF switch
to the OFF position (Note: do not allow your dog
to retrieve the duck as this may cause the duck to
break or cause injury to the dog).
10. Since the duck is capable of flying for 10
minutes on a single charge, it is likely that after a
few hunts the duck will still have a charge. You will
have the opportunity to try your luck again by
resetting the system and starting the game-play
over. It is recommended to switch roles with your
opponent (Player 1).
NOTE: YOU WILL NEED TO SWITCH THE
DUCK OFF AND ON EACH TIME IT IS SHOT
DOWN TO RESET THE DUCK’S
ELECTRONIC SYSTEM. YOU WILL ALSO
NEED TO RE-ACTIVATE THE CONTROLS
ON THE TRANSMITTER EVERY TIME YOU
SWITCH THE DUCK ON TO RESET THE
TRANSMITTER’S ELECTRONIC SYSTEM.
11. To recharge the duck, follow the steps outlined
in the “Charging the DUCK HUNTER BLASTER
XTREME: DUCK” section of these instructions
above.
12. If you are finished playing, make sure to turn
the ON/OFF switches on the Duck, the
Transmitter, and on the Shooter to the OFF
position for storing. It is best to remove the
batteries from the Transmitter and the Shooter if it
will be stored for a longer period of time.
6. Launch the duck from your hand with a gentle
horizontal toss while pushing the left stick
forward slowly. As the duck starts to flap its
wings, it will generate thrust and start to lift itself.
PRESS
ON
OFF