Preparation, Fill tank & connect power – InSinkErator F-C1100 Cold Only Faucet User Manual
Page 4
a
a
b
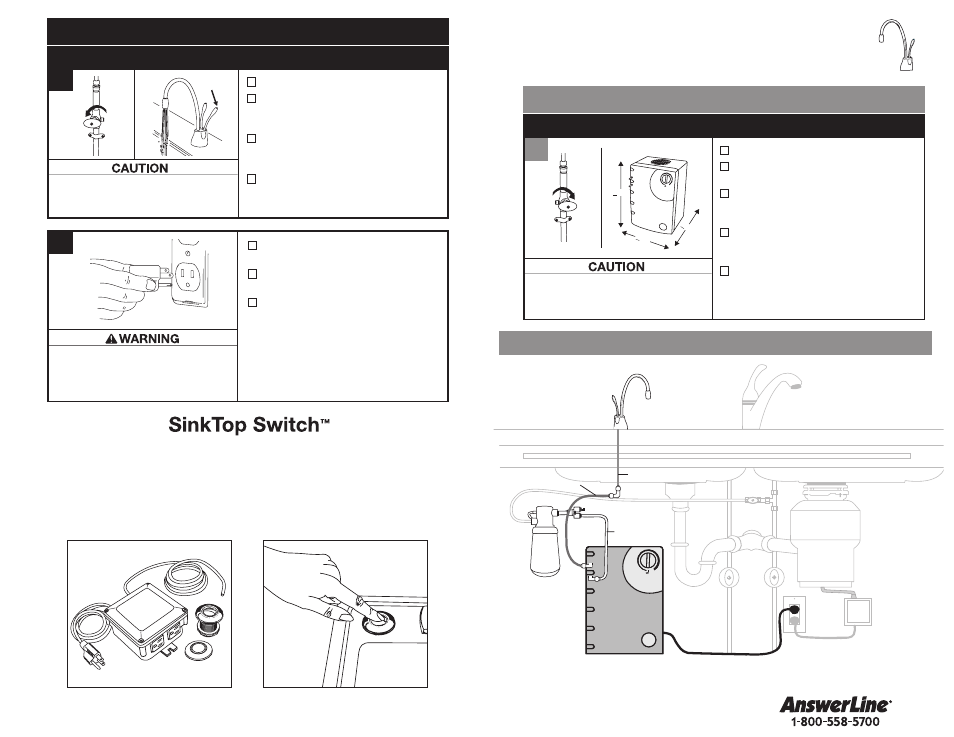
Property Damage: Do not place objects
on top of chilled water tank which
could obstruct the fan.
PREPARATION
Turn off water supply.
Identify the undersink location for
the chilled water tank.
For best performance, allow for a
minimum 2" space around the sides
and top of the chilled water tank.
The chilled water tank will require
a minimum footprint of 15" wide
by 11" deep.
Ensure that there is a minimum of
18" vertical clearance for the chilled
water tank.
1
Filter
Copper Tubing
Blue Tubing
Blue Tubing
White Tubing
White Tubing
Cold Only Faucet
Instant Hot/Cool
Water Dispenser Faucet
Filter
Instant
Hot Water
Tank
Food
Waste
Disposer
Food
Waste
Disposer
Chilled
Water
Tank
Air-Activated
SinkTop Switch
™
Air-Activated
SinkTop Switch
™
Chilled
Water
Tank
Copper Tubing
Shown with optional filtration
OVERVIEW OF A TYPICAL INSTALLATION with Cold Only Faucet
Follow these steps for installing chilled water tank with a cold only faucet.
Follow these steps for installing chilled water tank with instant hot/cool water dispenser.
Property Damage: Before plugging in
chilled water tank, check for leaks in all
water supply connections.
Turn on the cold water supply.
Depress the cold faucet handle
and hold it until water flows from
the spout.
Allow water to run for at least
60 seconds after water begins to
flow from faucet.
Depress the hot water handle until
water flows smoothly.
4
FILL TANK & CONNECT POWER
Brass Nut
Ferrule
Brass Insert
Wing Nut
Plug
Fiber
Washer
Brass Nut
Ferrule
Wing Nut
Fiber
Washer
1
2
3
Plastic
tube
Check all connections to ensure they
are tight and that there are no leaks.
Plug in chilled water tank
and hot water dipenser tank.
Prior to drinking water from the chilled
water tank, run the water for at least 5
minutes to flush lines.
Allow up to 60 minutes for
water to reach target temperature.
Electric Shock Hazard: A standard grounded
outlet is required under the sink.
Do not use an extension cord set with
the chilled water tank.
Brass Nut
Ferrule
Brass Insert
Brass Nut
Ferrule
Plastic
tube
1
4
Inlet
Outlet
White Tape
Brass Nut
Ferrule
Brass Insert
Brass Nut
Ferrule
Plastic
tube
1
4
Inlet
Outlet
White Tape
The instructions on pages 7-9 will guide you through the
installation of the InSinkErator C1100 Cold Only Faucet
and your Chilled Water Tank.
7
6
Gurgling or hissing is normal
during the initial cycle.
The SinkTop Switch
™
from InSinkErator
®
conveniently switches power between two
electrical outlets, which allows the chilled water tank, hot water dispenser and food
waste disposer to be connected to the same electrical outlet. The chilled water tank
should not be plugged into the SinkTop Switch. The chilled water tank must be connected
directly into the open wall outlet. For more information visit www.insinkerator.com.
< 18"
< 11"
< 15"
Brass Nut
Ferrule
Brass Insert
Brass Nut
Ferrule
Plastic
tube
1
4
Inlet
Outlet
White Tape
InSinkErator C1100
Cold Only Faucet