HB Optoelectronic HBP1003D User Manual
Menu enter source power, Aspect ratio warm standard cool, Quick start guide
USB Drive
Personal Computer
Power Switch
Focus Ring
File Format
Accepted Input Source
Page
Blu-ray 3D
HDMI – 1/ HDMI-2
p. 11
Half Side by Side or
Top and Bottom video/image files
USB Drive/Micro SD Card/VGA/HDMI – 1/ HDMI-2/AV
p. 14
2D file
USB Drive/Micro SD Card/VGA/HDMI – 1/ HDMI-2/AV
p. 19
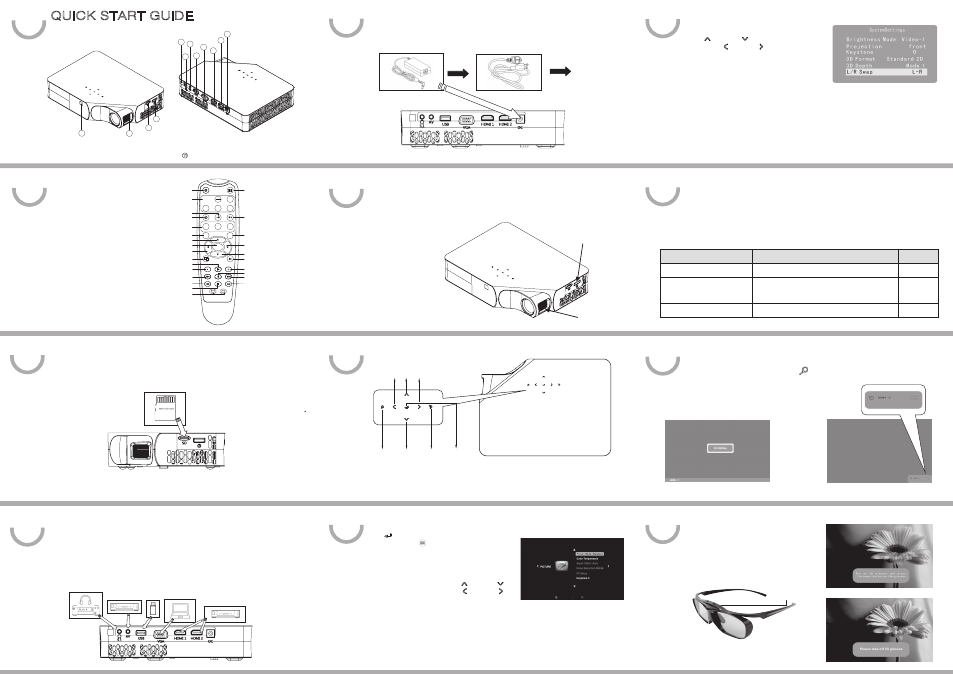
A. Product Overview
QUICK START GUIDE
3D DLP PICO PROJECTOR
1
5
6
7
8
9
10
11
12
2
B. Remote Control
C. Device Connectivity
Connect
● Micro SD Card
3
4
Note: Insert your Micro SD card while the side with flash contacts facing upward.
Mirco SD card*
Connect
● 5.1 Surround Sound Device/Earphone
● DVD Player and Other AV Interface Device
● USB Drive(2.0) ● Personal Computer VGA Cable
● Blu-ray Player and Other HDMI Interface Multimedia Device
5.1 Surround Sound
Device/Earphone
AC Socket
D. Operation Instruction
1. Connection
Power Adapter
Power Cord
Press the power switch to turn on the projector. Press it again to turn off the projector.
3. Adjust Focus
Rotate the focus ring to focus the image.
2. Power On/Off
4. Function Keys ( 7 touch sense keys )
E. Using Your Projector: 3D Projection
You can enjoy 3D images by:
● Playing Blu-ray 3D files.
● Creating 3D image from Half Side by Side or Top and Bottom video/image files.
● Creating 3D image from 2D files. See the corresponding page for further information.
1. Playing Blu-ray 3D from HDMI 1.4a Interface Device
(1) Choose input source: Press Source key and select your input source as “HDMI – 1”
or “HDMI-2”.
(2) Play your Blu-ray disc. Put on your 3D glasses
when you see the blue message window.
(3) Press the power button of the 3D glasses.
When the LED upon 3D glasses lights up, it means
the glasses are activated. For the first 5 minutes
after the glasses being activated, you don’t need to
push the power button again to watch video.
(4) When you stop playing the disc, you will see
the blue message window and you can take off
3D glasses.
Source—HDMI-2
Source—HDMI-1
Power Button
① Power Switch ② Micro SD ③ Focus Ring ④ IR Sensor ⑤ 5.1 Surround Sound/Earphone
⑥ AV in ⑦ USB ⑧ VGA ⑨ HDMI – 1 ⑩ HDMI – 2 DC in
● OSD Menu 2
You will see OSD menu 2 when your source is HDMI 2.
Use Up and Down to select the section
you want;Left and Right to choose the item you
want to adjust. See more details in User Guide.
*
The following steps use OSD menu 1 for example.
OSD Menu 1
5. OSD Menu 1 / OSD Menu 2
Press
to confirm your choice for 3
seconds (or menu key on the remote control) to
enter the OSD menu. You will see OSD Menu 1 or
OSD Menu 2.
● OSD Menu 1
You will see OSD Menu 1 when your source is USB,
Micro Card, VGA, HDMI #1. Use Up and Down
to select the section you want;Left and Right
to choose the item you want to adjust. See more
details in User Guide.
Published: 3/27/2013
Up Right
Left
Enter
Exit
Down
Source
When the touchscreen is unused for 1 minute, the whole LED will slowly flash 2 times before entering sleeping
mode. In sleeping mode, touching any button for the first time wakes up the system, with LED lightening.
Blu-ray Player and
other HDMI Interface
Multimedia Device
(HBD400 WiFi Android
Dongle)
DVD Player and Other
AV Interface Device
1
2
3
4
4
5
6
7
8
9
10
11
*
1
*
2
*
3
*
1:Move the cursor on the OSD Menu left; Press it for 3 seconds: Volume Down
*
2:Move the cursor on the OSD Menu right; Press it for 3 seconds: Volume Up
*
3:Confirm your choice; Press it for 3 seconds: enter the OSD menu.
Menu
ENTER
Source
Power
2D
3D
Aspect Ratio
Warm
Standard
Cool
AV
HDMI
1
HDMI
2
SD
USB
VGA
Color
Color
Video Mode
Keystone
Keystone Correction
Source
Power On/Off
Prev
Fast Backward
Play
Pause
Stop
Volume Down
Video Mode
Volume Up
Color Up
Color Down
Menu
Exit
Fast Forward
Next
Enter
Left
Aspect Ratio
Up
Down
Right
3D
2D
Mute
OSD Menu 2