Fire Magic 24180-12 Aurora Digital Thermometer User Manual
Aurora digital thermometer
REV 0 - 1311131105
L-C2-394
1
INSTALLER:
Leave these instructions with consumer.
CONSUMER:
Retain for future reference.
ROBERT H. PETERSON CO. • 14724 East Proctor Avenue • City of Industry, CA 91746
Aurora
Digital Thermometer
Model # 24180-12
MENU
SET
®
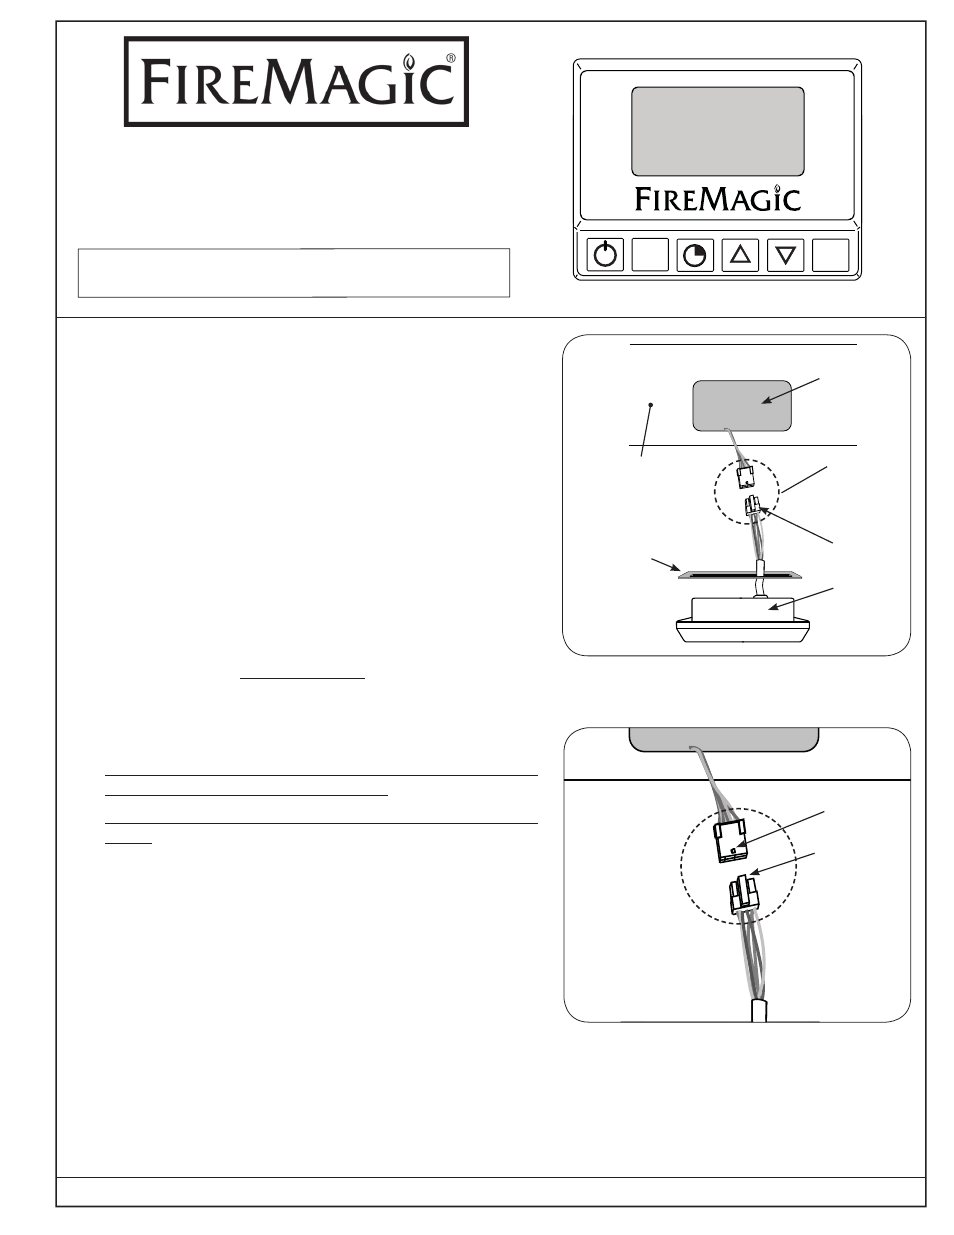
Fig. 1-1 Removing / connecting
digital thermometer
Thermometer cutout
Digital
thermometer
Wire
connection
Grill
control panel
(may or may not
have mirror panel)
This digital thermometer is for replacement on an Aurora grill.
To install, follow the steps below:
1. Be sure the grill is completely cool.
2. Locate the old thermometer on the grill control panel between
the knobs. Remove it from the grill by slightly sliding it to
the left, then lifting the right side outward until it clears the
control panel.
CAUTION: Remove carefully as the wire harnesses will still
be attached to the back of the thermometer.
3. The wire harness will be taped. CAREFULLY cut the tape.
Important: Take note of the way the harness is taped, as
once the new thermometer is connected; the new
harness will need to be similarly taped.
4. CAREFULLY push the end of the clip down and pull apart
the wire harness at the connector, as shown in Fig. 1-1.
DO NOT pull apart from the wires.
CAUTION: Pulling connection apart from the wires may
cause damage to your unit.
5. If your grill control panel is equipped with a mirror panel,
skip this step and proceed to step #6.
If your grill control panel IS NOT equipped with a mirror
panel, apply the supplied gasket onto the thermometer by
removing the protective sheet and pressing the adhesive
side against the rear of the thermometer (see Fig. 1-1).
6. Connect the new thermometer wire harness to the exposed
wire harness coming out of the grill (see Fig. 1-1).
CAUTION: The wire harness must be properly connected
as shown in Fig. 1-2 (the clip and tab must align,
allowing for an easy connection).
DO NOT FORCE the connection together.
7. Ensure that the wire harness is properly taped using high
temperature electrical tape.
8. Carefully install the thermometer into the cutout on the
control panel.
This completes installation, refer to the following pages for
digital thermometer operation.
Fig. 1-2 Proper connection
Tab
Clip
Clip
Gasket
(only use on
models WITHOUT
mirror panels)