EXCALIBUR 814R BBQ Grill User Manual
Page 2
S
AFETY
AND
P
RECAUTIONS
• D
O
NOT
use the BBQ Grill without adult
supervision and do not leave unattended
• D
O
NOT
use water to cool or extinguish the BBQ Grill
as this will damage the fi nish and the grill
• Close all vents to extinguish hot coals
• Keep the area around the BBQ Grill clear
• Though great care has been taken during production
to remove rough or dangerous edges, always,
with any grill, use caution when handling
• D
O
NOT
allow children or animals near the grill while it
is in use
• Allow grill to completely cool before attempting
to dispose the coals and/or clean
• When using the BBQ Grill make sure that
it is on a level surface and in no danger of
tipping over
• Never use a grill indoors
C
LEANING
T
IPS
• To make cleaning easier, line the inside of the grill
with aluminum foil (shiny side up). Remember to leave
ventillation holes clear by piercing the foil where
necessary.
• Clean the grill grate and tools by soaking them in
hot, soapy water as soon after you are done as
possible. Dry thoroughly and store in a dry place.
• D
O
NOT
leave your grill outside and unprotected
90-DAY LIMITED WARRANTY
EXCALIBUR ELECTRONICS, INC., warrants to the
original consumer that its products are free from any electrical
or mechanical defects for a period of 90 DAYS from the
date of purchase. If any such defect is discovered within
the warranty period, EXCALIBUR ELECTRONICS, INC.,
will repair or replace the unit free of charge upon receipt of
the unit, shipped postage prepaid and insured to the factory
address shown at right.
The warranty covers normal consumer use and does not
cover damage that occurs in shipment or failure that results
from alterations, accident, misuse, abuse, neglect, wear and
tear, inadequate maintenance, commercial use, or unreasonable
use of the unit. This warranty does not cover cost of repairs
made or attempted outside of the factory.
Any applicable implied warranties, including warranties
of merchantability and fi tness, are hereby limited to 90
DAYS from the date of purchase. Consequential or incidental
damages resulting from a breach of any applicable express
or implied warranties are hereby excluded. Some states
do not allow limitations on the duration of LIMITED 90-
DAY WARRANTY implied warranties and do not allow
exclusion of incidental or consequential damages, so the above
limitations and exclusions in these instances may not apply.
The only authorized service center in the United States is:
Excalibur Electronics, Inc.
13755 SW 119th Ave
Miami, Florida 33186 U.S.A.
Phone: 305.477.8080
Fax: 305.477.9516
www.ExcaliburElectronics.com
Ship the unit carefully packed, preferably in the original
carton, and send it prepaid, and adequately insured. Include
a letter, detailing the complaint and including your daytime
telephone number, inside the shipping carton. If your warranty
has expired and you want an estimated fee for service, write to
the above address, specifying the model and the problem.
NOTE: Please do not send your unit without fi rst receiving an
estimate for servicing from EXCALIBUR ELECTRONICS,
INC. Contact us before sending your unit. We cannot store
your unit!
Excalibur Electronics, Inc. reserves the right to make technical
changes without notice in the interest of progress.
A
SSEMBLY
I
NSTRUCTIONS
T
OOLS
R
EQUIRED
:
5/16" open-end wrench
Pliers
Flat-head Screwdriver
Phillips Head Screwdriver
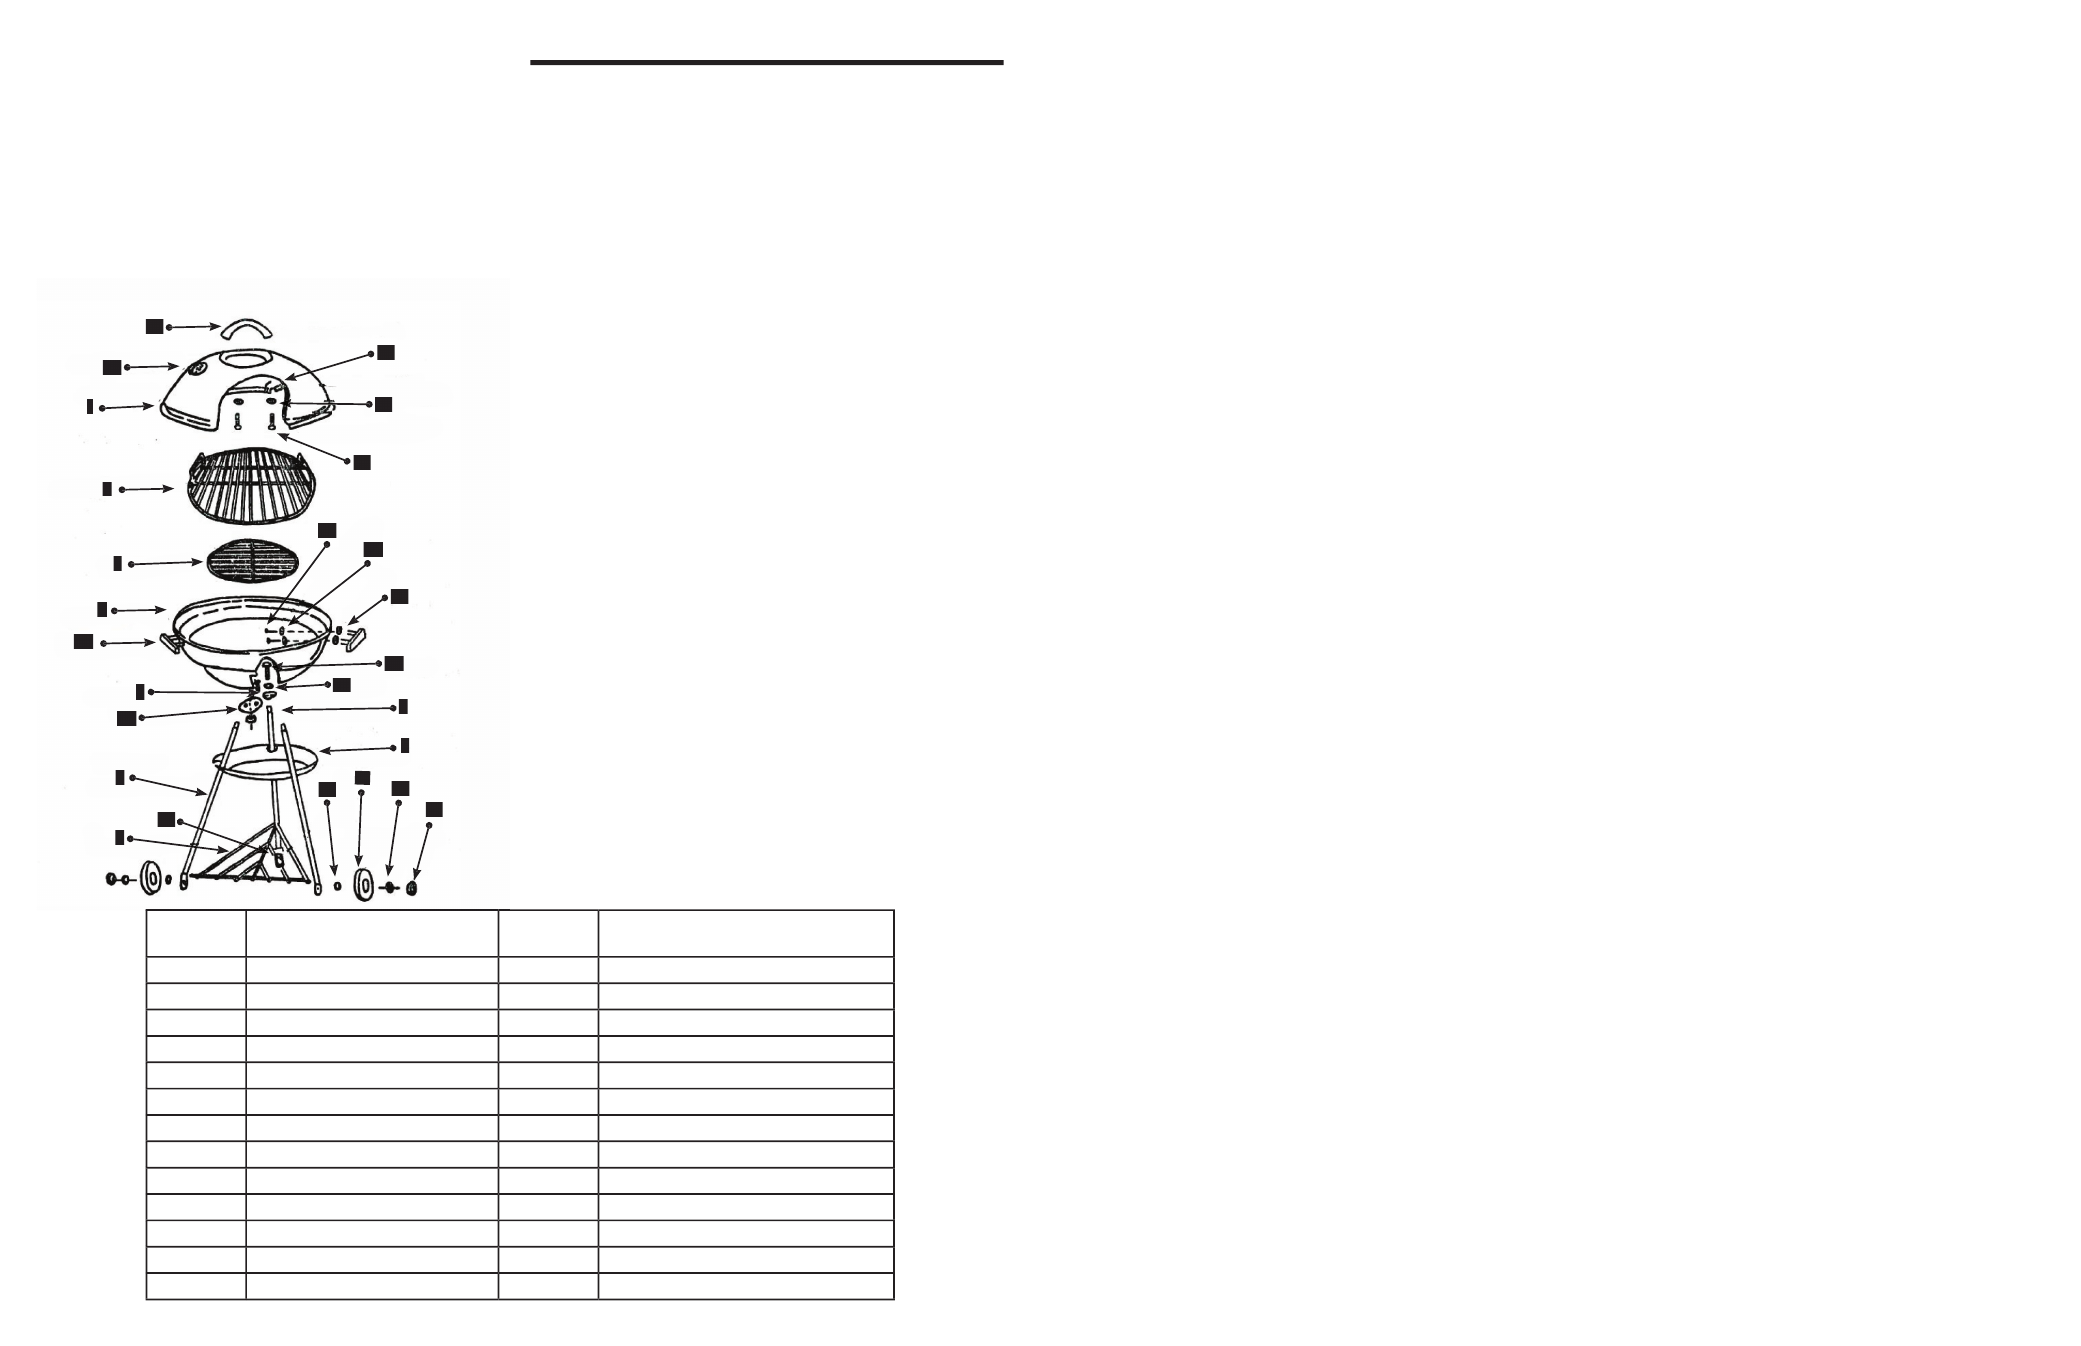
Note: Before assembling your Grill, please check to make
sure that all parts are present. Lay out all parts in front of you
and check them against the parts list (bottom of page). If any
parts are missing please contact the retailer from which you
purchased the BBQ Grill.
1. Attach the curved wooden handle (16) and lid hanger
bracket (17) to the grill top (1), using two screws (15) and
washers (18).
2. Attach the two fl at wooden handles (22) to the grill
bottom (4) using four washers (19), screws (23) and
washers (24).
3. Insert leg holders (5) over the short legs (6) and long leg (7)
and attach them to the grill bottom (4) one by one using the
longest screws (20) and washers (21).
4. Insert the rectangular wire shelf (9) in to the leg ends. The
bent tip goes into the holes of the short legs fi rst (with the
bent tip pointing in the opposite direction of the grill). Then,
align and insert the other end into the long leg (make sure
the hole that is closest to the end of the leg faces outward).
5. Insert spacer (10), wheel (11), and washer (12) and secure
with cap nut (13) on both sides.
6. Insert the plastic cap into the end of the long leg (7).
7. Turn the unit upright and tighten each screw to secure each
leg to the bottom of the unit.
8. Install ash tray (8) by aligning slots with legs and rotating to
lock in place.
9. Place the small grate (3) onto the bottom, and grill (2) onto
the top recess.
C
ongratulations on your purchase of the BBQ Grill
from Excalibur Electronics. Enjoy delicious grilled
food, cooked to perfection on this BBQ Grill that is easy
to assemble and just as easy to clean thanks to the built-in
ash catcher!
Before starting, please read this manual thoroughly,
especially noting safety and care. This package includes
the BBQ Grill and instruction manual.
Part NO.
(Quantity)
Part Name
Part NO.
(Quantity)
Part Name
1 (1)
Grill Top
14 (1)
Leg Cap
2 (1)
Grill Surface
15 (2)
Screw (Top Handle)
3 (1)
Grate
16 (1)
Wooden Handle
4 (1)
Grill Bottom
17 (1)
Lid Hanger Bracket
5 (3)
Leg Holders
18 (2)
Washer
6 (2)
Short Leg
19 (4)
Asbestos Washer
7 (1)
Long Leg
20 (3)
Leg Screws
8 (1)
Ash Tray
21 (3)
Leg Washers
9 (1)
Wire Shelf
22 (2)
Wooden Handle
10 (2)
Spacer
23 (4)
Screws (Side Handles)
11 (2)
Wheel
24 (4)
Washer (Side Handles)
12 (2)
Washer
25 (1)
Valve
13 (2)
Cap Nut Wheel
26 (1)
Ash Valve
P
A
R
T
S
L
I
S
T
P
A
R
T
S
L
I
S
T