Clearing discharge lines, Maintenance, Spare parts – Dometic 706 User Manual
Page 6
6
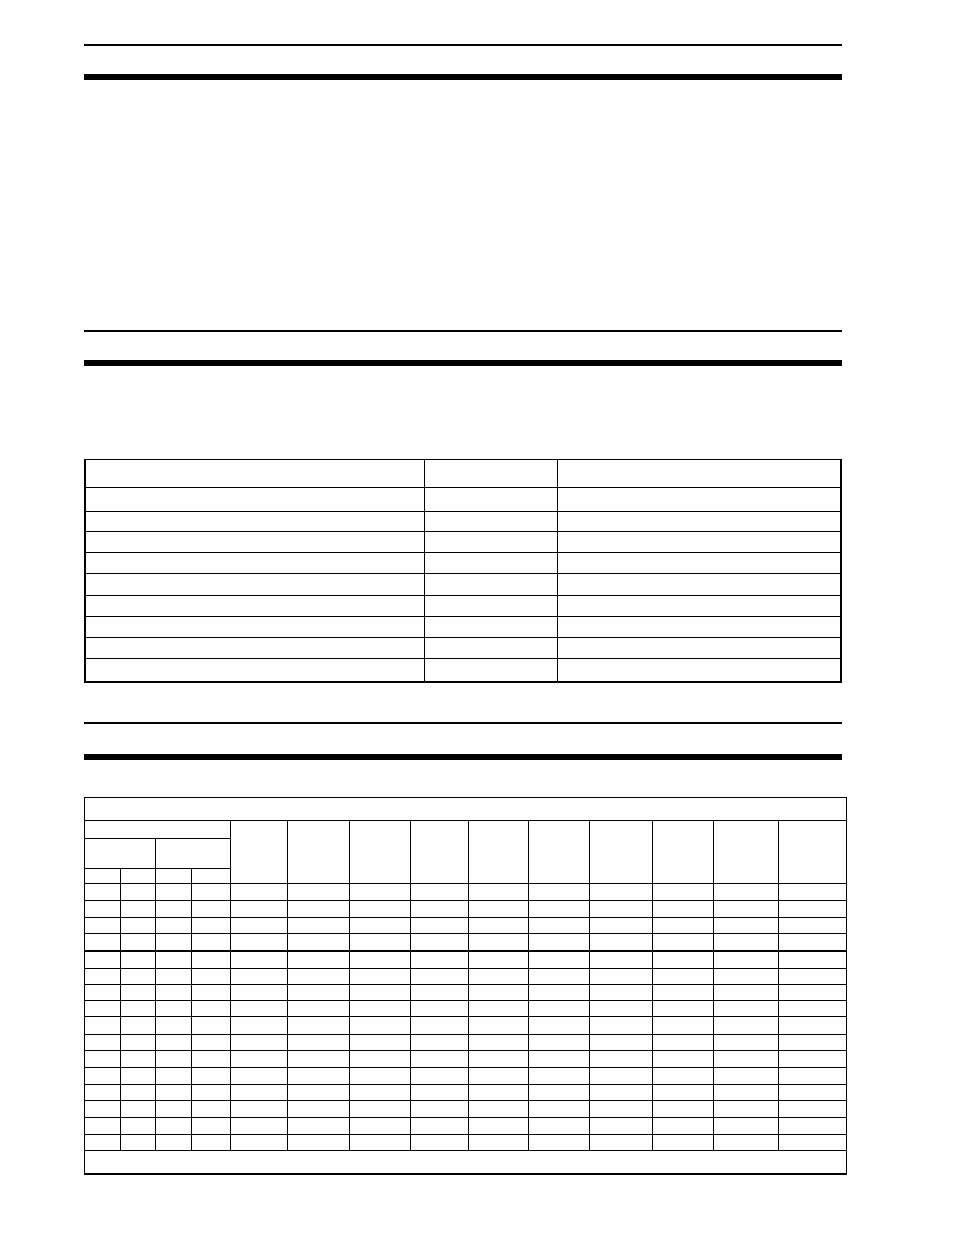
MAINTENANCE
Maintenance intervals and normal parts replacement vary widely depending on numerous factors such as:
type of vessel, frequency of system use, quality of flushing water, etc. The chart below is intended strictly as a
general guideline. Owner discretion and consideration of actual usage must be the first basis for determining
proper maintenance levels.
SPARE PARTS
To calculate total spare parts required, determine number and type of toilets and pumps.
*See Base Assembly - Page 10.
Maintenance Procedure
Follow cleaning procedures (page 5).
Tighten all clamps, including base clamp ring.*
Check all wire connections.
Check & tighten water valve mounting screws.
Clean filter screen in water valve.
Check pump and in-line valves.
Check toilet seals.
Check vacuum breaker.
Check water valve.
Part Number
—
—
—
—
—
385310076
385316140
385316906
385314349
Approximate Maintenance Level
Monthly
Annually
Annually
Annually
Annually
2-3 years or as needed
3-5 years or as needed
3-5 years or as needed
3-5 years or as needed
Type of System
Toilet Series
& Quantity
Pump Series
& Quantity
Toilet
Seal
Kit
Toilet
Water
Valve
Kit
S Pump
Duckbill
Valve Kit
M Pump
Duckbill
Valve Kit
Toilet
Vacuum
Breaker
Vacuum
Tank
Vacuum
Switch
Toilet
Ring/
Clamp
Kit
Toilet
Ball/Shaft
Cartridge
Kit
On Board Spare Parts Calculation Chart: (Per System)
500+
1
2
1
2
3
4
5
6
1000
1
2
1
2
3
4
5
6
S
1
2
1
2
M
1
1
1
1
1
1
1
1
1
1
1
1
1 each
1 each
1 each
1 each
1 each
1 each
1 each
2 each
2 each
2 each
1 each
1 each
1 each
2 each
2 each
2 each
1 each
1 each
1 each
1 each
1 each
1 each
1 each
2 each
2 each
2 each
1 each
1 each
1 each
2 each
2 each
2 each
2 each
2 each
2 each
2 each
4 each
4 each
4 each
4 each
4 each
4 each
4 each
4 each
4 each
4 each
4 each
4 each
1 each
1 each
1 each
1 each
2 each
2 each
2 each
1 each
1 each
2 each
2 each
2 each
1 each
1 each
1 each
2 each
1 each
1 each
1 each
2 each
1 each
1 each
1 each
2 each
1 each
1 each
1 each
2 each
1 each
1 each
1 each
1 each
1 each
1 each
2 each
1 each
1 each
1 each
1 each
2 each
Per Vessel: Vacuum Tester – 530002 (1 each) & Owner’s Manual – (1 each)
1 each
1 each
1 each
2 each
1 each
1 each
1 each
2 each
Vacuum
Generator
Switch
Kit
1 each
1 each
1 each
2 each
1 each
1 each
1 each
2 each
Low-Profile
Vacuum
Generator
Switch Kit
(2)
CLEARING DISCHARGE LINES
Sanitation hoses should be cleared if toilet will not be needed for an extended period of time (more than two weeks).
1. Fill toilet bowl with water and add 4 oz. (120 ml) of biodegradable laundry detergent (should NOT contain
bleach).
2. Flush toilet, holding pedal down for about two minutes. Close flush ball.
3. Turn off water supply to toilet.
4. Flush the toilet without water, allowing the vacuum pump to shut off after the flush. Repeat three times. (This
procedure will minimize any remaining water in the sanitation hoses.)
5. Turn off power to the vacuum pump.
6. Completely pump out holding tank.
If system will be subjected to freezing temperatures, please follow above procedure, then winterize system as
described in this manual.