Mounting aw series speakers – Definitive Technology OUTDOOR SPEAKERS AW5500 User Manual
Page 6
6
7
screw inserts on the end panels and the metal screws on the bracket knobs.
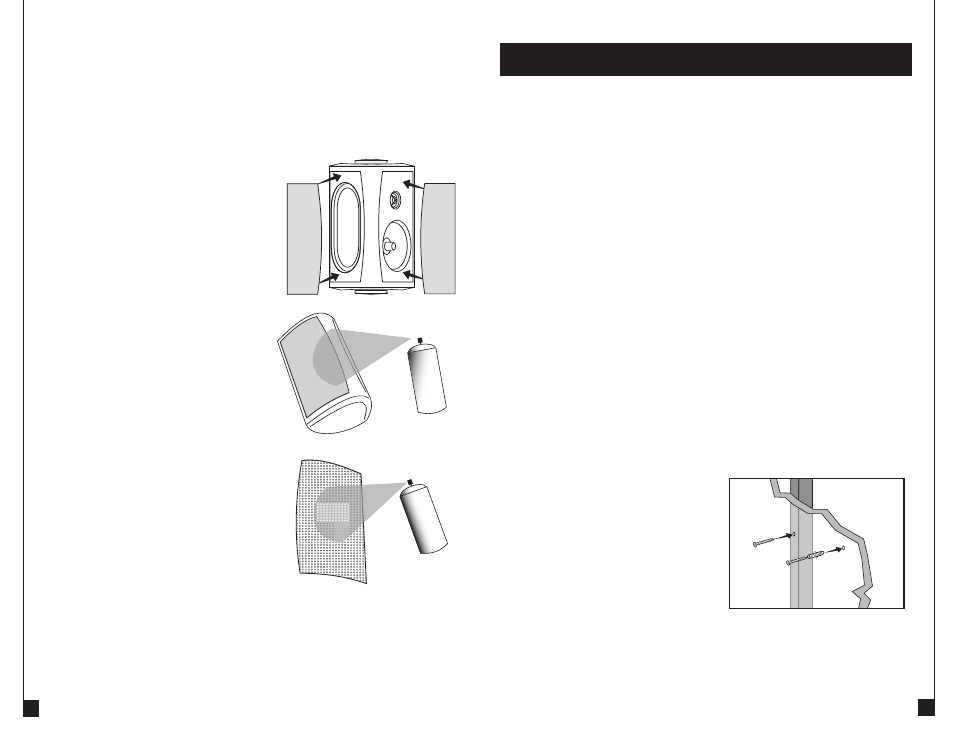
Carefully mask both baffles to protect the drivers, tweeters, low-bass
radiators, and baffles [figure C]. Make sure the tape forms a tight seal around
the edges so that no paint can get on the baffle or speaker parts. If paint gets
on the speaker parts (driver, tweeter, Low Bass Radiator), it will affect the
sound and is not covered by the warranty. The grille features an engraved
logo badge. You can remove it before painting the grille or paint right over it.
Painting the Cabinet, Bracket
Knobs and Bracket
1. Apply two thin coats of primer to the
cabinets and locking knobs. The brackets
do not require primer.
2. When the primer is completely dry,
apply the finish color [figure D].
3. When the paint is completely dry,
remove the masking materials.
4. Do not re-attach the speaker to the
bracket until the bracket is mounted.
Try to keep all handling of freshly
painted parts to a minimum.
Painting the Grille
1. The grille features an even, protective
powder coating. This powder coating is
an ideal primer. The grille features an
engraved logo badge. You can remove it
before painting the grille or paint right over
it. Rotate the logo badge to its horizontal
or vertical orientation prior to painting
the grille.
2. Using spray paint, spray two thin coats
of finish color with no primer [figure E].
If you’re using a compressor and spray
gun, use the finest, most diffuse setting.
Be careful not to fill the holes in the grille
with paint.
3. When the paint is completely dry, carefully fit the grille into its recess
so that it is just resting on the cabinet. Starting with one corner, go around
the speaker and push the grille into the grille notch a little bit at a time.
Be gentle; the grille may be easily bent out of shape by rough handling.
Paint Mask P
Paint Mask Pa
Paint Mask P
Paint Mask
Paint Mask P
Paint Mask Pa
Paint Mask P
Paint Mask
Paint Mask
Paint Mask
P
Paint Mask
Paint Mask
P
Paint Mask
Paint Mask
P
Paint Mask
Paint Mask
aint
Mas
k Pa
int M
a
Pain
t Ma
sk P
aint
M
aint
Mas
k Pa
int M
a
Pain
t Ma
sk P
aint
M
Pain
t Ma
sk P
aint
Ma
Pain
t Ma
sk P
aint
M
Pain
t M
ask
Pain
t M
Pain
t M
ask
Pain
t
nt M
Pain
t Ma
k Pa
int M
k Pa
int M
a
k Pa
int M
Pain
t M
C
D
The AW speakers can be mounted vertically or horizontally but remember to
always point the speaker in such a way as to allow water to roll off the driver cone
and/or Low Bass Radiator.
Installation of AW Series Loudspeakers requires basic skills in using tools such
as a drill and screwdriver. If you are in doubt that you possess the necessary skills
or tools, consult your Definitive Technology dealer, general contractor or a
professional installer.
To mount the speakers, remove the bracket, mount the bracket to the surface,
and then re-attach the speaker to the bracket, re-insert the locking knobs and
tighten. Aim the speaker so that the driver/tweeter side points as directly as
possible toward the listening area.
Detailed Mounting Directions
1. Make sure the mounting hardware and surface you choose are both capable of
holding the weight of the speaker (see specifications on page 11) combined
with the force generated by strong wind and/or snow accumulations common
to your area.
2. Make sure the locations you select do not conceal electrical wiring or
plumbing behind the surface.
3. Prior to installation, hold the speaker in the chosen location to make sure it
safely clears obstacles such as ceiling, adjacent walls, corners, beams, lighting
fixtures and door/window frames.
4. Remove the bracket and locking knobs by turning them counter-clockwise
until they come completely out of the cabinet.
5. Using the slots in the bracket as a template, mark the screw locations with
a pencil.
6. If you are certain that there is a stud
behind the wall surface, drive #10 screws
(not included) through the
wall and into the stud [figure F].
7. If there is no stud behind the wall
at the chosen location, install wall anchors
(not supplied) into the wall
by following the wall anchor
manufacturer’s instructions. Always
use two wall anchors and two screws per
speaker [figure F]. We do
not provide mounting screws or other hardware because we do not know what
kind of material you will be attaching the speaker to. For wood surfaces and
studs, use wood screws; for sheetrock or gypsum, you should use wall
anchors; for masonry, use masonry anchors.
E
Mounting AW Series Speakers
F