Bottom edge to ground, For step 14 – Brinly DK-422LX Dethatcher Kit for STS-426LXH User Manual
Page 6
L-1660-D
6
Figure 4
Figure 5
Figure 6
Figure 4
“Straight” edge
to tractor
Adjusting Holes
(Both Sides)
Lift Handle in Vertical Position
when attaching Transport Link.
Transport Link
Adjustment
Tip Leveling
Adjustment
Brush Tips = 1” off ground
Tine Tips = 1/2” - 1” off ground
Tip Height Adjustment
Tow Tubes
To Tractor
To
Tra
cto
r
To
Tra
cto
r
2
12
13
11
11
2
14
4
3
12
13
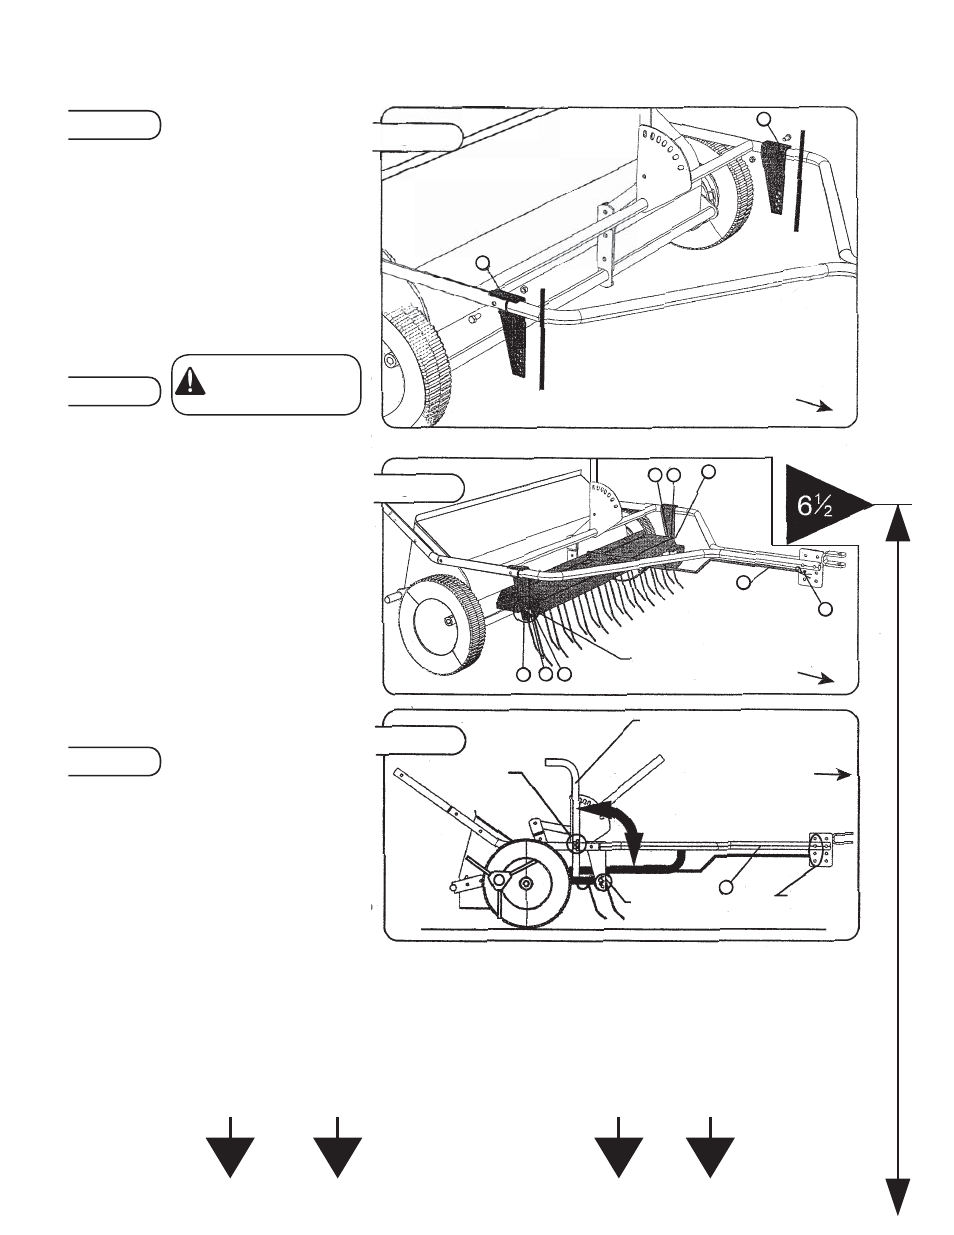
10. Remove the two 5/16” x 1-1/2” Hex Bolts
attaching Tow Tubes and Upper Frame
Assembly of Sweeper (at sides).
11. Attach the Left and Right-hand Mount
Brackets (3 & 4) to inside of Tow Tubes on
Sweeper using the previously Removed
hardware. (FINGER TIGHTEN ONLY)
12. Notice that the formed legs on Mount
Brackets (3 & 4) assemble over top of Tow
Tubes and the “straight” edge is to front of
Sweeper (lower group of adjusting holes
FORWARD).
Use Hardware Bag “A”
HITCH ASSEMBLY
Figure 4
Figure 5
Figure 6
13. Position the previously assembled
Dethatcher inside Tow Tubes with
Dethatcher Tine Tips facing FORWARD.
14. Notice the series of adjusting holes on the
Right and Left-hand Mount Brackets (3 &
4). Measuring from Ground UP, locate the
holes at each side that are approximately
6-1/2” (this page has a large arrow with a
6-1/2” mark for your convenience).
15. Position the Dethatcher Tray (1) so the
holes at sides line up with the selection
made in step 14.
16. Attach at these holes using two 5/16” x
3/4” Hex Bolts (11), 5/16” Flat Washers (12
- between the Tray and Mount Brackets)
and 5/16” Lock Nuts (13). Tighten both
sides until Dethatcher Tray is barely free
to pivot (TIGHTEN FASTENERS FROM
STEP 10).
17. Connect Transport Link (2) to front hole in
Sweeper Hitch Clevis Assembly(directly
above or below Tow Tubes as shown) and
secure with small Hairpin Cotter (14).
18. Raise Lift Handle (6) to vertical position
and attach opposite end of Transport Link
(2) into CENTER adjusting hole in Lift
Handle (6). Secure with other Hairpin
Cotter (14).
PLEASE BE SURE YOU
HAVE READ THE NOTE
ON PAGE 3 BEFORE
CONTINUING.
DETHATCHER TINE TIP ADJUSTMENT
IMPORTANT: Sweeper must be connected to Tractor Riding Equipment and Brush Height adjusted to approximately 1” off ground.
Lower Lift Handle (6), locking Transport Link (2) inside “pocket” of Lift Handle. Tray should be LEVEL to slightly higher at front*.
* If Tray is too HIGH at front, raise Handle to vertical position, remove Hairpin Cotter at Lift Handle and move Transport Link one hole to REAR. Reattach
with Hair Pin Cotter. Check for proper position and move additional hole, if necessary, to obtain proper position.
* If Tray is too LOW at front, raise Handle to vertical position, remove Hairpin Cotter at Lift Handle and move Transport Link one hole to FRONT. Reattach
with Hair Pin Cotter. Check for proper position and move additional hole, if necessary, to obtain proper position.
BOTTOM EDGE TO GROUND
For Step 14