Optional equipment – Avalon Firestyles Astoria 2001 to 2002 User Manual
Page 38
3 6
Optional Equipment
Travis Industries
4 0 1 1 0 0 9
9 3 5 0 8 1 2 6
Thermostat (Part # 99300650)
!
Do not connect 120
VAC to the
thermostat circuit of
this heater (do not
use a household
thermostat used for
a wall-board or other
electical heater).
1
Attach the
thermostat wire to
the circuit board.
2
Determine a
location for the
thermostat that is
within range of the
50' length of
thermostat wire. It
should be
centralized in the
room and away from
the heater. The
wire may be routed
externally on the
wall or behind the
wall (preferred).
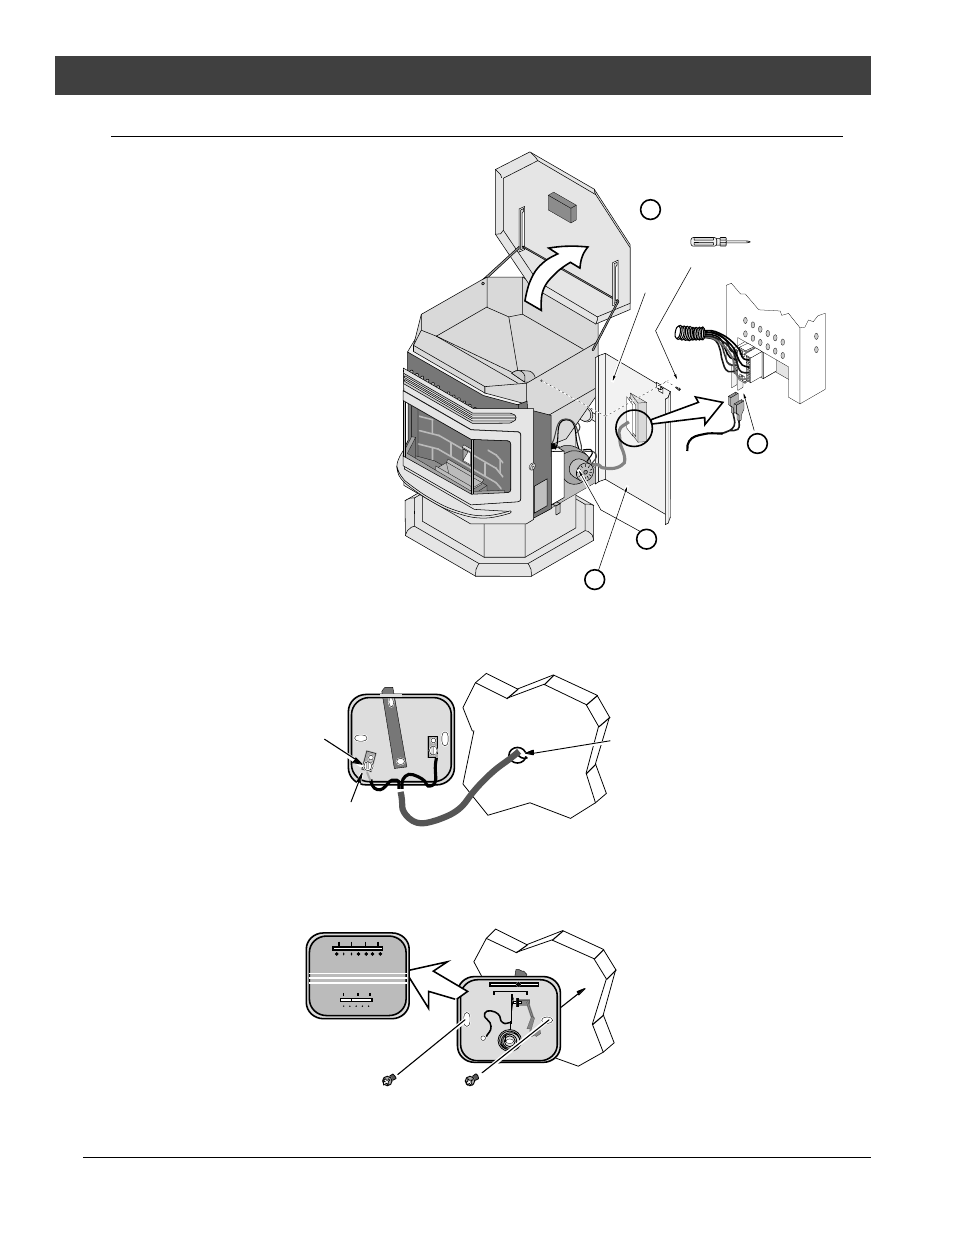
b
Swing the
panel
open.
Thread the thermostat wire
through the hole in the rear panel.
a
Phillips
Screwdriver
Open the hopper lid and remove the
screw holding the right panel in place.
Attach the quick-connects on
the thermostat to the thermostat
posts on the circuit board
(orientation does not mater).
Pull on the thermostat wire to allow just enough
slack to allow the right side panel to open.
d
c
3
Cut the thermostat wire so there is approximately 6" of slack. Expose 1/2" off each wire of
the thermostat wire. Attach the exposed wire to the clips on the back of the thermostat
using a screwdriver.
Run the thermostat
wire through the
wall (cut off
excess wire,
leaving 6" of slack)
Expose 1/2" of
wire and attach
to the two
connections on
the back of the
thermostat (use a
screwdriver).
Orientation does
not matter.
Wall
Back Side of
Thermostat
4
Pull the cover off the thermostat. Place the thermostat in location and attach it to the wall
through the two obround holes (use the appropriate screws for the type of wall it is being
attached to). Replace the cover on the thermostat to complete the installation.
Pull the cover off the
thermostat to expose the
holes for mounting the
thermostat.
Use the appropriate screws to
mount the thermostat to the wall.