Quick start installation guide sitesync iq, Wireless clock system, Connect cables to the system controller – American Time CDMA 5 Watt Campus User Manual
Page 2: Use the setup wizard, Unpack the box, Check the components, Choose your location
QUICK START INSTALLATION GUIDE
SITESYNC IQ
®
WIRELESS CLOCK SYSTEM
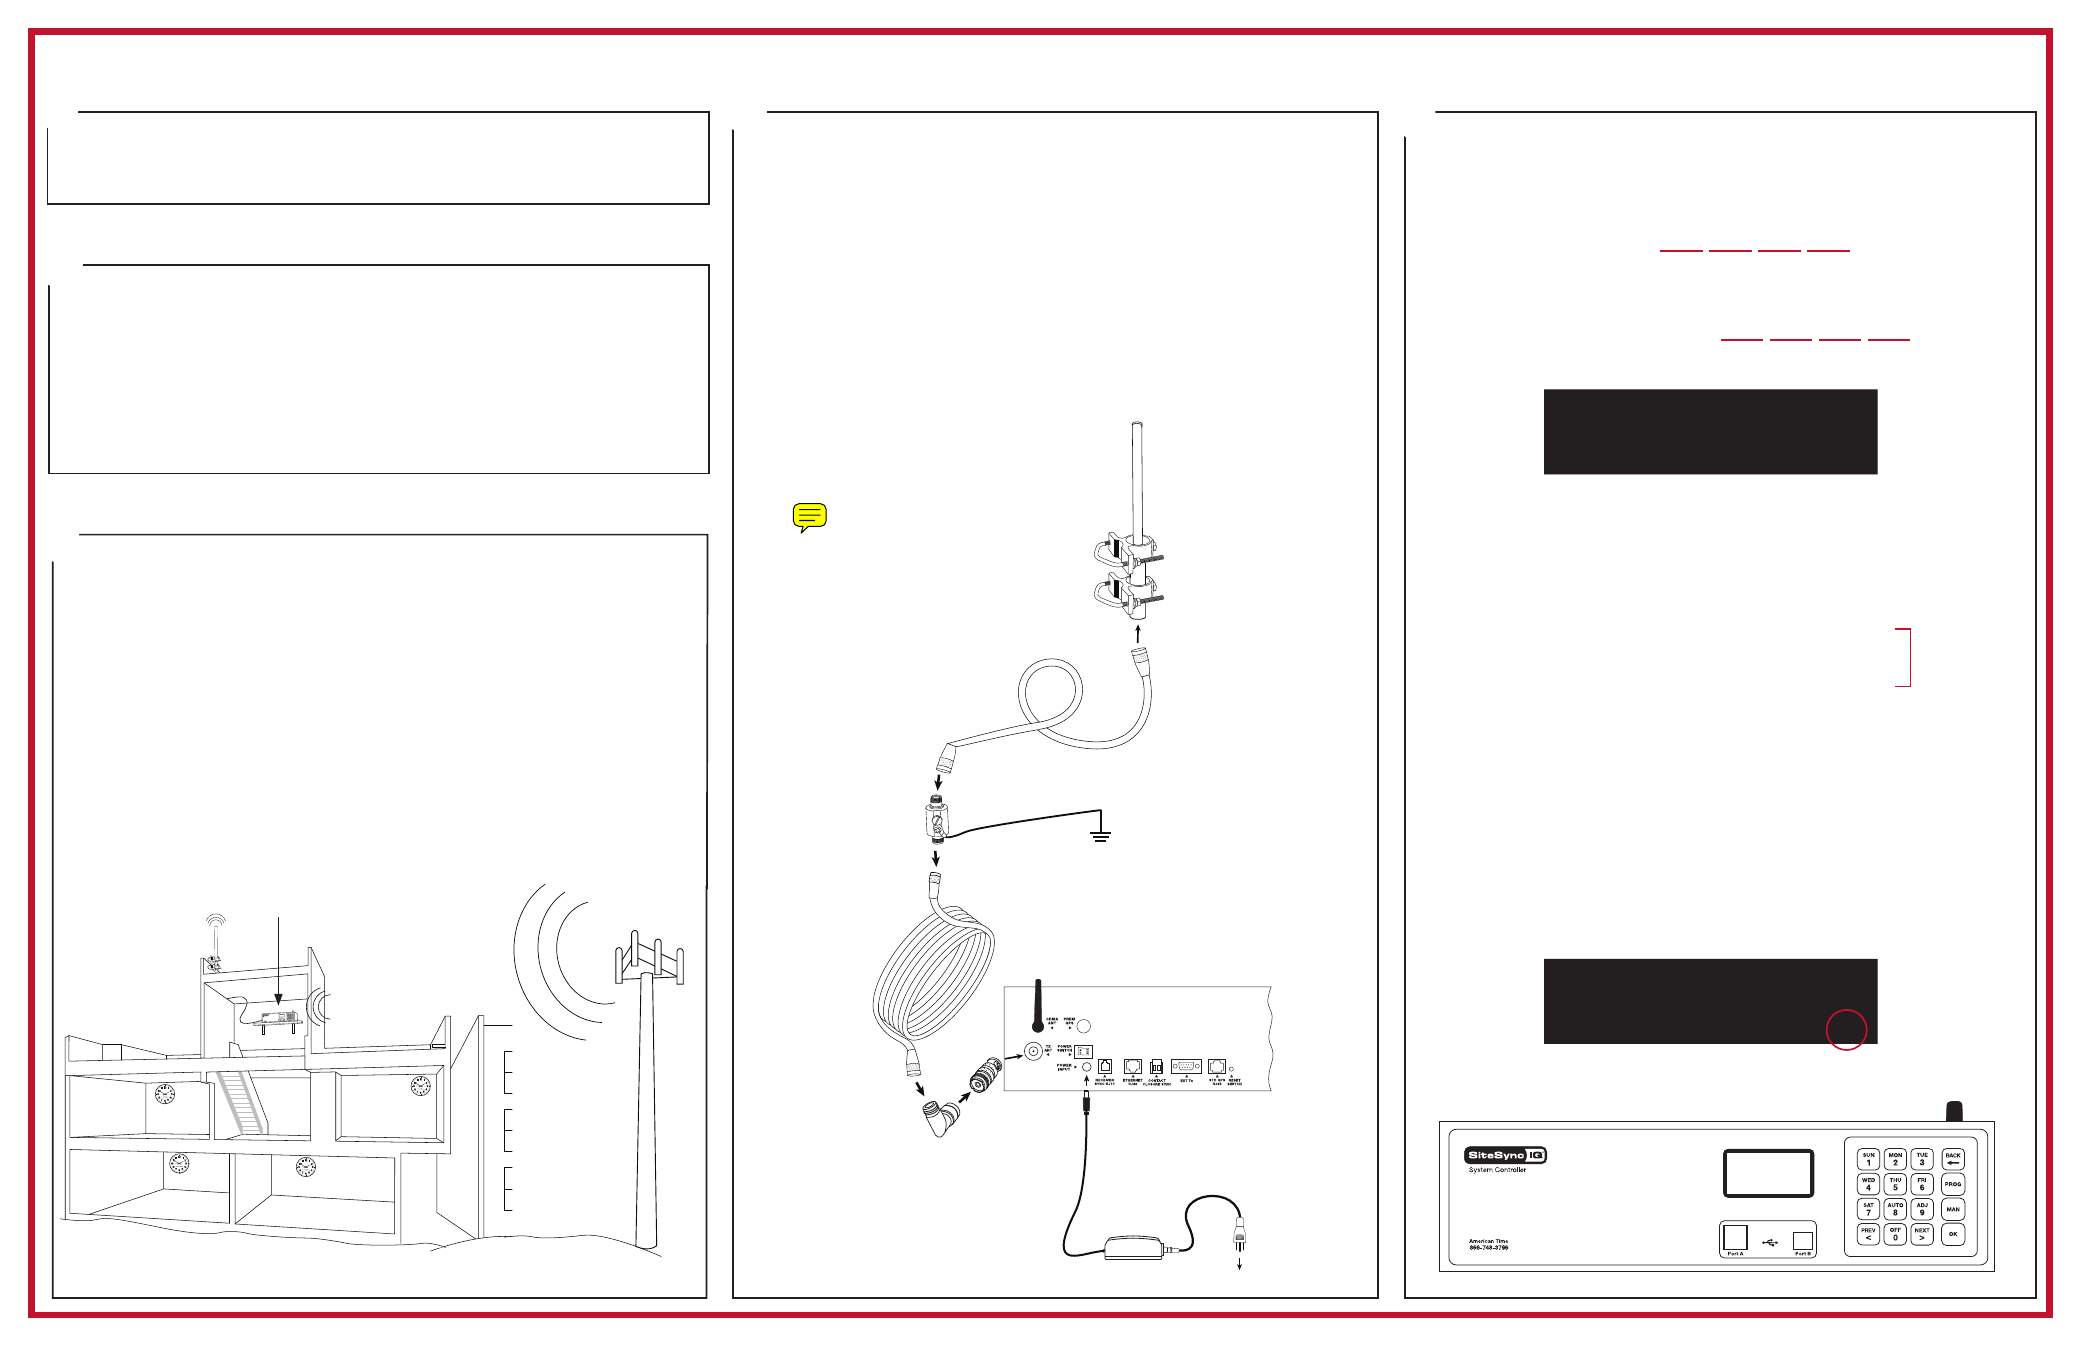
Connect cables to the system controller
A.
Connect the CDMA antenna to the CDMA ANT port.
B.
Connect the System Controller power supply to the POWER
INPUT port.
C.
Connect campus antenna to the TX ANT port. *Lightning
arrestor must be grounded per local electrical code.
Plug 110v cord into power source. Turn the POWER SWITCH on
the back of the system controller to the on position.
Use the Setup Wizard
1. Press
1 to start the Setup Wizard
(Page 9 in Installation Manual)
2. Create a 4 digit
User Lock or enter 0000 to disable this
feature. Press
O
.
Tip: Record this password.
3. Create a 4 digit
Service Lock (for advanced features) or enter
0000 to disable this feature. Press
O
.
Tip: Record this password.
4. Select local time zone by using the
<>
keys. Press
O
.
USET=Eastern USCT=Central USMT=Mountain USPT=Pacific
Note: There are 40 options to choose from.
5. Press
8
to select automatic DST (Daylight Saving Time) or
0
to disable DST if your location doesn't observe DST.
Press
O
6. Press
1
for 12-hour mode - AM/PM (1:00PM).
Press
2
for 24-hour mode - Military (13:00).
7. To confirm proper set up, press
8
to sync.
• If successful, “CDMA Sync Successful” will display
• If not successful, “CDMA Sync Failed” will display. Re-try
by pressing
8
again.
8. “Setup Wizard Successfully Completed” will display.
The system controller now shows the correct time and date. You
will no longer be prompted on power-up for setup information.
9.
Verify the unit is transmitting. TX should display for about
three seconds every 30 seconds (approximately the top and
bottom of every minute) in the bottom right corner of the
screen.
MON MAR 10 2014
10:38:06 AM USCT
American Time
Status=AUTO
TX
MON MAR 10 2014
10:38:06 AM USCT
American Time
Status=AUTO CDMA=S
1
4
5
Unpack the box
1. Remove the components and system controller from the box.
Save the packing materials in case you need them later.
Check the components
Your system kit comes with:
• System Controller
• Hinged screw-on CDMA antenna
(A)
• Power supply
(B)
• Campus TX antenna kit
(C)
• Installation & Operation Manual
Choose your location
• Choose a location for the system controller that receives good
cellular reception. The easiest way to check reception is to
check signal strength on a cell phone.
Avoid high voltage equipment when choosing a location.
• Choose a location for your campus TX antenna either
outside or inside at the highest central location in your facility.
The TX antenna must be located at least 4' away from
the system controller
2
3
Set Menu LOCAL
Time Zone Code: 05
99=Custom USCT
<>=Scroll
OK=Accept
A
B
C
To local
power
(110vac)
Note: If your system controller supports more than one time sync
option, refer to the SiteSync IQ Installation & Operation Manual
for detailed instructions.
TX Ant signal
out to clocks
CDMA signal
to facility
CDMA Ant
signal in
System controller
located high & central
Note: Screen
will advance
immediately
*
See above
To ground
- CDMA 10 Watt Campus GPS Plus 25 Watt Campus GPS Plus 40 Watt Campus Standard GPS 5 Watt Campus Standard GPS 10 Watt Campus GPS Plus 5 Watt Campus GPS Plus 10 Watt Campus Ethernet 5 Watt Campus Ethernet 10 Watt Campus Ethernet 25 Watt Campus Ethernet 40 Watt Campus CDMA 25 Watt Campus CDMA 40 Watt Campus GPS Plus 5 Watt Standard GPS Plus 10 Watt Standard CDMA 5 Watt Standard CDMA 10 Watt Standard Standard GPS 5 Watt Standard Standard GPS 10 Watt Standard Standard GPS 25 Watt Campus Standard GPS 40 Watt Campus Ethernet 5 Watt Standard Ethernet 10 Watt Standard