Aervoe Mr. Max Table Top Burner User Manual
Page 2
Read instruction manual thoroughly prior to use, and retain these instructions for future reference.
Not for household use. For outdoor use only.
All burning appliances consume oxygen. Use only in well ventilated areas.
DO NOT tamper with or disconnect the factory installed safety devices.
Operate burner only on stable, flat surfaces in a horizontal position.
Avoid using when strong winds are present.
DO NOT use oversized pots or pans that extend over the edge of the fuel cartridge cover.
Never use two or more adjacent units to extend the cooking surface.
DO NOT expose fuel cartridge to heat or open flame, or store at temperatures above 110
°
F (43
°
C).
DO NOT use aluminum foil as a cooking container.
DO NOT store burner with fuel cartridge in place.
DO NOT use or store near heat, open flame, or gasoline.
DO NOT use if burner has been damaged.
No more than 48 LP-gas fuel cartridges shall be stored in one building.
Close supervision is necessary when used near children.
CLEANING
1. Be sure burner has cooled completely. Wash with warm soapy water to clean the
burner body, trivet, and pan supports. Rinse with clean warm water and wipe
with a clean dry cloth.
2. DO NOT clean burner head with water, this may result in failure of ignition. A wire
brush can be used to clean burner head and burner holes if needed.
3. DO NOT immerse in water.
4. DO NOT use solvents or harsh chemicals to clean. Use of solvents or harsh
chemicals may cause damage.
CARE & MAINTENANCE
Evaluate the condition of your stove before each use. Do not use if it has any damage,
loose parts, or does not operate correctly.
• Ensure the trivet is properly placed in the upright position.
• Verify the piezoelectric igniter operates properly and creates a spark by testing
it without a fuel cartridge installed. Turn the ignition knob fully to the left until
you hear a loud click. You should see a spark at the burner. This means it is
operating correctly.
REPAIR & REPLACEMENT PARTS
Warning: This stove contains no customer serviceable parts. Only authorized factory
representatives may make repairs to this stove. Attempt to service yourself will void
all manufacturer warranties.
Igniting the Burner
CAUTION: Never operate or expose the stove to any other
flammable vapors or liquids.
1. Close the fuel cartridge cover.
2. Turn the ignition knob in a counter-clockwise direction until you hear a loud
click. A distinct click sound indicates that a spark has been generated and the
burner should now be ignited and a flame will be present.
3. Verify that a bluish-yellow flame is present and has completely formed around
the burner orifice.
4. If the burner fails to ignite, immediately turn ignition knob in a clockwise direction
to the OFF position. Wait 5 minutes for gas vapors to dissipate, then repeat step
2 above.
5. Discontinue use and consult manufacturer if stove fails to ignite properly after
a few attempts.
To Adjust Heat
Full power is achieved when the ignition knob is in the HIGH position while the
burner is on. To adjust the flame, turn the ignition knob slowly towards the OFF
position until the desired flame or heat level is achieved.
To Shut Off
After every use:
1. Turn the ignition knob to the OFF position.
2. Lift the fuel cartridge locking lever up to the unlock position to disengage
the fuel cartridge.
3. Open the fuel cartridge cover and remove the fuel cartridge. Replace the cap on
the fuel cartridge and store in cool, dry place, separate from burner. Let burner
cool completely before storing, cleaning, or re-inserting the fuel cartridge.
Max Burton
®
Mr. Max
TM
Portable Gas Stove #8254
OPERATING INSTRUCTIONS
Before operating and during use, check the following at regular intervals.
1. Keep the area around the stove clear and free from combustibles including gasoline
and other flammable vapors and liquids.
2. Never obstruct the flow of combustion air and ventilation air.
Installing the Fuel Cartridge
1. The ignition knob must be in the OFF position.
2. Open the fuel cartridge cover.
3. Remove the cap from the fuel cartridge.
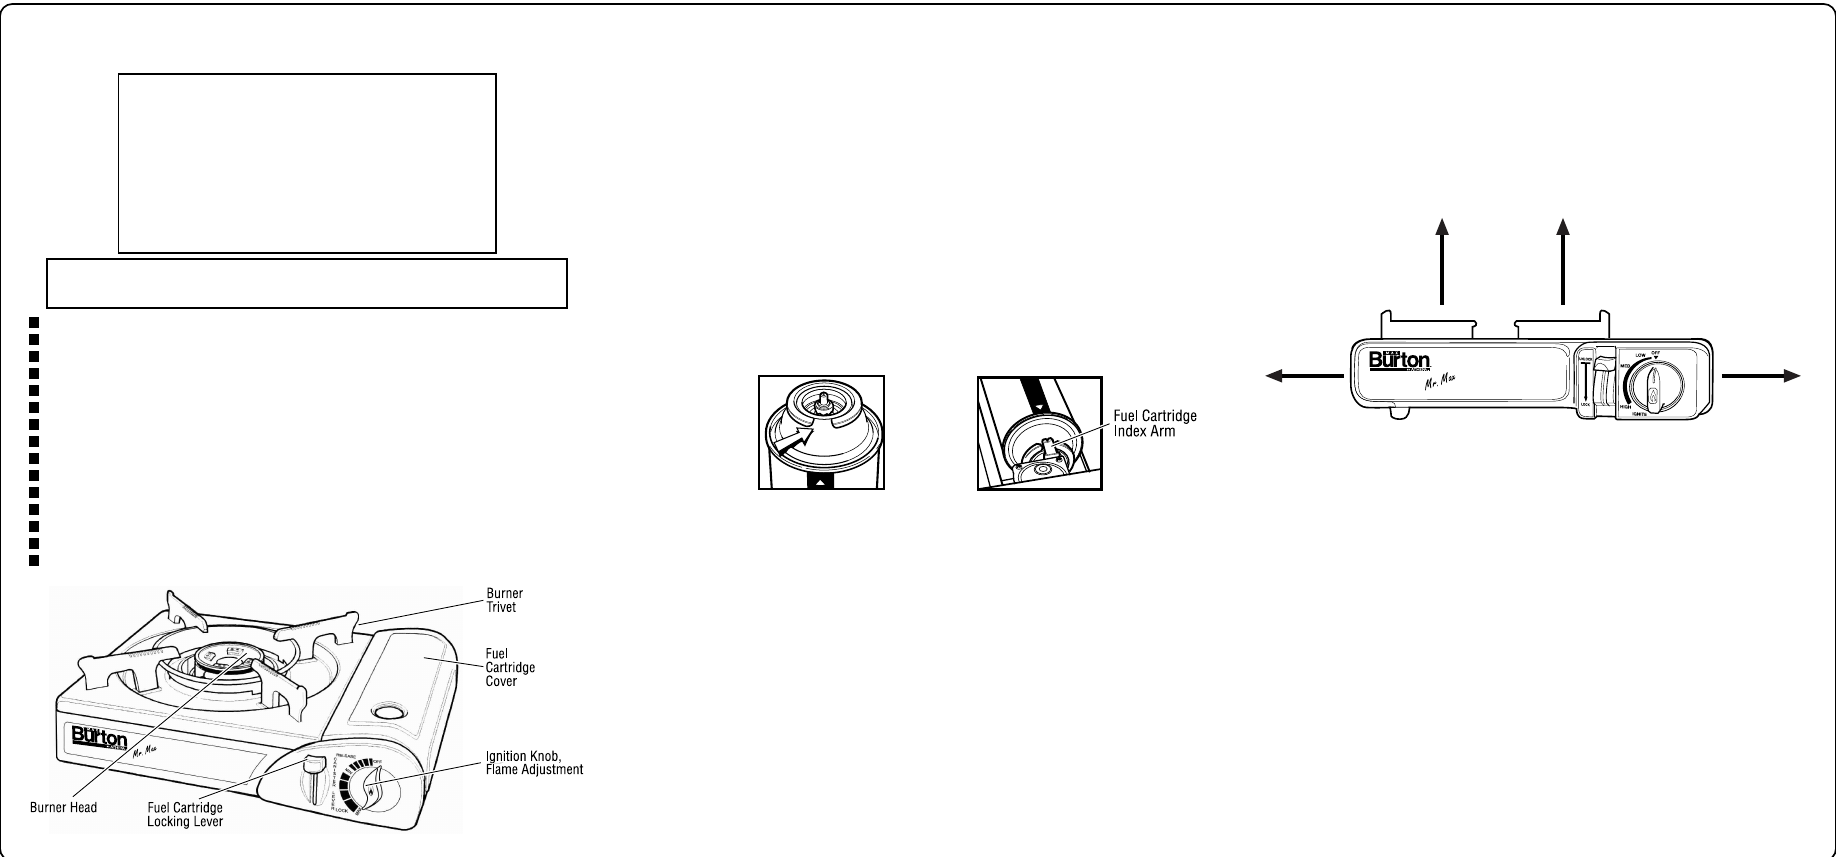
4. Locate the notch collar on top of the fuel cartridge. (see fig. 1). Align the notch
collar with the fuel cartridge index arm. (see fig. 2)
5. To engage the fuel cartridge, press down on the fuel cartridge locking lever until
it is in the lock position. If the ignition knob is in the off position and a hissing
sound is heard, this indicates a gas leak. Lift the fuel cartridge locking lever up
to the unlock position to disengage the fuel cartridge. Remove the fuel cartridge
and repeat steps 5 and 6 until no hissing sound is heard.
Do not use near combustible materials or obstruct ventilation.
FOR YOUR SAFETY
If you smell gas:
1. Do not attempt to light this appliance
2. Extinguish any open flame
3. Disconnect from fuel supply
4. Evacuate the area
5. Call for professional help
WARNING
Do not store or use gasoline or other liquids with flammable
vapors in the vicinity of this or any other appliance.
™
Parts Identification
Fig. 2
Fig. 1
MINIMUM OPERATING CLEARANCE
20”
20”
40”