Aervoe 3-Watt Spotlight User Manual
Max burton, Watt spotlight #6985
Max Burton
®
3-Watt Spotlight #6985
IMPORTANT SAFEGUARDS
Read all instructions before operating
•
Do not place in or around any source of heat or flame to prevent the
•
rechargeable lithium-ion battery from exploding
Do not operate if there is any damage to the unit or charging adapters
•
Do not use an extension cord. Plug adapters directly into an electrical outlet
•
To keep the battery in the best operating condition, do not store for more than 3
•
months without charging or operating
To avoid electrical shock, do not immerse cord or unit in water or other liquids
•
Unit may be operated in wet environments but do not leave it out in severe
•
weather
Do not shine directly into eyes
•
Administer close supervision when using this spotlight around children
•
LED bulb is not replaceable. Do not attempt to remove or replace
•
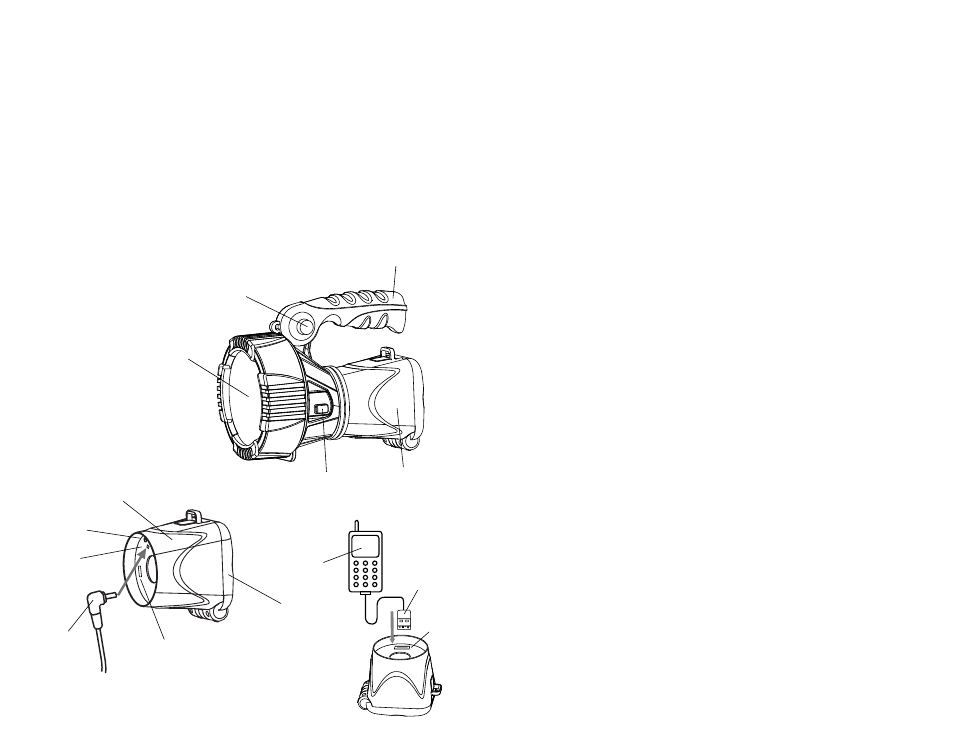
PARTS IDENTIFICATION
CHARGING THE SPOTLIGHT/POWER POD
For optimal performance, fully charge prior to first use. The removable/rechargeable
Power Pod may be charged using the included 12V or 120V power adapters or using
an accessory solar collector. Additional Power Pods can be purchased separately
(P/N #6986) and kept charged for uninterrupted power to the spotlight or other
accessory device.
Remove the Power Pod from the Spotlight by turning it in a counter-clockwise
1.
direction ¼ turn. Be careful not to damage the electrical connection terminals
inside of the Power Pod when removing or installing.
Plug the 120V AC/DC wall adapter or the 12V DC vehicle adapter (both included)
2.
into the DC INPUT on the Pod and the other end into an electrical wall outlet or
vehicle DC receptacle.
To charge using a solar collector, connect the 12V DC vehicle adapter to the DC
3.
INPUT on the Pod. Connect the female 12V adapter that is included with any
Aervoe Solar Collector to it and follow the charging instructions included with
your solar collector.
A red charging indicator light on the Pod will illuminate to indicate it is charging
4.
and remain on during charging.
A green charging indicator light will illuminate when the battery is fully charged.
5.
Replace the Pod to the back of the Spotlight for use by reversing the action in
6.
step #1 above.
NOTE: The Power Pod may be left connected to the chargers to ensure the unit is
fully charged and ready for use. Always fully charge before storing for over 3 months.
Test every 30 days to ensure proper operation.
SPOTLIGHT OPERATION
Push the
1.
hANDLE RELEASE BUTTON to turn the 2 POSITION hANDLE to
either the upper position (pistol grip) or lower position (search grip). The upper
position is for spotlighting long-range objects. The lower position is ideal for
search mode.
Press the 3 position
2.
POwER BUTTON:
Low
•
High
•
Off
•
USB POWER OUTPUT
The 5V~500 mAh USB port on the Power Pod may be used to charge electronic
devices such as LED work/reading lights, cell phones, cameras, MP3 players, GPS,
etc. with the stored power in the Pod. Plug in your device’s USB charging adapter
into the USB OUT PORT in the Pod to charge.
LED Bulb
Handle
Handle Adjustment
Button
Power Button
Power Pod
Attached
Power Pod
LED Indicator
Light
USB Out
DC IN
DC Charging
Plug
Battery
Compartment
Electronic
Device
USB 5V
DC Out
Device’s USB
Adapter Cord