Saturn ST-CC7145 User Manual
Page 3
4
that they do not play with the appliance.
21. Do not use the device if its
component parts (the power cord, plug,
etc.) are damaged. Do not attempt to
repair
the
device
yourself.
Please
contact the nearest authorized service
center for a qualified inspection and
repair.
NOTE:
1. Care should be taken when using the
appliance due to the emission of steam.
2. Unplug the appliance Curing filling
and cleaning.
3. If the supply cord is damaged, it
must be repaired by it's service agent in
order to avoid a hazard.
Accessory Assemble
Fig. 1
The steamer comes with a Fabric Brush
for smoothing wrinkles from fabrics
delicately. Follow the following steps to
attach the accessories to the Steam
Nozzle.
1.
Make sure the steamer is turned off
and no steam emits from the Steam
Nozzle.
2.
Take the Fabric Brush and slide it
onto the Steam Nozzle, as shown in Fig.
1.
3.
Make sure that holes on Steam
Nozzle are aligned with open slot on the
accessory, so that steam is not blocked.
Caution!
Do not install the accessory on
nozzle while steam emitting, to
avoid burns.
OPERATING INSTRUCTION
Filling Water Tank
1.
Unplug the steamer before filling
the water.
2.
Place the steamer on a flat and firm
surface.
3.
Cautiously unscrew and remove
Water Tank Cap
4.
Carefully fill Water Tank with water
from the provided measuring cup.
5.
Fill up the Water Tank with cool
water to desired steaming level without
exceeding the MAX (0.25l) fill line as
indicated from the Water Tank window.
6.
Replace Water Tank Cap.
Max 15 steaming for 15 minutes
10 steaming for 10 minutes
5 steaming for 5 minutes.
CAUTION:
1. Alter each use always allow unit to
cool down for 15 minutes before adding
cold water. Cold water added lo a hot
boiler may cause net water and steam
to shoot out of fill hole.
2. Extreme caution is needed when
pouring water into the water tank and
keep eyes distant from the fill hole.
3. Never fill water exceeding the MAX
filling.
NOTE:
1. Use of distilled or de-mineralized
water is recommenced to prolong the
life of the steamer.
2. Use water only. No detergent or other
chemical substance should be added to
avoid damage.
3. This kind of misuse will lead to invalid
warranty.
Steaming Linens & Fabrics
Make sure the Water Tank has been
already filled and that deseed accessory
is connected before the following steps.
1.
Plug in the unit. Switch on the unit
by pressing the On/Off Switch. The
Switch will illuminate to indicate that
the unit is on.
2.
Steam will emit from the Steam
Nozzle in approximately 2 minutes.
3.
Direct the Steam Nozzle with either
one of the accessories towards the
material you wish to steam.
4.
Keep the flow of steam focused on
the material you are steaming. Using a
slight back-and-forth motion over the
area you are steaming will further
enhance the process.
Always be sure that Steam Nozzle and
the attachment are pointed in a safe
5
direction (away from the user, other
people, pets and plants) when steam is
being emitted.
OPERATING INSTRUCTION
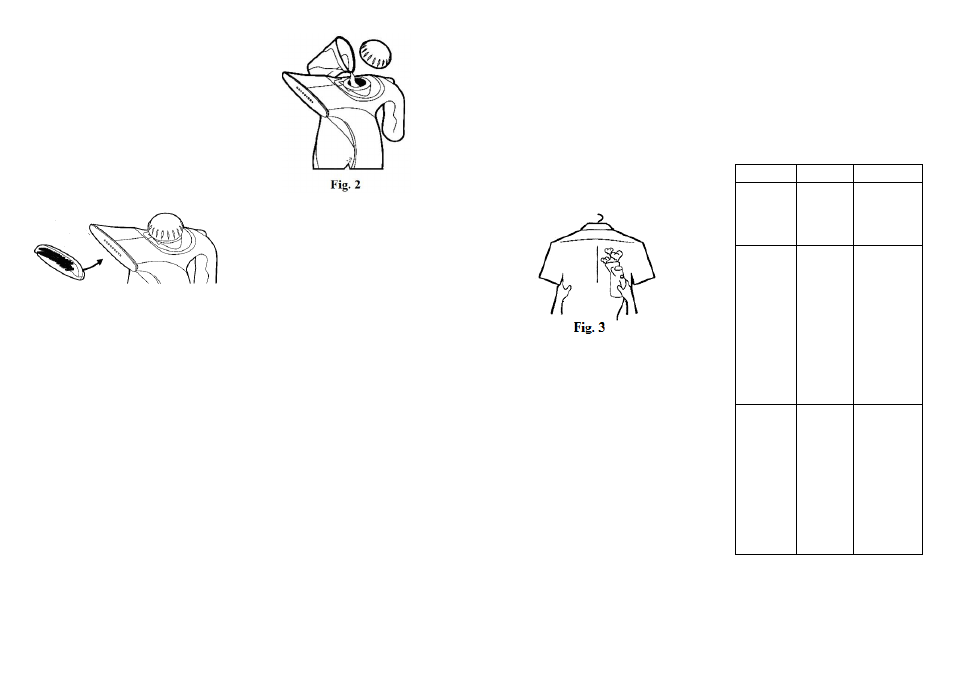
Steaming Garments
1.
Place garment on a clean, rust-free
hanger.
2.
Direct steam nozzle towards bottom
of the garment. Steam will rise along
inside and outside of the fabric and
remove wrinkles. Slowly slide Steam
Nozzle upward from bottom lo top of the
garment (Fig. 3).
3.
Direct Steam Nozzle away from the
garment and smooth fabric with your
free hand".
4.
Repeat as necessary until garment
is wrinkle-free.
STORAGE
1. Unplug the power cord.
2. Allow the unit to cool completely (at
least 60 minutes)
3. Remove the attachment from the
unit.
4. Drain remaining water in water tank
thoroughly into a sink or tub to
minimize potential mineral build-up.
Loosely replace Water Tank Cap. Do not
tighten cap, it may lie difficult for the
next use.
5. Store all accessories with the unit in
a cool, dry location.
REMOVING MINERAL BUILD-UP
The best way to avoid mineral build-up
is to use distilled or de-mineralized
water. 1. Unplug the unit and allow it to
cool completely (at least 60 minutes).
2. Remove all accessories from the unit.
3. Remove Water Tank Cap and drain
water from the Water Tank into sink or
tub.
4. Using a measuring cup, make a
mixture of 0.125L vinegar and 0.125L
water.
5. Slowly pour water-vinegar solution
into the Water Tank.
6. Allow to stand for 1 -2 hours.
7. Drain the solution from the Water
Tank.
8. If the mineral build-up still remain in
the unit. Repeat points 3-7 above until
the mineral build-up is removed.
9. Rinse the Water Tank with fresh
water, drain and repeat until vinegar
odor disappears.
10. Replace the Water Tank Cap.
1) The unit is designed for indoor
household use only.
2) Commercial users will not obtain the
regular warranty as stated in the terms
of the warranty card.
Problem
Possible
Reasons
Solution
Unit fails
to
heat
up.
Unit
is
not plug
in.
Switch is
not
activated
.
Plug
into
electrical
outlet.
Press
the
On/Off
switch.
Unit heats
up,
but
fails
to
steam.
Water
tank
is
empty or
water
level too
low.
Mineral
build-up
in unit.
Thermo-
fuse
breakdow
n.
Refill Water
Tank
according to
the
Operating
instruction
of
this
manual.
Follow
Removing
Mineral
Build-Up
procedure
of
this
manual.
Bring
to
Service
Centre.
Steam
output is
intermit-
tent.
Mineral
build-up
in unit.
It’s
normal
for unit to
stop
periodically
steaming
for a few
seconds. If
steam stays
of for longer
periods,
follow
“Removing
Mineral
Build-Up”
procedure
of
this
manual.
Specification
Power: 1000 W
Rated Voltage: 220-230 V
Rated Frequency: 50 Hz
Rated Current: 4.5 A