Instructions for installation and use – Brennenstuhl Solar LED-spot Duo Premium SOL SV0805 P1 IP44 with PIR sensor 8xLED 0,5W 320lm Cable length 4,75m Colour Anthracite User Manual
Page 6
6
We'd like to thank you for purchasing this product.
Please familiarise yourself with the product before using it for
the first time. Read the following instructions and safety notes
carefully. Use the device as described and for the specified
purposes only.
Do not throw away these instructions. Include all
documentation if giving the device to a third party.
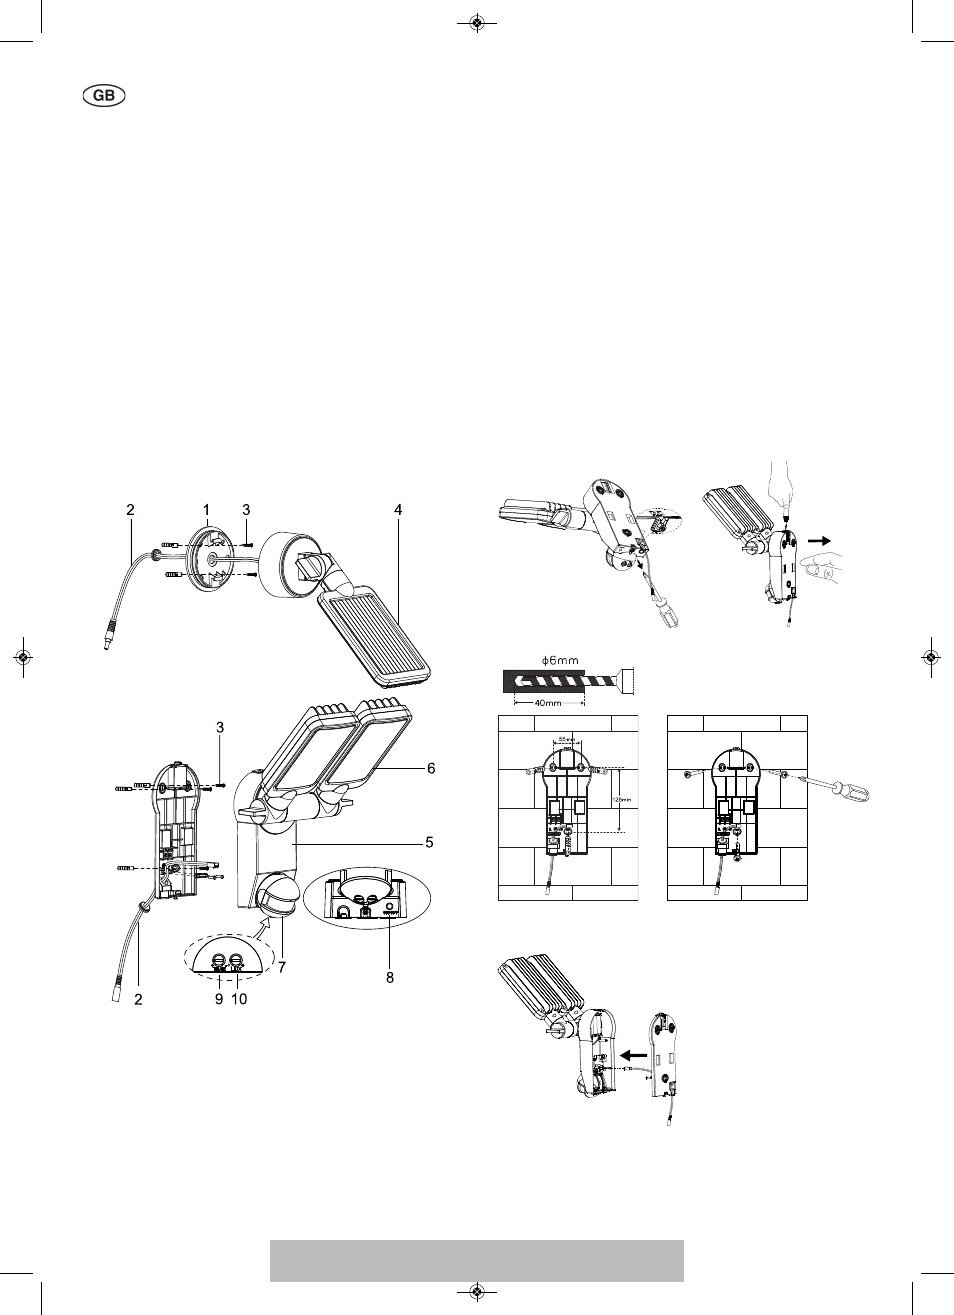
PARTS LIST
1
Solar panel mounting bracket
2 Solar panel connection cable
3 Solar module mounting screws and main unit mounting
screws (5x)
4 Solar module
5 Main unit
6 LED unit
7 Motion detector
8 ON / OFF switch
9 Light ON time adjustment knob
10 Sensitivity adjustment knob
CHARGING THE SOLAR LIGHT FOR THE FIRST TIME
Before you can use your solar light it must be charged using
the solar module.
Connect the solar module cable with the main unit.
The ON / OFF switch on the main unit must be set to OFF.
Put the solar module in a location where it will get maximum
exposure to direct sunlight. Refer to the notes on suitable
installation locations in the following section.
Depending on the season, the weather and the location of the
solar module charging may take up to 4 days before the light is
ready for use.
SUITABLE LOCATIONS FOR INSTALLING THE SOLAR
LIGHT AND THE SOLAR MODULE
Main Unit:
The main unit contains the light, the motion detector and the
batteries. Please note when installing the main unit that the
monitoring range of the motion detector is a maximum of 180º
within an 10-metre range, depending on installation height.
Use the screws included in the package (item 3 on the parts
list) for installing the light on a firm surface, such as a wall. Use
screws and screw anchors that are suitable for the installation
surface.
Installation:
• Loosen the screw (Fig. 1) of the wall bracket
• Press the release button on the top side (Fig. 2) and open
the cover by pulling the wall bracket
• Avoid damaging existing cables or wires when drilling
mounting holes in the wall or when tightening the screws
Fig. 1
Fig. 2
Fig. 3
Fig. 4
Fig. 5
INSTRUCTIONS FOR INSTALLATION AND USE
SOL SV0805 P1 IP 44, SOL LV0805 P1 IP44, SOL SV0805 P2 IP44,
SOL LV0805 P2 IP44, SOL SV1205 P2 IP44, SOL LV1205 P2 IP44
043413 SOL SH_LH Doppelstrahler 17.05.13 18:47 Seite 6
- Solar LED-light Duo Premium SOL LV0805 P1 IP44 with PIR sensor 8xLED 0,5W 320lm Cable length 4,75m Colour Anthracite Solar LED-spot Duo Premium SOL SV0805 P2 IP44 with PIR sensor 8xLED 0,5W 320lm Cable length 4,75m Colour Anthracite Solar LED-light Duo Premium SOL LV0805 P2 IP44 with PIR sensor 8xLED 0,5W 320lm Cable length 4,75m Colour Anthracite Solar LED-spot Duo Premium SOL SV1205 P2 IP44 with PIR sensor 12xLED 0,5W 480lm Cable length 4,75m Colour Anthracite Solar LED-light Duo Premium SOL LV1205 P2 IP44 with PIR sensor 12xLED 0,5W 480lm Cable length 4,75m Colour Anthracite Solar LED-Spot SOL 1x4 IP44 with PIR sensor 4xLED 0,5W 160lm Cable length 4,75m Colour Grey white Solar LED-Spot SOL 1x4 IP44 with PIR sensor 4xLED 0,5W 160lm Cable length 4,75m Colour Anthracite Solar LED-Spot SOL 2x4 IP44 with PIR sensor 8xLED 0,5W 300lm Cable length 4,75m Colour white Solar LED-Spot SOL 2x4 IP44 with PIR sensor 8xLED 0,5W 300lm Cable length 4,75m Colour Anthracite Solar LED-Spot Premium SOL SH0805 P1 IP44 with PIR sensor 8xLED 0,5W 320lm Cable length 4,75m Colour Anthracite Solar LED-light Premium SOL LH0805 P1 IP44 with PIR sensor 8xLED 0,5W 320lm Cable length 4,75m Colour Anthracite Solar LED-spot Premium SOL SH0805 P2 IP44 with PIR sensor 8xLED 0,5W 320lm Cable length 4,75m Colour Anthracite Solar LED-light Premium SOL LH0805 P2 IP44 with PIR sensor 8xLED 0,5W 320lm Cable length 4,75m Colour Anthracite Solar LED-spot Premium SOL SH1205 P2 IP44 with PIR sensor 12xLED 0,5W 480lm Cable length 4,75m Colour Anthracite Solar LED-light Premium SOL LH1205 P2 IP44 with PIR sensor 12xLED 0,5W 480lm Cable length 4,75m Colour Anthracite