Assembly instructions, Operating tips – Weston AutoFresh Vacuum Dome User Manual
Page 3
-3-
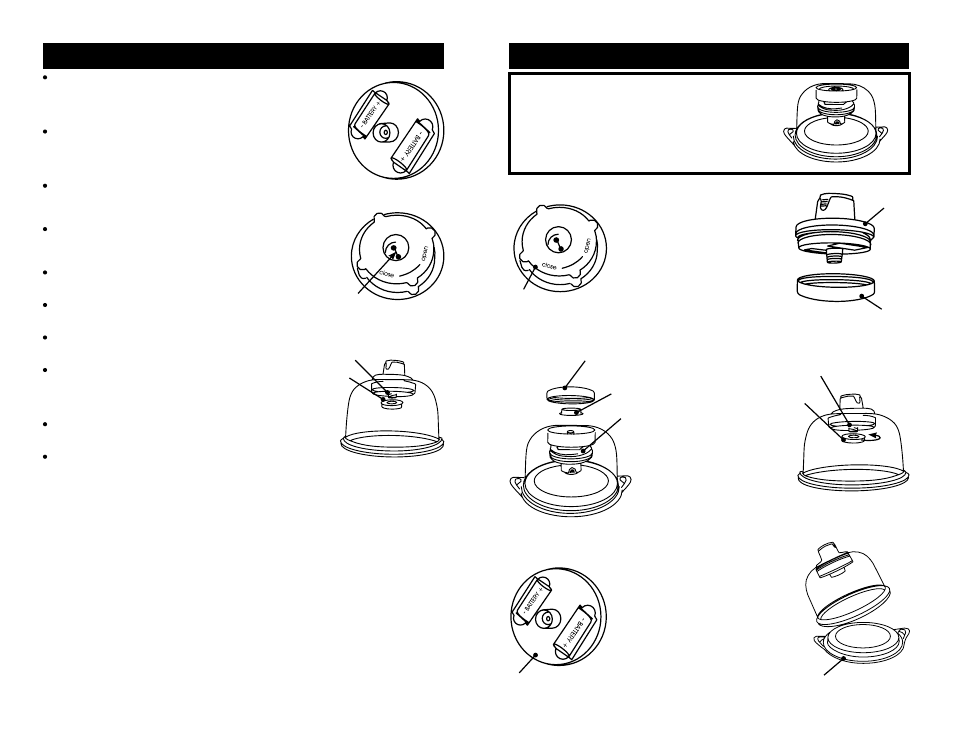
NOTE: FOR SHIPPING PURPOSES, the AutoFresh
Vacuum Dome’s Vacuum Base is placed onto the
Dome upside down (figure 1). The Vacuum Base
must be removed and turned as illustrated in the
following instructions.
ASSEMBLY INSTRUCTIONS
1. Remove the Vacuum
Base Lid from the top of the
Dome (figure 3).
2. Unscrew and remove the
Vacuum Cap (figure 2) from
the Vacuum Base (figure 3).
3. Remove the Vacuum
Base from the Acrylic Dome.
4. Install two new “C” type
batteries into the Battery
Compartments of the Vacuum
Base, following the imprinted
battery diagram inside the
Battery Compartments (figure
4).
5. Replace the Vacuum
Base Lid onto the Vacuum
Base. Twist the Vacuum
Base Lid on snugly, do not
overtighten (figure 5) .
6. Place the Vacuum Base
into the groove on the top of
the Dome, pushing the post of
the Vacuum Base through the
hole and inside the Dome.
7. From the inside of the
Dome, place the Vacuum Cap
onto the post of the Vacuum
Base. Twist the Vacuum Cap
on snugly, do not overtighten
(figure 6).
8. Place the Dome onto the
Food Tray (figure 7).
figure 1
figure 2
figure 3
figure 6
figure 5
figure 4
figure 7
Vacuum
Cap
Dome
Vacuum
Cap
Vacuum
Base
Vacuum
Base
Vacuum Lid
Vacuum
Base
Vacuum
Cap
Food Tray
Post of the
Vacuum Base
OPERATING TIPS
. Be sure to use new “C” type batteries. Do not use old batteries.
Do not store the AutoFresh Vacuum Dome with the batteries
installed. Be sure the batteries in use are not dead. Dispose of old
batteries properly.
. Be sure the batteries are installed in the correct direction. Install
two new “C” type batteries into the Battery Compartments, following
the imprinted battery diagram inside the Battery Compartments
(figure 16).
. If using the AutoFresh Vacuum Dome on a surface instead of
the Food Tray, make sure the surface is smooth, clean and dry.
Liquids, debris and porus surfaces can hinder the vacuum process.
. If using the AutoFresh Vacuum Dome with the Food Tray,
make sure the surface is smooth, clean and dry. Liquids, debris
and porus surfaces can hinder the vacuum process.
. Be sure the “On/Off” Button is fulled pressed on and snapped
into place.
. Be sure that the vent holes in the Vacuum Cap are
not blocked or obstructed by the food (figure 17) .
. Be sure the Vacuum Cap is securely fastened onto
the post of the Vacuum Base (figure 18).
. The Manufacturer declines any responsibility in
the case of improper use of this product. Improper
use of the AutoFresh Vacuum Dome will Void the
Warranty.
. NEVER open the housing of the Vacuum Base.
Doing so will Void the Warranty.
. This product is not a toy. Keep children away.
figure 16
figure 17
Vent Holes
in the
Vacuum Cap
figure 18
Vacuum
Cap
Post of the
Vacuum Base
-6-
Vacuum
Base Lid