Power supply, Grounding, Extension cords – Weston Pro 2300 Vacuum Sealers User Manual
Page 7: Grounding instructions, Preparing vac bags from a roll, Service instructions
-7-
-10-
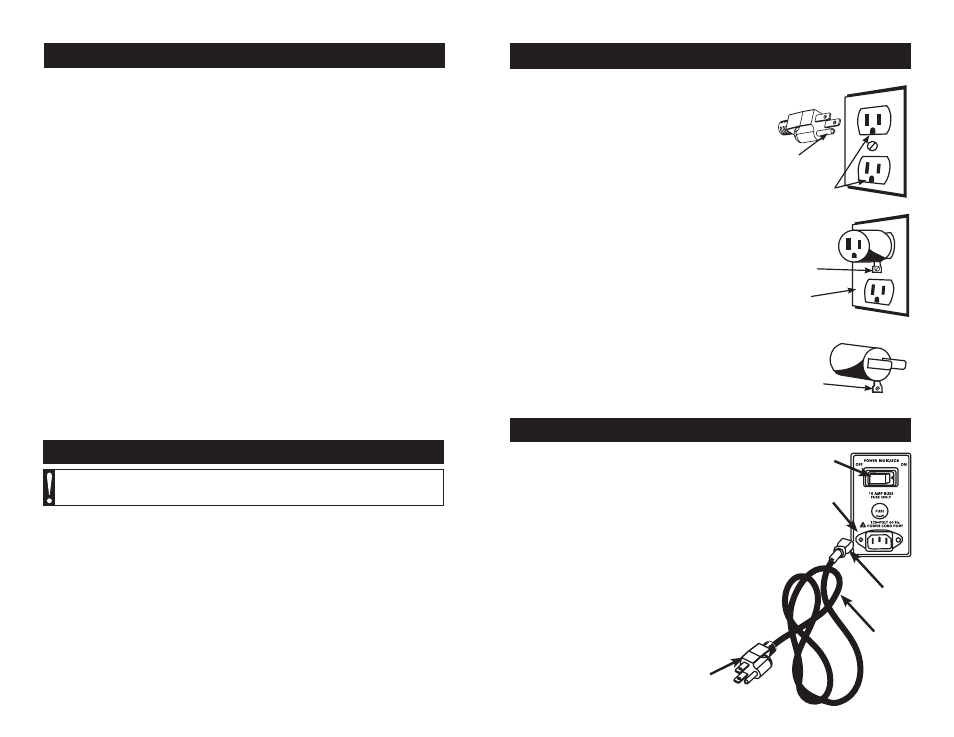
POWER SUPPLY
Insert the connector end of the
Power Cord into the
Power Cord Port on the right side of the unit. Insert
the
Plug on the Power Cord into a standard 120-volt
grounded electrical outlet
Figure 2
. DO NOT modify the
plug to fit an unsuitable outlet.
Power
Indicator
Switch
Power Cord
Port
Connector
End
Plug End
GROUNDING
This appliance must be grounded while in use to protect
the operator from electrical shock. The appliance
is equipped with a 3-conductor cord and a 3-prong
grounding type plug to fit the proper grounding-type
receptacle. The appliance has a plug that looks like
Figure A. An adaptor, Figure B, should be used for
connecting Figure A plugs to two-prong receptacles.
The grounding tab which extends from the adaptor
must be connected to a permanent ground such as
a properly grounded outlet box as shown in Figure C
using a metal screw.
EXTENSION CORDS
Use only 3-wire extension cords which have 3-prong
grounding-type plugs and a 3-pole cord connector
that accepts the plug from the appliance. Use only
extension cords having an electrical rating not less
than the rating of the appliance. Do not use damaged
extension cords. Examine extension cord before using
and replace if damaged. Do not abuse extension cord
and do not yank on any cord to disconnect. Keep
cord away from heat and sharp edges.
Figure A
Figure B
Figure C
Circuit
Grounding
Conductor
Grounding
Prong
Metal
Grounding
Screw
Cover of
Grounded
Outlet Box
Grounding
Means
AA2220
GROUNDING INSTRUCTIONS
Power
Cord
Figure 2
PREPARING VAC BAGS FROM A ROLL
1. Make sure the
Vacuum Sealer is in the “OFF” position. Attach the Vacuum Sealer
to the power supply.
2. Turn the
Vacuum Sealer “ON”.
3. The “
POWER” Light on the display, “POWER INDICATOR” Switch both will
illuminate and the
Internal Cooling Fan will run.
4. Open the
Vacuum Lid.
5. Cut a vacuum bag to the length you want from a roll.
6. Place either open end of the bag against the outer face of the
Oval Vacuum
Chamber Seal in the Vacuum Chamber (not in the Vacuum Chamber).
7. Close the
Vacuum Lid. The bag end should be sandwiched between the Vacuum
Lid Seal and Seal Bar Heating Element. Make sure there are no wrinkles or creases
in the bag in the sealing area.
8. Press and hold the
Vacuum Lid Handle down. You may need to continue holding
the bag.
9.
Press the
“START” Button
(this will engage the
Pump
and the
Heating Element
).
Press the
Manual Seal Button to seal the vacuum bag.
10. Sealing is complete when the
Vacuum Chamber releases after a 3 second cooling
period (the
“COOL” Light will illuminate). The release is audible.
11. Open the
Vacuum Lid and remove the bag. DO NOT try to open the Vacuum Lid
before the vacuum has released or unit damage may occur. Wait at least 20 seconds
before sealing another bag to avoid overheating the unit.
12. Turn the
Vacuum Sealer “OFF” and unplug the Power Cord when you are done.
Some parts of the
Vacuum Sealer may need replacing after repeated use. A Vacuum
Sealer Maintenance Kit
(Sold Separately Model No. 08-0501-W)
may be necessary for the
Vacuum Sealer to properly function.
REPLACING THE OVAL VACUUM CHAMBER SEALS:
1. Turn “OFF” the
Vacuum Sealer and remove the Power Cord from the electrical
outlet.
2. Make sure the unit is completely cool.
3. Open the
Vacuum Lid.
4. Remove the
Oval Vacuum Chamber Seal from the groove on the underside of
the
Vacuum Lid.
5. Remove the
Oval Vacuum Chamber Seal from the groove in the Plastic Vacuum
Chamber.
SERVICE INSTRUCTIONS
WARNING!
Before cleaning, assembling or disassembling the Vacuum
Sealer, make sure the Vacuum Sealer is OFF and the PLUG IS REMOVED
FROM THE OUTLET/POWER SOURCE!