Mode ok holidays select, Ok holidays select – TFC Group Grasslin QEG-2S User Manual
Page 2
1)
Function not available for all products.
Disposal / Recycling
Dispose of the packing material correctly according to legal
requirements and regulations.
Observe the following notes for disposing of defective system
components or the system after its service life:
• Dispose of appropriately, i.e. separating the parts to be disposed
of according to material groups.
• Do not throw electrical and electronic components in the bin.
Bring these parts to the recycling centers.
• Always ensure the environmentally sound disposal conform to the
state-of-the-art environment protection, recycling and disposal
engineering.
Service menu
1)
This mode is a countdown of the operating running time. Service period
time, action and message shown will be set into service menu (for
service variants only).
To access to service menu (SERV MENU) the device must be working in
RUN mode (green indicator lamp RUN must be ON).
Service mode is PIN code protected. The preset value is
1234. You can
change the PIN code in the installers menu.
If you wish to change the settings in the service menu, follow the
instructions below:
INST MENU
SERV MENU
PIN CODE
SERV MODE
SERV DAYS
DAYS NOTICE
ACTION TYPE
INST PHONE
INST PHONE INP
SERV RESET
CHANGE PIN
10 sec.
1. Make sure the device is working in
RUN mode.
2. Press and hold buttons at the same time for 10 seconds.
Z
Z
INST MENU opens and OK is flashing.
3. Press button.
Z
Z
Service menu (
SERV MENU) is selected.
Z
Z
OK is flashing.
4. Confirm with .
Z
Z
First number of
PIN CODE is flashing.
5. Enter first number of PIN code, or , and confirm with .
Z
Z
Second number of PIN CODE is flashing.
6. Enter second number of PIN code, or , and confirm with .
Z
Z
Third number of PIN CODE is flashing.
7. Enter third number of PIN code, or , and confirm with .
Z
Z
Fourth number of PIN CODE is flashing.
8. Enter fourth number of PIN code, or , and confirm with .
Z
Z
If PIN code is correct, service menu is activated, you can
change the settings.
Z
X
Press or to scroll through the menu.
Z
X
Press to edit/confirm settings and or to select settings.
Z
X
To save your settings, continue scrolling through the menu options
with key, until you see
CHANGE PIN / – OK +, and finally leave
the service menu with key.
Z
X
To cancel service menu, press
Override
HEATING
HOT WATER
Extra Hour
Mode
DAY/
CH
RUN
TIME
OFF
am
Thu
AUTO
ONCE
CONT
EXT HOUR
+1
+2
+3
07 / 02 / 2013
ON1
OFF
AUTO
ONCE
CONT
EXT HOUR
+1
+2
+3
ON1
DHW
Override
Extra Hour
Mode
OK
Holidays
Select
button.
The following settings are possible:
Service mode
(SERV MODE)
NO: Functionality is disabled (Default value)
YES: Functionality is enabled.
Service days
(SERV DAYS)
You can set the number of days (1 to 400) after
which a service message is to appear. It will be
shown on the display as soon as the counter has
reached the number of days set by you.
Days notice
(DAYS NOTICE)
Number of days to „show“ service message on
screen. Adjustable from 0 to 30 days.
Action type
(ACTION TYPE)
TIMED: After service days due, heating system will
be OFF, with possibility to switch ON manually the
channels in 1 hour time fractions by pressing Extra
hour button, up to 3 hours (maximum nr. of times :
Timed Boost) (Default value)
REMIND: After service days due, system will
remind by a message to call installer for revision
and system restart.
PIN code
1)
Service mode is PIN code protected. The preset value is
1234.
If you wish to change the PIN code, follow the instructions below:
INST MENU
SERV MENU
CHANGE PIN
OLD PIN 1
OLD PIN 2
OLD PIN 3
OLD PIN 4
NEW PIN 1
NEW PIN 2
NEW PIN 3
NEW PIN 4
NEW PIN SET
10 sec.
1. Make sure the device is working in
RUN mode.
2. Press and hold buttons at the same time for 10 seconds.
Z
Z
INST MENU opens and OK is flashing.
3. Press 2 x until
CHANGE PIN is displayed.
Z
Z
OK is flashing.
4. Confirm with .
Z
Z
First number of
OLD PIN CODE is flashing.
5. Enter old PIN code.
Z
X
Press or to set a numeric value.
Z
X
Press to set the next number.
Z
Z
If old PIN code was correct, first number of
NEW PIN CODE
is flashing.
6. Enter new PIN code.
Z
X
Press or to set a numeric value.
Z
X
Press to set the next number.
Z
Z
New PIN code is saved.
TOTAL OFF: After service days due, heating system
will be off until installer restarts the device (all
push buttons and running modes will be disabled)
Timed boost
(TIMED BOOST)
Available only if action type is set as TIMED.
It gives the possibility to run manually for an
undefined time (in 1 hour fraction times) or during
a maximum number of times.
Setting possibilities:
NO LIMIT (Default value)
SELECTAbLE, 1 to 99 times,
Phone number
(INST PHONE)
Show/Hide Installer´s phone nr. on screen, after
service due day. Setting possibilities:
NO: Hide phone Nr. (Default value)
YES: Show Phone Nr.
When entering your own ‘phone number in the Service Mode,
the number will appear in the smaller line of text above the
display.
Initially, there is an underscore cursor visible in the top left area
above the clock display. Press the or buttons to scroll
through numbers and text (full Alpha-numeric range), once you
have selected the character you require, press
OK, the cursor
will move to the next character space. There is capacity to enter
13 characters.
Installer‘s phone
number
(INST PHONE
INPUT)
Menu reserved to introduce installer´s own phone
nr. (max. 12 digits)
Setting possibilities:
EMPTY (Default value)
Inserted
PHONE NUMbER, if installers place any
phone number.
Service reset
(SERV RESET)
Reset all parameters of service menu to factory
default
Holiday mode
1)
The Holiday function allows you to switch OFF your heating system for
a specified number of days (from 1-90 days). This lets you save energy
and related costs when you are away from home, but resumes normal
operation on the day of your return.
Holidays
SELECT DAYS
HOLIDAY MODE
IS ACTIVATED
1. Make sure the device is working in
RUN mode.
2. Press the
HOLIDAY button.
3. Select desired numbers of days, or , and confirm with .
Z
Z
Holiday mode is activated.
To cancel the Holiday function, just press the
HOLIDAY button
again. If you use the holiday function during winter you should
ensure that you have a secondary frost protection device in your
system to prevent frost damage.
Example 2: Weekly programming CH, built-in programme STD
1. Press the
SELECT
Override
HEATING
HOT WATER
Extra Hour
Mode
DAY/
CH
RUN
TIME
OFF
am
Thu
AUTO
ONCE
CONT
EXT HOUR
+1
+2
+3
07 / 02 / 2013
ON1
OFF
AUTO
ONCE
CONT
EXT HOUR
+1
+2
+3
ON1
DHW
Override
Extra Hour
Mode
OK
Holidays
Select
until indicator lamp CH is ON.
Z
Z
Day
MON is flashing.
You have the possibility to edit each day individually or you can
create dayblocks, e.g. Tue, Wed, Fri and Sat, where you can set
the same ON and OFF sequence.
Days you do not select will keep the preset values.
Set day:
2. Select the first desired day, or , and confirm with .
Z
Z
The menu item
ADD DAY is displayed.
ADD DAY:
YES
Z
X
Choose
YES, or , if you want to create a dayblock and
confirm with .
Z
Z
The next day is flashing.
Z
X
Select the next day you want to add to the dayblock, or ,
and confirm with .
Z
Z
The menu item
ADD DAY is displayed.
Z
X
Repeat this process until the desired days have been selected.
On the last day selected, choose
NO for ADD DAYS and confirm
with .
Z
Z
The selected days are shown in the display.
Z
Z
The preset time
ON1 (06:30) is blinking.
Review/Edit domestic hot water (DHW) program
Depending on the product you can choose between three different
settings: Daily, Weekly
1)
or Week-Weekend (5-2 days)
1)
.
Daily
All days (Monday - Sunday) are programmed with
the same ON/OFF time schedule
Weekly
1)
You can program each day (Monday, Tuesday, ...)
with a different ON/OFF time schedule
Week-Weekend
1)
You can program Monday - Friday with a ON/
OFF time schedule and Saturday - Sunday with
a different one.
You can choose the desired setting in the
INSTALLERS MENU.
Every programme has three pairs of ON/OFF switching times per
day. Each time can be set between 3.00 am and 2.50 am (on the
next day). To review or edit your doemstic hot water programme,
press the
SELECT
Override
HEATING
HOT WATER
Extra Hour
Mode
DAY/
CH
RUN
TIME
OFF
am
Thu
AUTO
ONCE
CONT
EXT HOUR
+1
+2
+3
07 / 02 / 2013
ON1
OFF
AUTO
ONCE
CONT
EXT HOUR
+1
+2
+3
ON1
DHW
Override
Extra Hour
Mode
OK
Holidays
Select
until menu DHW is selected.
Example: Daily programming DHW, built-in programme STD
DHW
CH
RUN
DAY/
TIME
ON1 DHW
OFF1 DHW
ON2 DHW
OFF2 DHW
ON3 DHW
OFF3 DHW
ON1 DHW
SAVED
1. Press the
SELECT
Override
HEATING
HOT WATER
Extra Hour
Mode
DAY/
CH
RUN
TIME
OFF
am
Thu
AUTO
ONCE
CONT
EXT HOUR
+1
+2
+3
07 / 02 / 2013
ON1
OFF
AUTO
ONCE
CONT
EXT HOUR
+1
+2
+3
ON1
DHW
Override
Extra Hour
Mode
OK
Holidays
Select
until indicator lamp DHW is ON.
Z
Z
Preset value ON1 (06:30) is flashing.
2. Enter hour and minute for the new
ON1 command, or , and
confirm with .
Z
Z
Preset value OFF1 (08:30) is flashing.
3. Enter hour and minute for the new
OFF1 command, or , and
confirm with .
Z
Z
Preset value ON2 (12:00) is flashing.
4. Enter hour and minute for the new
ON2 command, or , and
confirm with .
Z
Z
Preset value OFF2 (12:00) is flashing.
5. Enter hour and minute for the new
OFF2 command, or , and
confirm with .
Z
Z
Preset value ON3 (16:30) is flashing.
6. Enter hour and minute for the new
ON3 command, or , and
confirm with .
Z
Z
Preset value OFF3 (22:30) is flashing.
7. Enter hour and minute for the new
OFF3 command, or , and
confirm with .
Z
Z
Set value ON1 is flashing.
8. Press the
SELECT
Override
HEATING
HOT WATER
Extra Hour
Mode
DAY/
CH
RUN
TIME
OFF
am
Thu
AUTO
ONCE
CONT
EXT HOUR
+1
+2
+3
07 / 02 / 2013
ON1
OFF
AUTO
ONCE
CONT
EXT HOUR
+1
+2
+3
ON1
DHW
Override
Extra Hour
Mode
OK
Holidays
Select
until indicator lamp RUN is ON.
Z
Z
The program is saved.
The settings for a weekly programming DHW is done in the same
way as the weekly programming for central heating (CH), see
example „Weekly programming CH“ on the left side.
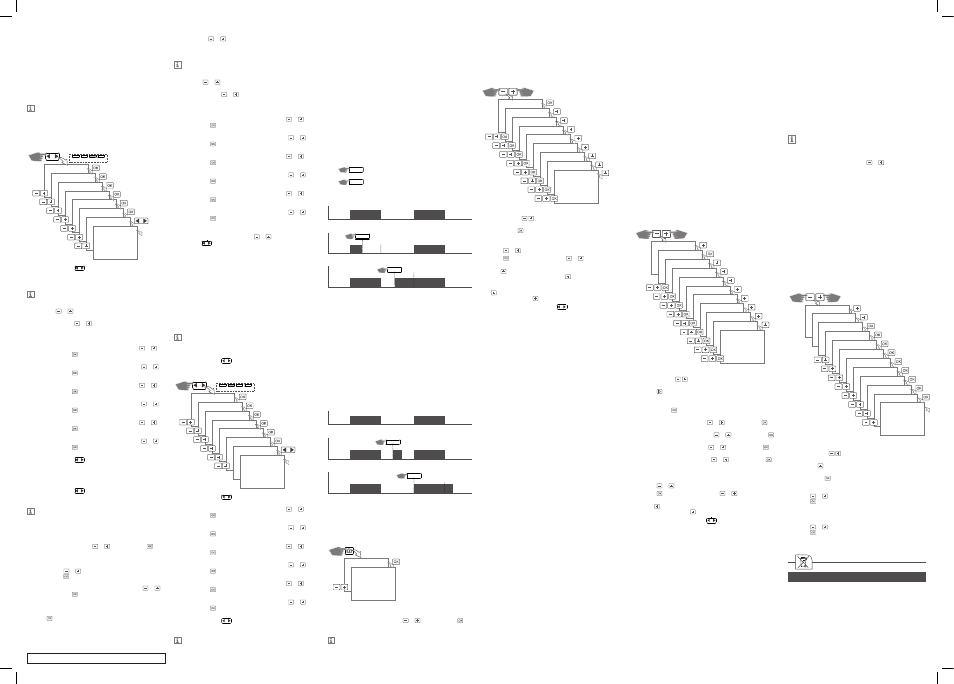
OVERRIDE mode
The Override function (temporary program override) allows the user to
finish the current running program prematurely or start a program to run
before its scheduled start. This depends on the current channel status.
The Override function applies only to the current program and remains
active until the next program change. After that, the programmer returns
to AUTO mode.
The Override function is only available when the device is running in
AUTO and ONCE operating mode.
Override
HEATING
HOT WATER
Extra Hour
Mode
DAY/
CH
RUN
TIME
OFF
am
Thu
AUTO
ONCE
CONT
EXT HOUR
+1
+2
+3
07 / 02 / 2013
ON1
OFF
AUTO
ONCE
CONT
EXT HOUR
+1
+2
+3
ON1
DHW
Override
Extra Hour
Mode
OK
Holidays
Select
1 x
Enable OVERRIDE
Override
HEATING
HOT WATER
Extra Hour
Mode
DAY/
CH
RUN
TIME
OFF
am
Thu
AUTO
ONCE
CONT
EXT HOUR
+1
+2
+3
07 / 02 / 2013
ON1
OFF
AUTO
ONCE
CONT
EXT HOUR
+1
+2
+3
ON1
DHW
Override
Extra Hour
Mode
OK
Holidays
Select
2 x
Disable OVERRIDE
OFF
OFF
OFF
ON
ON
OFF
OFF
Example 1
Example
AUTO mode
OFF
Back to AUTO
ON
ON
ON
OFF
OFF
Example 2
OFF
Back to AUTO
ON
Override
HEATING
HOT WATER
Extra Hour
Mode
DAY/
CH
RUN
TIME
OFF
am
Thu
AUTO
ONCE
CONT
EXT HOUR
+1
+2
+3
07 / 02 / 2013
ON1
OFF
AUTO
ONCE
CONT
EXT HOUR
+1
+2
+3
ON1
DHW
Override
Extra Hour
Mode
OK
Holidays
Select
Override
HEATING
HOT WATER
Extra Hour
Mode
DAY/
CH
RUN
TIME
OFF
am
Thu
AUTO
ONCE
CONT
EXT HOUR
+1
+2
+3
07 / 02 / 2013
ON1
OFF
AUTO
ONCE
CONT
EXT HOUR
+1
+2
+3
ON1
DHW
Override
Extra Hour
Mode
OK
Holidays
Select
Extra hour mode
The extra hour button allows you to switch the system ON for up to 3
extra hours without altering the program.
• When the blue central heating indicator lamp is OFF, pressing an
EXTRA HOUR button switches the heating ON for just one hour.
• When the blue central heating indicator lamp is ON, pressing an
EXTRA HOUR button extends the programmed ON period by one
hour.
• Further presses of the EXTRA HOUR button will increase the extra
hour period by one hour for each button press, up to a maximum of
3 hours.
• To cancel the extra hours, just keep pressing the EXTRA HOUR
button until the message EXT HOUR disappears from the display. The
system returns to previous status.
OFF
OFF
OFF
ON
ON
ON
ON
ON
OFF
OFF
OFF
(1 to 3 hours)
(1 to 3 hours)
Example 1
OFF
ON
ON
OFF
OFF
Example 2
OFF
ON
Override
HEATING
HOT WATER
Extra Hour
Mode
DAY/
CH
RUN
TIME
OFF
am
Thu
AUTO
ONCE
CONT
EXT HOUR
+1
+2
+3
07 / 02 / 2013
ON1
OFF
AUTO
ONCE
CONT
EXT HOUR
+1
+2
+3
ON1
DHW
Override
Extra Hour
Mode
OK
Holidays
Select
Override
HEATING
HOT WATER
Extra Hour
Mode
DAY/
CH
RUN
TIME
OFF
am
Thu
AUTO
ONCE
CONT
EXT HOUR
+1
+2
+3
07 / 02 / 2013
ON1
OFF
AUTO
ONCE
CONT
EXT HOUR
+1
+2
+3
ON1
DHW
Override
Extra Hour
Mode
OK
Holidays
Select
Example
AUTO mode
Installers menu
The programmer has a special installers menu where some features
can be adjusted to suit your lifestyle or preferences.
To access to installers menu (INST MENU) the device must be working
in
RUN mode (green indicator lamp RUN must be ON).
If you wish to change the settings in the installers menu, follow the
instructions below:
INST MENU
DIGI CLOCK
BACKLIGHT
S W CHANGE
PROG TYPE
NR PERIODS
DEFAULT PROG
PUMP GRAVITY
RESET
10 sec.
1. Make sure the device is working in
RUN mode.
2. Press and hold buttons at the same time for 10 seconds.
Z
Z
INST MENU opens and OK is flashing.
3. Confirm with .
Z
Z
Installers menu is activated, you can change the settings.
Z
X
Press or to scroll through the menu.
Z
X
Press to edit/confirm settings and or to select settings.
Z
X
To save your settings, continue scrolling through the menu options
with key, until you once again see
INST MENU / – OK +, and
finally leave the installers menu with key.
With QEG-2S, continue scrolling through the menu options with
key, until you see
CHANGE PIN / – OK +, and finally leave the
installers menu with key.
Z
X
To cancel installers menu, press
Override
HEATING
HOT WATER
Extra Hour
Mode
DAY/
CH
RUN
TIME
OFF
am
Thu
AUTO
ONCE
CONT
EXT HOUR
+1
+2
+3
07 / 02 / 2013
ON1
OFF
AUTO
ONCE
CONT
EXT HOUR
+1
+2
+3
ON1
DHW
Override
Extra Hour
Mode
OK
Holidays
Select
button.
The following settings are possible:
Digital clock
(DIGI ClOCk)
Shows the current time (hours/minutes) in a digital
and analog clock format
Setting possibilities:
NO: Digital clock not shown (Default value).
YES: Digital clock shown.
If digital clock is set
YES, you can choose between
12 HRS (AM-PM) or 24 HRS format.
Backlight
(BACklIGHT)
Setting possibilities:
PERMANENT ON: Backlight always ON (Default
value).
PERMANENT OFF: Backlight always OFF.
bUTTON PRESSED: Backlight ON when any
pushbutton is pressed. Backlight goes OFF 20
seconds after the last pushbutton press.
Auto Summer/
Wintertime
changeover
(S W CHANGE)
Automatic Summer/Winter time change.
Summer time starts on the last Sunday of March
(1:00 am to 2:00 am) and ends on last Sunday of
October (2:00am to 1:00am), then Winter time starts
Setting possibilities:
ON: S/W time change will be done automatically
(Default value)
OFF: S/W time change must be done manually.
Programming type
1)
(PROG TYPE)
Daily:
Weekly
1)
Week-Weekend
1)
Menu to select daily, week-weekend
1)
, weekly
1)
programming. This value will be applied to both
central heating and domestic hot water programming
method.
Setting possibilities:
All days (Monday - Sunday) are programmed with the
same ON/OFF time schedule
You can program each day (Monday, Tuesday, ...) with
a different ON/OFF time schedule
You can program Monday - Friday with a ON/OFF
time schedule and Saturday - Sunday with a different
one.
Number of
periods (NR
PERIODS)
Number of adjustable time periods defined by
ON-OFF pairs to control central heating or domestic
hot water.
Setting possibilities:
3 ON-OFF: adjust maximum 3 ON-OFF time periods
(Default value).
2 ON-OFF: adjust maximum of 2 ON-OFF time
periods.
Default
programmes
(DEFAUlT PROG)
Time programme that will appear by default when
running in AUTO mode or as base point to customize
according to users´ lifestyle
Setting possibilities:
STD: Standard Profile (Default value)
HOME: Home Profile
ECO: ECO Profile
Detailed explanation of the profiles see chapter
“Running a built-in programme”
Fully pumped/
gravity systems
(PUMP GRAVITY)
Fully pumped systems (PUMPED)
(Default value)
Central heating (CH) and domestic hot water (DHW)
channels run independently
Gravity systems (GRAVITY)
Domestic hot water (DHW) is ON every time that
Central heating (CH) is ON.
Reset
(RESET)
Reset all parameters of installation menu to factory
default
Review/Edit central heating (CH) program
Depending on the product you can choose between three different
settings: Daily, Weekly
1)
or Week-Weekend (5-2 days)
1)
.
Daily
All days (Monday - Sunday) are programmed
with the same ON/OFF time schedule
Weekly
1)
You can program each day (Monday, Tuesday,
...) with a different ON/OFF time schedule
Week-Weekend
1)
You can program Monday - Friday with a ON/
OFF time schedule and Saturday - Sunday
with a different one.
You can choose the desired setting in the
INSTALLERS MENU.
Every programme has three pairs of ON/OFF switching times
per day. Each time can be set between 3.00 am and 2.50 am
(on the next day).
Example 1: Daily programming CH, built-in programme STD
DHW
CH
RUN
DAY/
TIME
ON1 CH
OFF1 CH
ON2 CH
OFF2 CH
ON3 CH
OFF3 CH
ON1 CH
SAVED
1. Press the
SELECT
Override
HEATING
HOT WATER
Extra Hour
Mode
DAY/
CH
RUN
TIME
OFF
am
Thu
AUTO
ONCE
CONT
EXT HOUR
+1
+2
+3
07 / 02 / 2013
ON1
OFF
AUTO
ONCE
CONT
EXT HOUR
+1
+2
+3
ON1
DHW
Override
Extra Hour
Mode
OK
Holidays
Select
until indicator lamp CH is ON.
Z
Z
Preset value ON1 (06:30) is flashing.
Set time:
• If you make any changes, you must press OK to confirm ALL
ON/OFF pairs before pressing the select button to return to
the RUN mode, otherwise your changes will be lost.
• Press
or briefly to increase/decrease the time in 1
minute steps.
Press and hold or longer than 2 seconds to increase/
decrease the time quickly.
Or press OK to confirm a displayed (flashing) value
2. Enter hour and minute for the new
ON1 command, or ,
and confirm with .
Z
Z
Preset value OFF1 (08:30) is flashing.
3. Enter hour and minute for the new
OFF1 command, or ,
and confirm with .
Z
Z
Preset value ON2 (12:00) is flashing.
4. Enter hour and minute for the new
ON2 command, or ,
and confirm with .
Z
Z
Preset value OFF2 (12:00) is flashing.
5. Enter hour and minute for the new
OFF2 command, or ,
and confirm with .
Z
Z
Preset value ON3 (16:30) is flashing.
6. Enter hour and minute for the new
ON3 command, or ,
and confirm with .
Z
Z
Preset value OFF3 (22:30) is flashing.
7. Enter hour and minute for the new
OFF3 command, or ,
and confirm with .
Z
Z
Set value ON1 is flashing.
8. Press the
SELECT
Override
HEATING
HOT WATER
Extra Hour
Mode
DAY/
CH
RUN
TIME
OFF
am
Thu
AUTO
ONCE
CONT
EXT HOUR
+1
+2
+3
07 / 02 / 2013
ON1
OFF
AUTO
ONCE
CONT
EXT HOUR
+1
+2
+3
ON1
DHW
Override
Extra Hour
Mode
OK
Holidays
Select
until indicator lamp RUN is ON.
Z
Z
The program is saved.
ADD DAY:
NO
Z
X
Choose
NO, or , if you want to edit each day individually
Z
Z
The preset time
ON1 (06:30) is blinking.
Set time:
• If you make any changes, you must press OK to confirm ALL
ON/OFF pairs before pressing the select button to return to the
RUN mode, otherwise your changes will be lost.
• Press
or briefly to increase/decrease the time in 1 minute
steps.
Press and hold or longer than 2 seconds to increase/
decrease the time quickly.
Or press OK to confirm a displayed (flashing) value
3. Enter hour and minute for the new
ON1 command, or , and
confirm with .
Z
Z
Preset value OFF1 (08:30) is flashing.
4. Enter hour and minute for the new
OFF1 command, or , and
confirm with .
Z
Z
Preset value ON2 (12:00) is flashing.
5. Enter hour and minute for the new
ON2 command, or , and
confirm with .
Z
Z
Preset value OFF2 (13:00) is flashing.
6. Enter hour and minute for the new
OFF2 command, or , and
confirm with .
Z
Z
Preset value ON3 (16:30) is flashing.
7. Enter hour and minute for the new
ON3 command, or , and
confirm with .
Z
Z
Preset value OFF3 (22:30) is flashing.
8. Enter hour and minute for the new
OFF3 command, or , and
confirm with .
Z
Z
The time is saved.
Z
Z
The menu item
SELECT DAY is displayed.
9. You can select and edit a new day, or , or press the
SELECT
Override
HEATING
HOT WATER
Extra Hour
Mode
DAY/
CH
RUN
TIME
OFF
am
Thu
AUTO
ONCE
CONT
EXT HOUR
+1
+2
+3
07 / 02 / 2013
ON1
OFF
AUTO
ONCE
CONT
EXT HOUR
+1
+2
+3
ON1
DHW
Override
Extra Hour
Mode
OK
Holidays
Select
until programming menu RUN is selected to exit.
Operating modes
The operating mode may only be changed when
RUN mode is activated
(green indicator lamp RUN must be ON).
OFF
The system will remains OFF.
AUTO
The system will be switched ON and OFF according to
the adjusted program.
ONCE
The heating will come ON at the first programmed ON
time, and go OFF at the last programmed OFF time.
CONTINUOUS The system will remain ON continuously.
80.10.1352.7_manual_QEG2_QEG2S_FERTIG_V02.indd 2
24.04.2013 11:36:49