Fig. 9, Fig. 8 – TFC Group Famoso 601 (24 Hr) User Manual
Page 2
12
3
9
6
1
9
20
2
1
22
23
24
1
2
3
4
5
6
7
8
9
10
11
12
13
14
15
16
17
18
Fig. 9
30°C
5°C
30°C
5°C
1
2
A
B
C
D
E
GB
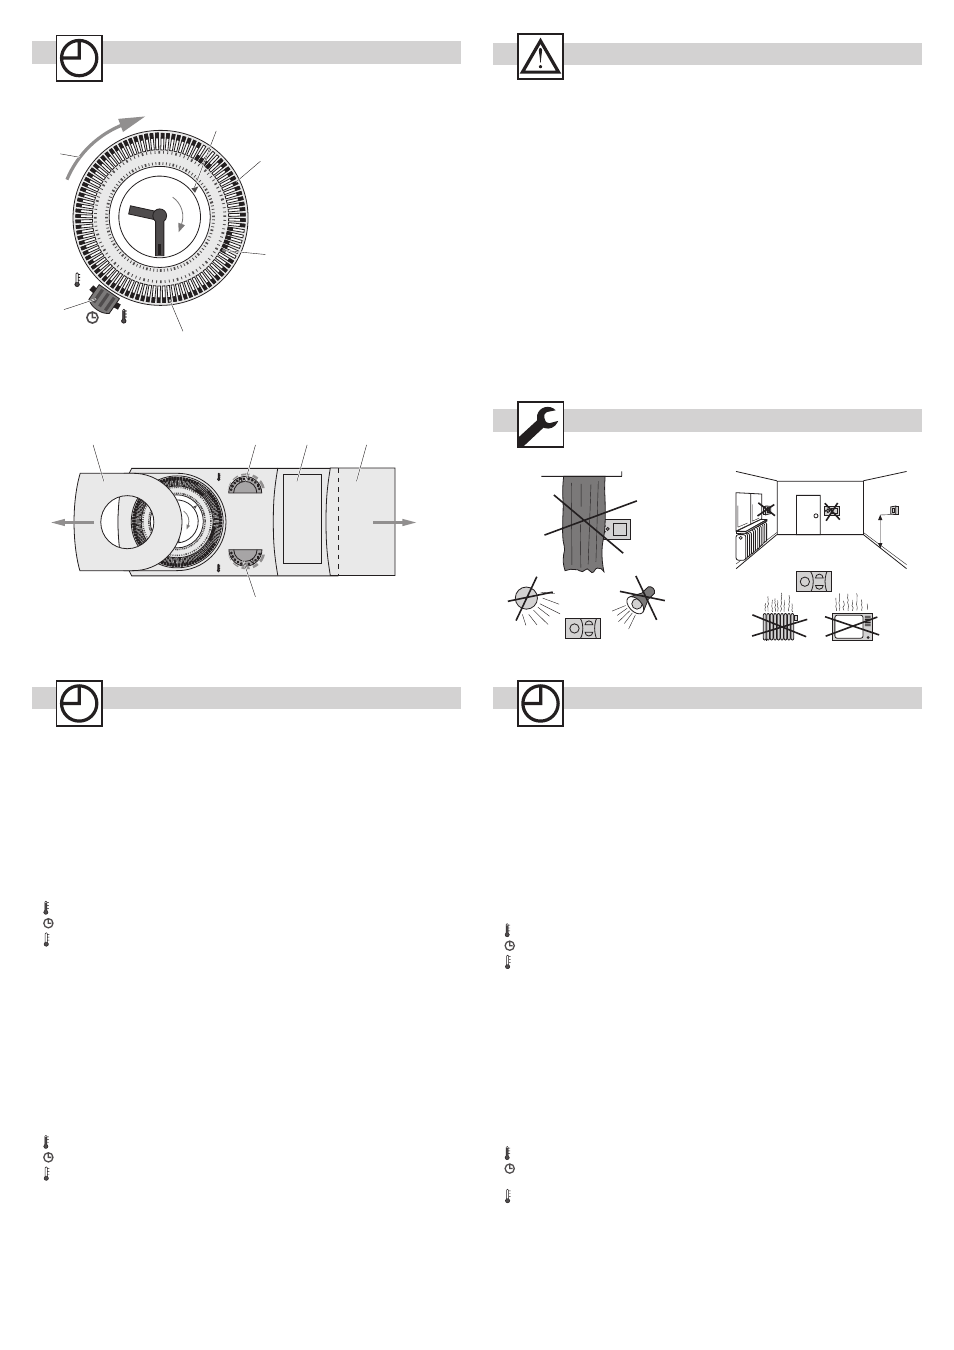
Setting the Room ChronoStat
·
To set the Time: Slide the cover A (fig. 9) off the unit. Rotate the timer clock clockwise until the time is correct,
fig. 8 (2).
·
To set the Central heating DAY/NIGHT temperature Times: Move the tappets inwards for Day temperature times
and outwards for Night temperature times (each tappet represents 15 minutes).
·
To set The Day Room Temperature: Rotate the room temperature dial B (fig. 9) until the desired room
temperature is selected. (comfort temperature value e.g. 22ºC)
·
To set The Night Room Temperature: Rotate the room temperature dial C (fig. 9) until the desired room
temperature is selected. (low temperature value e.g. 15ºC). Never over Day
temperature value.
·
To set The Operating mode: Slide the three position selector switch 6, (fig. 9) to the desired position.
1
Day = Continuosly Day Temperature ON.
Auto = Central Heating Day/Night temperature times controlled by the tappets
2
Night = Continuosly Night Temperature ON.
·
Quick Reference Guide: Slide cover E (fig.9) to find quick reference guide D (fig. 9)
D
Einstellung der Raumthermostatuhr
·
Uhrzeiteinstellung: Entfernen Sie den Deckel A (fig. 9). Drehen Sie den Schaltkopf in Uhrzeigerrichtung solange bis
die Uhrzeit korrekt eingestellt ist , fig. 8 (2).
·
Einstellung des Programms (Temperaturprofil): Nach Innen gerichtete Reiter entsprechen der Komfort-
temperatur, nach Außen liegende Reiter entsprechen der abgesenkten Temperatur (Jeder Reiter entspricht einer
Zeit von 15 Minuten)
·
Einstellung der Komforttemperatur: Drehen Sie den Knopf B (fig. 9) bis die gewünschte Raumtemperatur einge-
stellt ist (Komforttemperatur z. B. 22ºC)
·
Einstellung der Absenktemperatur: Drehen Sie den Knopf C (fig. 9) bis die gewünschte Raumtemperatur einge-
stellt ist (Absenktemperatur z. B. 15ºC). Die Absenktemperatur nicht über Komforttemperatur einstellen.
·
Handschalter Funktionen: Stellen Sie den Handschalter 6, (fig.9) in die gewünschte Position:
1
Tag
= Komforttemperatur dauerhaft eingestellt.
Auto = Automatikbetrieb, die Raumtemperatur wird je nach Ihrer Programmeinstellung geregelt
2
Nacht = Absenktemperatur dauerhaft eingestellt.
·
Kurzbedienanleitung: Auf der Innenseite des Deckels E (fig.9) finden Sie die Kurzbedienanleitung D (fig.9)
1 Rotate to adjust time
Drehen zur Zeiteinstellung
Girar para ajustar la hora
Ruotare per impostare l’ora
2 Time Pointer
Uhrzeit Markierung
Indicador horario
Indicatore dell’ora
3 Tappets
Programm Einstellung
Segmentos de programación
Cavalieri
4 Day temperature set
Komfort Temperatur (Tag)
Ajuste de temp. de dia
Temperatura Giorno
5 Night temperature set
Abgesenkte Temperatur (Nacht)
Ajuste de temp. de noche
Temperatura Notte
6 Three position switch
Handschalter
Interruptor de 3 posiciones
Selettore a 3 posizioni
12
3
9
6
19
2
0
2
1
22
23
24
1
2
3
4
5
6
7
8
9
10
11
12
13
14
15
16
17
18
1
2
1
Fig. 8
2
3
4
5
6
80.10.1149.7/06/01
E
Ajustar el Cronotermostato ambiente
·
Ajuste de la hora: Deslizar la cubierta A (fig. 9). Girar el reloj en sentido horario hasta que la hora sea la correcta,
fig. 8 (2), haciendo un ajuste fino mediante el giro de la manecilla de minutos.
·
Ajuste de tiempo para temperatura DIA/NOCHE: Moverlos segmentos hacia el interior para programar periodos
de temperatura de dia, y mover los segmentos hacia el exterior para programar periodos de temperatura de
noche (cada segmento representa 15 minutos).
·
Ajuste Temperatura de Día (Comfort): Girar el dial de temperatura B (fig. 9) hasta ajustar la temperatura
deseada. (temperatura comfort ej. 22ºC)
·
Ajuste Temperatura de Noche (Reducida): Girar el dial de temperatura C (fig. 9) hasta ajustar la temperatura
deseada. (temperatura reducida ej. 15ºC) Nunca superior a la temperatura de comfort.
·
Ajuste del modo de funcionamiento: Seleccionar la posicion deseada en el mando selector de tres posiciones 6,
(fig.9).
1
Día
= Temperatura de Dia (Comfort) seleccionada de forma continua.
Auto = Temperatura Día/Noche, segun programación realizada en el reloj.
2
Noche = Temperatura de Noche (reducida) seleccionada de forma continua.
·
Guia de referencia rápida: Deslizar la cubierta E (fig.9) podrá ver la guia rápida de manejo D (fig.9)
I
Programmare il cronotermostato trasmettitore
·
Per programmare l’ora: Spostare a sinistra il coperchio A (fig. 9). Ruotare in senso orario il disco orario finché
l’impostazione dell’ora è corretta.
·
Per programmare la temperatura Giorno/Notte nel tempo: Muovere i cavalieri verso l’alto per impostare l’orario
con temperatura Giorno e verso il basso per la temperatura Notte (ciascun cavaliere rappresenta 15 minuti).
·
Per programmare la temperatura Giorno: Ruotare il quadrante della temperatura B (fig. 9) fino alla desiderata
temperatura (per esempio temperatura di comfort 22ºC)
·
Per programmare la temperatura Notte: Ruotare il quadrante della temperatura C (fig. 9) fino al valore di
temperatura desiderato (per esempio temperatura economica 15ºC)
·
Per programmare il modo di funzionamento: Spostare il selettore a tre posizioni 6, (fig.8) sulla posizione desiderata:
1
Giorno = continuamente temperatura Giorno ON.
Auto = riscaldamento centrale con orario impostato a temperatura
Giorno/Notte in funzione della posizione dei cavalieri
2
Notte = Continuamente temperatura Notte ON.
·
Veloce guida istruzione: Spostare il coperchio E (fig.9) per leggere le istruzioni base D (fig.9)
1.5 m
GB
Safety instructions
· Installation and mounting of electric appliances must be carried out only by skilled electricians.
· It is imperative to observe the generally applicable safety measures, such as: Before starting any work on the
appliance, switch off power supply and secure against switching on.
D
Sicherheitshinweise
· Einbau und Montage elektrischer Geräte dürfen nur durch eine Elektrofachkraft
(DIN VDE 0105 Teil 1) erfolgen.
· Allgemein gültige Sicherheitsvorkehrungen müssen beachtet werden z.B.: Vor Arbeiten am Gerät die Stromzufuhr
abschalten und vor Wiedereinschalten sichern.
E
Indicaciones de seguridad
· El montaje y la integración de los aparatos eléctricos sólo debe realizarlos un especialista (DIN VDE 0105 Parte 1).
· Hay que tomar las medidas de seguridad generales como p. ej.: Desconectar la alimentación de corriente antes
de realizar trabajos en el aparato y asegurarlo contra toda reconexión.
I
Avertenze per la sicurezza
· L’installazione ed il montaggio dei dispositivi elettrici possono venire eseguiti esclusivamente da un elettricista
specializzato.
· Devono essere osservate le generali precauzioni di sicurezza vigenti, ad es.: Prima di eseguire i lavori
sull’apparecchio disinserirlo ed assicurarlo contro reinserimento.