Steps – RTA Products RTA-1462 User Manual
Page 11
RTA-1462
P. 11
20
21
STEPS
10
E
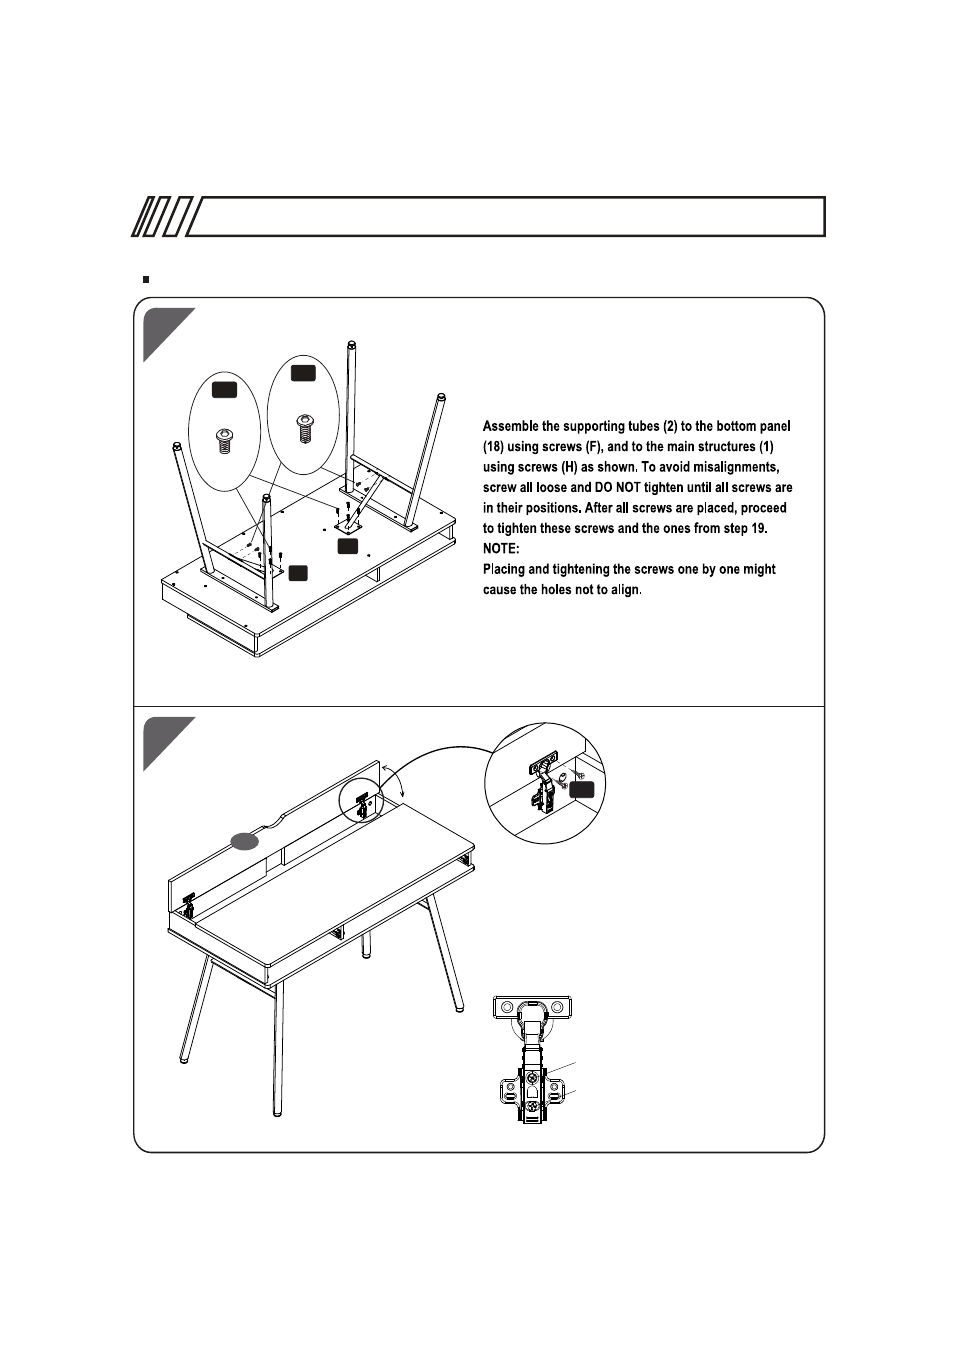
F
6X12 MM
8 PCS
H
6X15 MM
4 PCS
2
2
Carefully turn the table upright. Assemble
the auxiliary panel (10) using screws (E) as
shown. After installing the hinges, they might
need fine-tuning for proper alignment and
smooth closing. If adjust is necessary,
loosen or tighten the 2 adjusting screws as
indicated below.
This screw can adjust the
No.10 panel back and forth.
This screw can adjust the
No.10 panel up and down.
See also other documents in the category RTA Products Computer hardware:
- RTA-00397B (5 pages)
- RTA-1565 (11 pages)
- RTA-2018 (13 pages)
- RTA-2202 (22 pages)
- RTA-2706 (15 pages)
- RTA-3325 (15 pages)
- RTA-3331 (9 pages)
- RTA-3343 (8 pages)
- RTA-3784 (14 pages)
- RTA-8104 (5 pages)
- RTA-8336 (8 pages)
- RTA-8338 (9 pages)
- RTA-B001N (14 pages)
- RTA-B002 (14 pages)
- RTA-B003 (4 pages)
- RTA-B005 (15 pages)
- RTA-Q203 (7 pages)
- RTA-Q207 (15 pages)
- RTA-S06 (18 pages)
- RTA-S10 (11 pages)
- RTA-B006 (11 pages)
- RTA-3309 (10 pages)
- RTA-6336 (7 pages)
- RTA-8107 (10 pages)
- RTA-220AB (12 pages)
- RTA-S06C (11 pages)
- RTA-S07 (17 pages)
- RTA-S08 (10 pages)
- RTA-S11 (9 pages)
- RTA-S13 (9 pages)
- RTA-8830 (13 pages)
- RTA-8850 (11 pages)
- RTA-8896 (10 pages)
- RTA-8897 (10 pages)
- RTA-9910 (9 pages)
- RTA-9920 (9 pages)
- RTA-7732 (6 pages)
- RTA-7733 (6 pages)
- RTA-7734 (6 pages)
- RTA-7735 (6 pages)
- RTA-8807 (15 pages)
- RTA-8811 (13 pages)
- RTA-4804L (29 pages)
- RTA-4805L (30 pages)