RTA Products RTA-B003 User Manual
Page 2
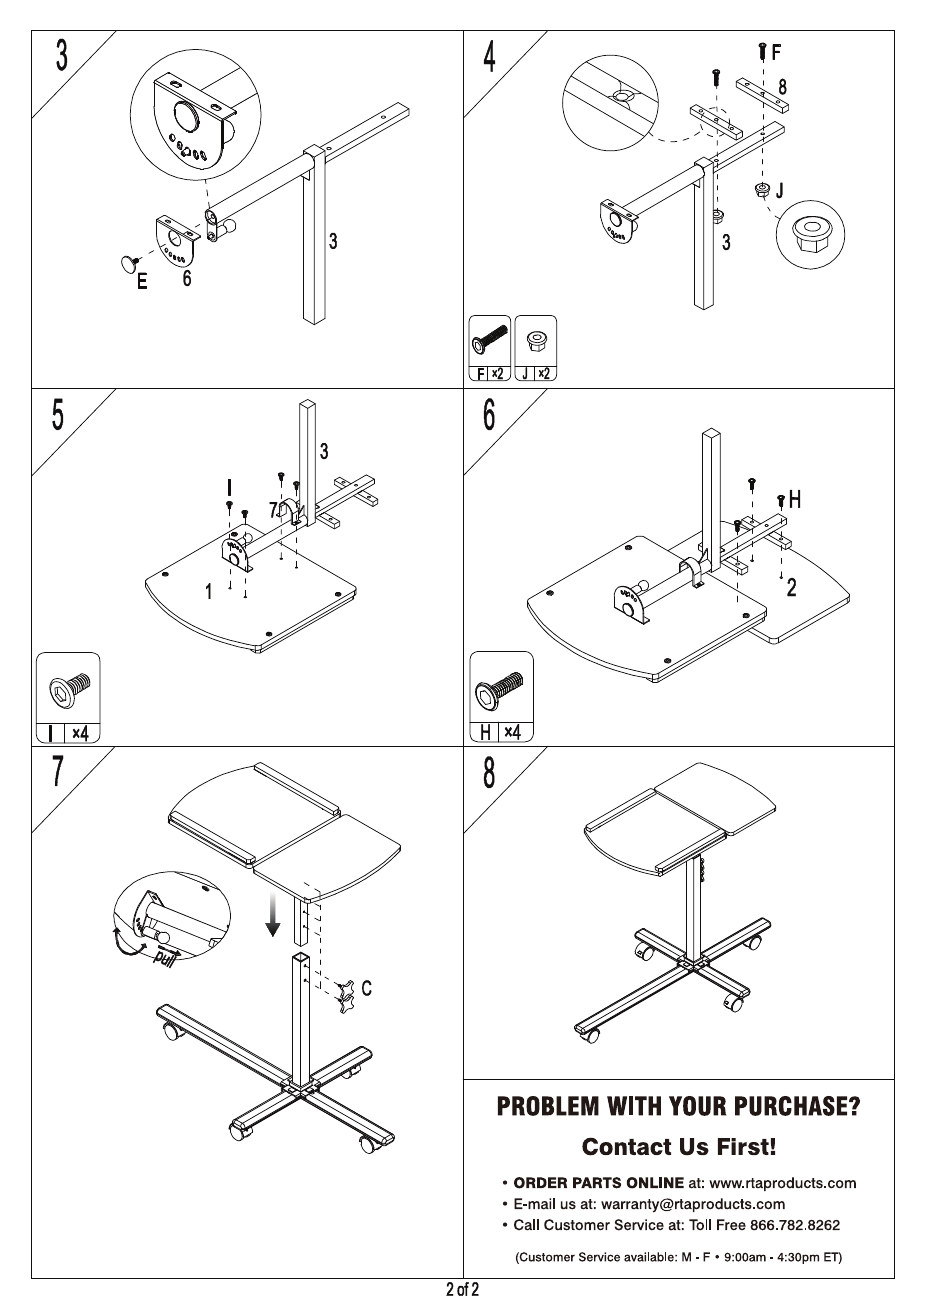
Take main panel locking mechanism part #6 and
insert it into round tube of part#3 and affix it with
part #E.
Take completed main support frame #3 and
place it upside down on right main panel #1
and fix it with part #7 using screws #I.
Take both metal parts #8 and place
them on the other side of main support
frame #3 and affix them with “F” and “J”.
Now take left panel #2 and attach it to
main support frame #3 with screws #H.
Take the top structure with both assembled
panels and insert it into the bottom structure upright tube.
Use the knobs “C” to locate a desired height location hole
and firmly tighten both knobs to secure in place both
structures. Adjust the “right main panel” swivel angle
location by pulling from the round head with spring
of the mechanism #6.
Your laptop cart is completely assembled.
- RTA-00397B (5 pages)
- RTA-1565 (11 pages)
- RTA-2018 (13 pages)
- RTA-2202 (22 pages)
- RTA-2706 (15 pages)
- RTA-3325 (15 pages)
- RTA-3331 (9 pages)
- RTA-3343 (8 pages)
- RTA-3784 (14 pages)
- RTA-8104 (5 pages)
- RTA-8336 (8 pages)
- RTA-8338 (9 pages)
- RTA-B001N (14 pages)
- RTA-B002 (14 pages)
- RTA-B005 (15 pages)
- RTA-Q203 (7 pages)
- RTA-Q207 (15 pages)
- RTA-S06 (18 pages)
- RTA-S10 (11 pages)
- RTA-B006 (11 pages)
- RTA-3309 (10 pages)
- RTA-6336 (7 pages)
- RTA-8107 (10 pages)
- RTA-220AB (12 pages)
- RTA-S06C (11 pages)
- RTA-S07 (17 pages)
- RTA-S08 (10 pages)
- RTA-S11 (9 pages)
- RTA-S13 (9 pages)
- RTA-8830 (13 pages)
- RTA-8850 (11 pages)
- RTA-8896 (10 pages)
- RTA-8897 (10 pages)
- RTA-9910 (9 pages)
- RTA-9920 (9 pages)
- RTA-1462 (14 pages)
- RTA-7732 (6 pages)
- RTA-7733 (6 pages)
- RTA-7734 (6 pages)
- RTA-7735 (6 pages)
- RTA-8807 (15 pages)
- RTA-8811 (13 pages)
- RTA-4804L (29 pages)
- RTA-4805L (30 pages)