Peg-Perego Prima Pappa Diner User Manual
Page 9
_ To extend the tray, pull the lever under it and pull the tray towards you into the first position, repeating the
operation to move it into the second position.
_ To remove the tray, pull the lever and at the same time push the tray towards yourself until it disengages.
6 The high chair has a double tray. The top tray can easily be washed in a dishwasher. To remove it, detach it
from the lower tray and lift it up (fig_a). To fix the tray on the rear supports of the high chair, align and engage
it with the attachments provided (fig_b). When the high chair is closed, the tray cannot be attached to the
rear supports.
7 FIVE POINT SAFETY HARNESS: to close it, insert the two waist strap buckles (with attached shoulder straps)
into the crotch strap until they click into position (fig_a). To release it, press the two sides of the buckles and
at the same time pull the waist strap outwards (fig_b). To tighten the waist strap pull from both sides in the
direction of the arrow (fig_c), to loosen do the opposite. The waist strap can be tightened up to the safety
stop (fig_d).
8 The shoulder straps can be adjusted to two different heights. Unfasten the safety belt from behind the
backrest by pushing the buckle downwards (fig_a) and unthread the strap from the cover (fig_b). Insert the
strap buckle into the other slot in the backrest (fig_c) and reattach the buckle, pulling the strap until it clicks
into position (fig_d).
9 ADJUSTING HEIGHT: the high chair can be set at 7 different heights. To raise it, take hold below the tray and
pull upwards (fig_a). To lower it, press the two side buttons at the same time and move to the required height
(fig_b). This can also be carried out with the child in the high chair.
10 RECLINING BACKREST. The high chair can be reclined in four positions: for eating, playing, resting, or sleep. To
adjust it, raise the handle behind the backrest (fig_a) and lock in the required position (fig_b). This can also be
carried out with the child in the high chair.
11 CLOSING AND REOPENING THE TRAY: to close the tray, pull it to the third position indicated with the red
markings (fig_a), push down button 1 (fig_b), push down button 2 (fig_c), and at the same time rotate the tray
upwards until it locks (fig_d). To reopen the tray, push down button 2, rotate the tray downwards and set it in
the first or second position.
12 FOLDING: before folding up the high chair, close the tray, move the backrest to the upright position, lower
the seat to the lowest position, and close the footrest. To fold up the high chair, release the safety device by
turning it in the direction of the arrow and then press the pedal (fig_a). At the same time take hold of the seat
and fold it by pulling it upwards (fig_b). The high chair is freestanding when folded up.
13 REMOVING THE COVERS: to remove the high chair covers, unthread the harness straps from the backrest (fig_
a) and from the seat (fig_b). Fully recline the seat to unbutton the covers from the sides of the backrest (fig_c),
unbutton from the inside of the armrests, and slide the cover upwards to remove it.
14 PACKING POSITION: in order to return the high chair to its “packing position” (for transport purposes, or to put
it back into its box), proceed as follows (a small screwdriver is required). Remove the tray, move the backrest
into the upright position, lower the seat to the lowest position, and close the footrest. Press the side button
(fig_a), at the same time inserting the screwdriver into the slot, and push towards the right (fig_b). Repeat the
same operation on the other side (fig_c), pushing the screwdriver towards the left (fig_d) and lower the seat
to the bottom (the non-usable position). Then fold up the high chair and put it into its box.
CLEANING
AND
MAINTENANCE
PRODUCT MAINTENANCE: protect from the weather: water, rain, or snow; prolonged and continuous exposure
to bright sunlight may give rise to colour changes of various different materials; store this product in a dry
place.
CLEANING THE CHASSIS: periodically clean all plastic parts with a damp cloth. Do not use solvent or similar
cleaning products; keep all metal parts dry to prevent rusting; keep moving parts clean (adjustment
mechanisms, locking mechanisms, wheels, ...) and free of dust and sand and, if necessary, lubricate with light
machine oil.
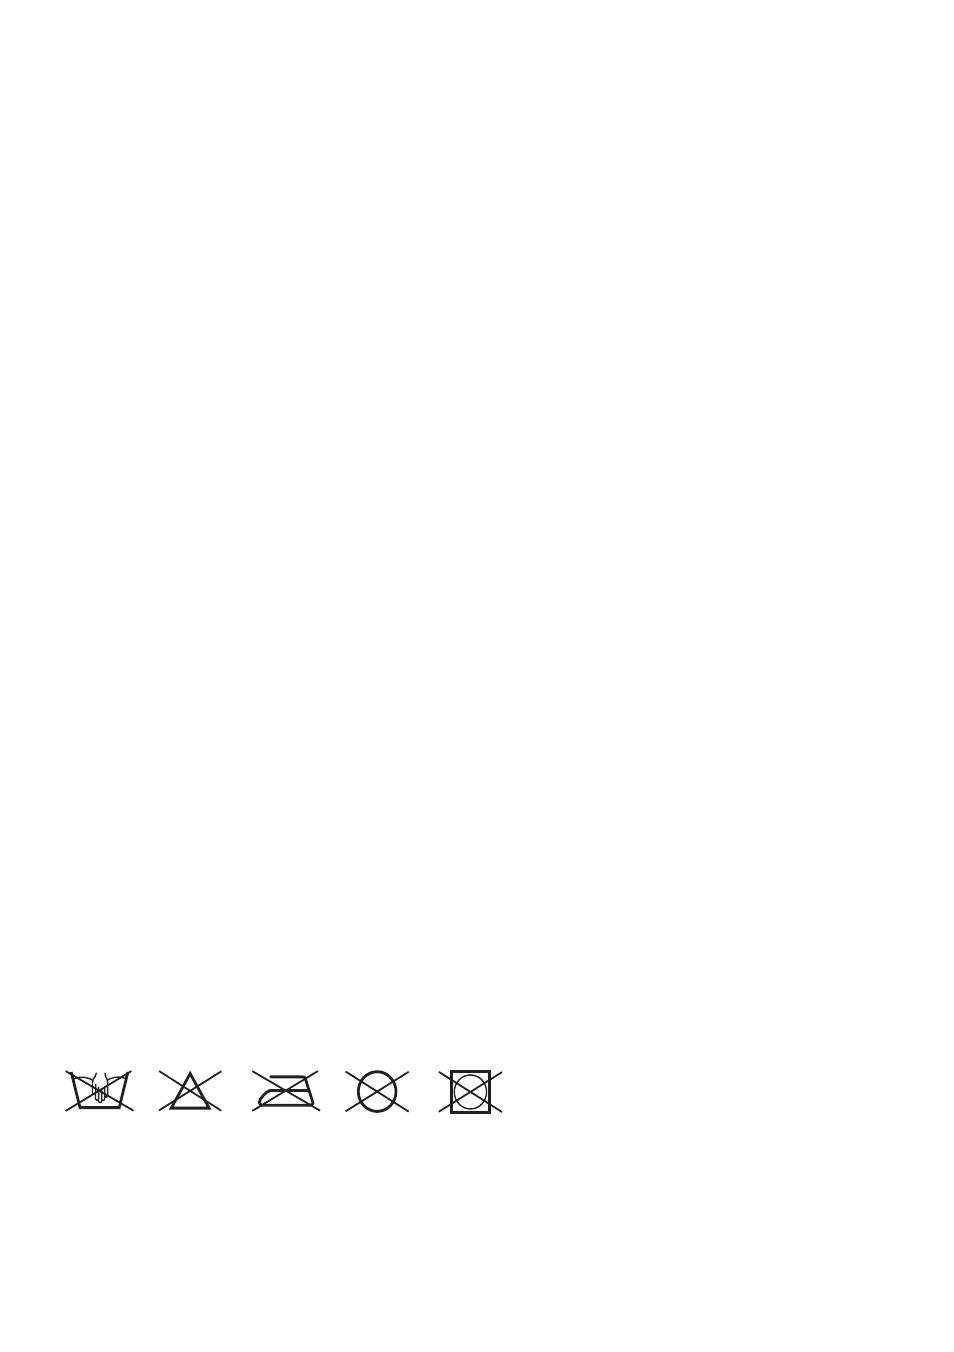
CLEANING THE SACK: Wash with a damp cloth and neutral detergent. Do not wring. Do not use chlorine
bleach. Do not iron. Do not dry clean. Do not use solvents for stain removal. Do not spin dry.
PEG-PÉREGO
S.p.A.
Peg Pérego can make changes at any time to the models described in this publication for technical or
commercial reasons.
PEG-PÉREGO
AFTER-SALES
SERVICE
If any parts of your Peg Pérego product should be accidentally mislaid or damaged, use exclusively genuine
original Peg Pérego replacements. For any repairs, replacements, product information, and orders for genuine