Motor service, Troubleshooting guide as3x – ParkZone PKZ6980 User Manual
Page 12
EN
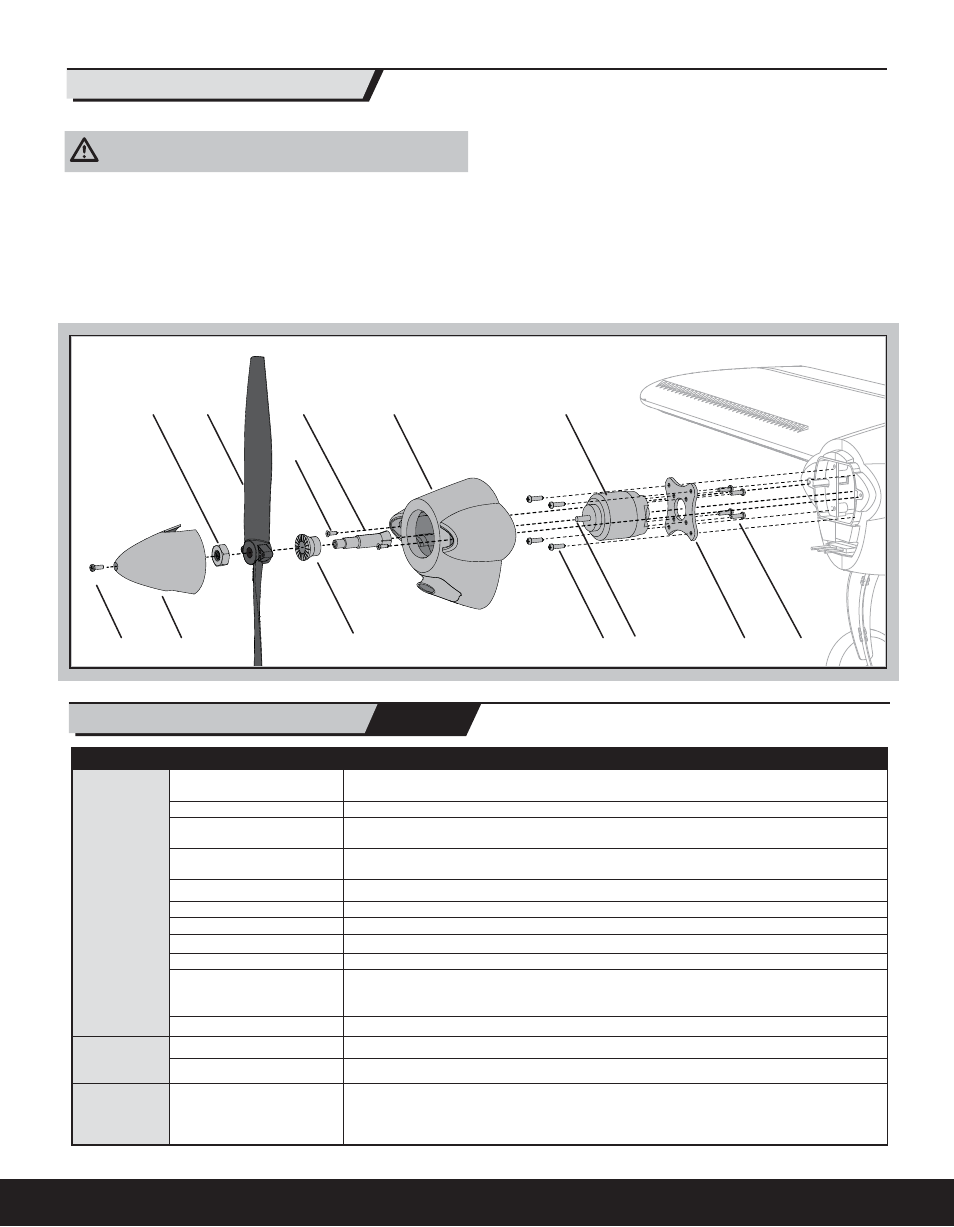
Motor Service
Disassembly
CAUTION: Always disconnect the fl ight battery from the aircraft before
removing the propeller.
1. Remove the screw (A) and spinner (B) from the collet (C).
2. Remove the spinner nut (D), propeller (E), backplate (F) and collet from the
motor shaft (H). You will need a tool to turn the spinner nut.
3. Remove the 2 screws (I) from the cowling (J). Carefully remove the cowling
from the fuselage. Paint may keep the cowling attached to the fuselage.
4. Remove the 4 screws (K) from the motor mount (L) and the fuselage.
5. Disconnect the motor wires from the ESC wires.
6. Remove the 4 screws (M) and motor (N) from the motor mount.
Assembly
Assemble in reverse order.
• Correctly align and connect the motor wire colors with the ESC wires.
• The propeller size numbers (
10.75 x 8
) must face out from the motor for cor-
rect propeller operation.
• A tool is required to tighten the spinner nut on the collet.
• Ensure the spinner is fully connected to the collet for safe operation.
Not all wiring shown.
D
C
N
K
E
J
A
B
F
L
M
H
I
Problem
Possible Cause
Solution
Oscillation
Flying over recommended
airspeed
Reduce air speed
Damaged propeller or spinner
Replace propeller or spinner
Imbalanced propeller
Balance the propeller. For more information, view John Redman’s propeller balancing video at www.
horizonhobby.com
Flight condition variations
Adjust gain to current fl ight conditions (wind, updrafts, local conditions (elevation, humidity, temperature,
etc.))
Motor vibration
Replace parts or correctly align all parts and tighten fasteners as needed
Loose receiver
Align and secure receiver in fuselage
Loose aircraft controls
Tighten or otherwise secure parts (servo, arm, linkage, horn and control surface)
Worn parts
Adjust gain to compensate for parts wear or replace worn parts (especially propeller, pivot points or servo)
Irregular servo rotation
Replace servo
Incorrect transmitter type (com-
puterized or non-computerized)
assigned in receiver
Assign correct transmitter type in the receiver (refer to receiver manual)
If oscillation persists ....
Decrease gain (refer to receiver manual)
Trim change
when fl ight
mode is switched
Trim is not at neutral
If you adjust trim more than 8 clicks, adjust the clevis to remove trim
Sub-Trim is not at neutral
No Sub-Trim is allowed. Adjust the servo arm or the clevis
Incorrect
response to the
AS3X Control
Direction Test.
Incorrect direction settings in
the receiver, which can cause
a crash
DO NOT fl y. Correct the direction settings (refer to the receiver manual), then fl y.
Troubleshooting Guide
AS3X
12