Keypad description installing batteries, Wireless installation of the keypad, Learn” transmitter code – Mighty Mule FM137 User Manual
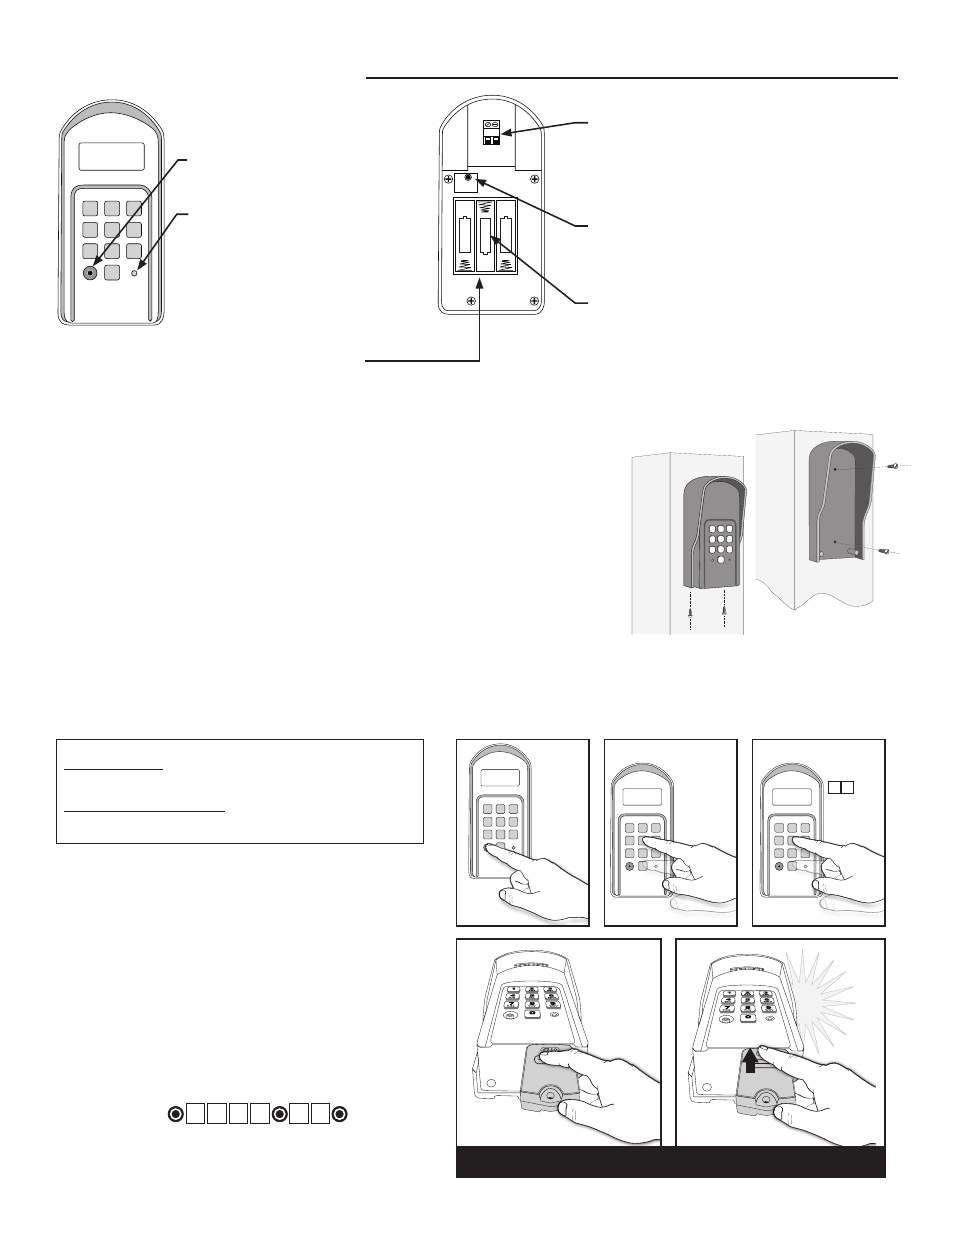
Page 3: Keypad - front, Keypad - inside, Status light, Program button, Battery holder, Reset button, Open collector output
2
3
1
2
ABC
3
DEF
4
GHI
5
JKL
6
MNO
7
PRS
8
TUV
9
WXY
0
Keypad Description
Installing Batteries
Step 1: Remove the two screws from the bottom of the keypad (FIG. 3) and separate the keypad from its housing.
Step 2: Install 3 AA batteries (not included). (FIG. 2) NOTE: Choose wireless or wired
installation (not both) and proceed to appropriate section.
1
2
ABC
3
DEF
4
GHI
5
JKL
6
MNO
7
PRS
8
TUV
9
WXY
0
STATUS Light:
The LED will blink once when
any key is pressed and provides
visual feedback during access
code programming.
PROGRAM Button:
Use for / during program process.
Keypad - Front
Battery Holder:
Use 3 AA batteries.
OUT COM.
RESET
+
–
–
– +
+
RESET Button:
Pressing this button for 2 seconds will
reprogram keypad to factory settings. All
codes are deleted. Default master code is 1234.
Open Collector Output:
Used to connect Keypad to gate opener that
accepts logic inputs (All GTO gate openers)
in hard-wired applications.
Keypad - Inside
Wireless Installation of the Keypad
NOTE: For wireless applications, the distance from the keypad to the opener’s receiver
should not exceed 50 ft. Always test the keypad range before permanently mounting it.
Step 1: Mount the keypad cover using the screws provided.
Step 2: Slide the keypad into the cover and secure with the small screws provided.
NOTE: If you have not changed your opener’s transmitter code from the factory setting,
see the “Setting Your Personal Transmitter Code” section in the gate opener’s manual then
“Learn” the transmitter code into the keypad. See “Learn Transmitter Code” section below.
1
2
ABC
3
DEF
4
GHI
5
JKL
6
MNO
7
PRS
8
TUV
9
WXY
0
❶
Press and release the PROGRAM button.
❷
Enter the Master Code then press and release the
PROGRAM button.
❸
Enter 0,5 then press and release the PROGRAM button.
❹
Press and hold the transmitter button while holding the
transmitter to the bottom of the keypad as shown.
❺
The keypad will beep 3 times to confirm that the
transmitter is successfully “Learned.” Release the
transmitter button at this time.
Example: Learn transmitter code with Master Code of
“1234”. Then press and hold transmitter button until you hear
3 beeps. The round black dot is the “PROGRAM” button.
Go to “Programming the keypad” to change the master code
(if desired)
Turn the gate opener back on and confirm that the keypad
operates the gate using the master code.
1 2 3 4 0 5
NOTE: 3 AA batteries are required to power the keypad.
FIG. 1
FIG. 2
FIG. 3
FIG. 4
1
2
ABC
3
DEF
4
GHI
5
JKL
6
MNO
7
PRS
8
TUV
9
WXY
0
①
1
2
ABC
3
DEF
4
GHI
5
JKL
6
MNO
7
PRS
8
TUV
9
WXY
0
IMPORTANT: Make sure the transmitter operates
the gate opener.
Turn off the gate opener so that there is no unintended
operation of the gate during the learning process.
“Learn” Transmitter Code
(for wireless installation)
②
③
⑤
④
IMPORTANT: Transmitter must be placed exactly as shown, and against the bottom of
the keypad in order for the “learning” process to work correctly.
Press &
Release
Program
Button.
Enter Master
Code, Press
& Release
Program
Button again.
Enter
0 5
Press &
Release
Program
Button again.
Press and hold
the transmitter
button holding
it to bottom of
keypad.
Keypad will
beep 3 times.
Release the
transmitter
button.