Martin Archery XR Recuve User Manual
Page 2
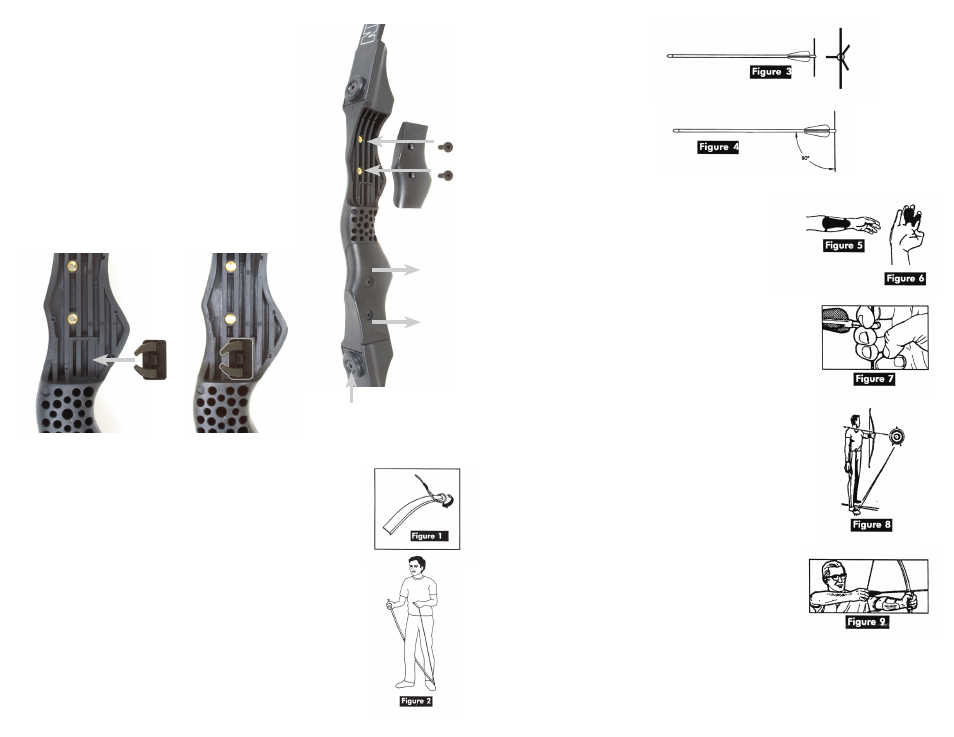
THE ARROW: The arrow nock always has the
groove positioned so that the index vane clears the
bow in the best fashion. (Figure 3)
NOCKING THE ARROW: Place the arrow nock
groove on the string. Make sure the arrow nock
groove is completely sealed on the string. The arrow
should be 90 degrees (right angle) to the string.
(Figure 4)
ARMGUARD: Put arm guard on the arm with which you
hold the bow. It should cover the inside of the lower arm to
protect it from being slapped by the string when string is
released. (Figure 5)
FINGER TAB: The finger tab protects your fingers from
rubbing by the bow string when string is release. (Figure 6)
To place finger tab on hand:
1. Slip the finger tab over your second finger so that the tab is
on the palm side of your hand with the small lobe up.
2. Bend the tab so that the small lobe covers your index
finger, and the large lobe covers your middle two fingers.
HOLDING THE STRING AND ARROW: Hook the three fingers
on the string at the first joint. Place the thumb and little
finger together in the modified Boy Scout Salute. (Figure 7)
SHOOTING STANCE AND AIMING:
1. Stand with your body at a right angle to the target.
Right-handers will have their left shoulder toward the target.
Left-handers will have their right shoulder toward the target.
These instructions are written for right-handers.
Left-handers simply reverse instructions.) (Figure 8)
2. Stand with target slightly to the front of a line running from
your left shoulder. (Figure 8)
3. Hold the bow in your left hand. Extend left arm toward the
target with your head in a natural “looking at the target”
position.
4. Place the arrow on the left hand side of the bow with the
odd color feather (index vane) facing the left.
5. Nock the arrow on the string.
6. Pull the string using your first three fingers of your right
hand, with the arrow between your first and second fingers.
Keep your left arm (holding the bow) slightly bent. Keep
bow straight up and down. (Figure 7)
7. Pull the string to your face. Aim arrow at the target and
release string. Time should be taken to aim before releasing
arrow. (Figure 9)
THE TARGET: The target face shipped with this set should be mounted close to the
ground and on something that will accept the arrow and hold it, will not cause the
arrow to glance off, and will not damaged the arrow. For example, use a large
cardboard box stuffed with straw.
STRINGING THE BOW:
1. Hook the string onto the end of the lower limb so that the string
runs along the face of the bow. (Figure 1)
2. Grasp the loose end of the string with your left hand and grasp the
upper limb near the top with your right hand. Your right hand
should be on the back of the bow.
3. Lay the curve of lower limb over left ankle. (Figure 2)
4. Step right foot over bow so that the face of the bow touches the
back or your right thigh.
5. Push slightly against the bow with your right hand.
6. Raise left heel off ground, lock right knee and push forward with
the right hand so bow bends naturally. Hook string onto the end of
the bow and relax pressure slightly.
7. Check to see that the string is seated properly before releasing
remaining pressure.
TO UNSTRING BOW: Reverse the process above. It is a good idea to
string and unstring the bow several time until it becomes easy and
natural to do.
CONVERTING FROM RIGHT TO LEFT HAND:
The XR Recurve comes setup for right hand users. Follow
these instructions to switch bow to left hand. (See Left)
1. Locate Left Hand Riser Insert that came with the bow.
2. Remove the two Allen screws holding the Right Hand
Riser Insert on the bow.
3. Insert the Left Hand Riser Insert into the riser and screw
the two Allen screws (that were removed from the Right
Hand Insert) through the Left Hand Insert and tighten
into riser.
4. Flip string over from top to bottom (see Stringing below)
INSTALLING THE ARROW REST: Remove the back of
adhesive pad on the bottom of the arrow rest. Locate the
indentation in the sight window of the XR Recurve and insert
the arrow rest so the prongs point to the front of the bow.
(See Picture Below)
Left Hand
Riser Insert
Remove
Right Hand
Riser Insert
Arrow
Rest
Check Limb Bolts to make
sure they are tight.